注册中心(三)之Redis
本文基于 Dubbo 2.6.1 版本,望知悉。
1. 概述
前置阅读文章:
我们先来看下 《Dubbo 用户指南 —— Redis 注册中心》 文档,内容如下:
基于 Redis 实现的注册中心。
流程
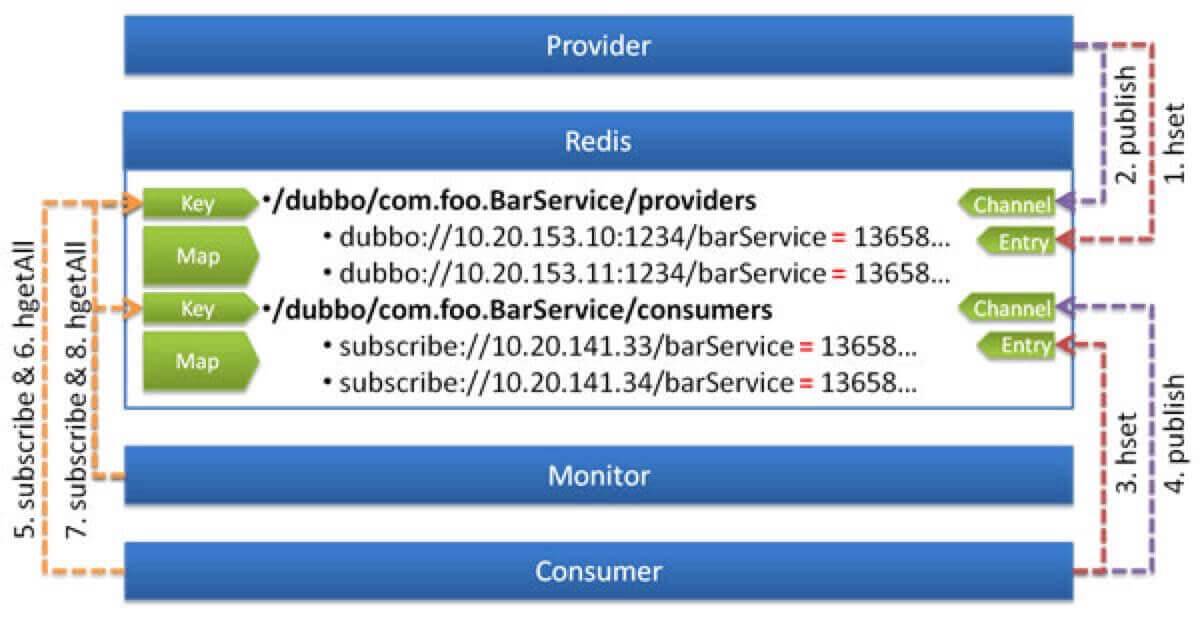
使用 Redis 的 Key/Map 结构存储数据结构:
- 主 Key 为服务名和类型
- Map 中的 Key 为 URL 地址
- Map 中的 Value 为过期时间,用于判断脏数据,脏数据由监控中心删除
- 横向RootServiceTypeURL 来看,和基于 Zookeeper 实现的注册中心,也是分成 、 、 、 四层。
- 使用 Redis Map 的数据结构,聚合相同服务和类型( Root + Service + Type )。
- 不使用 Redis 的自动过期监控中心 机制,而是通过 ,实现过期机制。因为,Redis Key 自动过期时,不存在相应的事件通知。
- 服务提供者和消费者,定时延长其注册的 URL 地址的过期时间。
使用 Redis 的 Publish/Subscribe 事件通知数据变更:
- 通过事件的值区分事件类型: register , unregister
- 普通消费者直接订阅指定服务提供者的 Key,只会收到指定服务 的变更事件
- 监控中心通过 psubscribe 功能订阅 所有服务 /dubbo/* ,会收到 的所有变更事件
- 服务实例的启动或关闭,会写入或删除对应的 Redis Map 中,并发起对应的 实时性 register , unregister 事件,从而保证 。
- 通过监控中心,轮询 Key 过期,保证未正常关闭最终一致性 的服务实例的 URL 的删除,并发起对应的 unregister 事件,从而保证 。
调用过程:
【一】服务提供方
- 1、服务提供方启动时,向 Key:/dubbo/com.foo.BarService/providers 下,添加当前提供者的地址
- 2、并向 Channel:/dubbo/com.foo.BarService/providers 发送 register 事件
【二】服务消费方
- 3、服务消费方启动时,从 Channel:/dubbo/com.foo.BarService/providers 订阅 register 和 unregister 事件
- 4、并向 Key:/dubbo/com.foo.BarService/providers 下,添加当前消费者的地址 服务消费方收到 register 和 unregister 事件后,从 Key:/dubbo/com.foo.BarService/providers 下获取提供者地址列表
【三】服务监控中心
- 5、服务监控中心启动时,从 Channel:/dubbo/* 订阅 register 和 unregister ,以及 subscribe 和 unsubsribe 事件
- 6、服务监控中心收到 register 和 unregister 事件后,从 Key:/dubbo/com.foo.BarService/providers 下获取提供者地址列表
- 7、服务监控中心收到 subscribe 和 unsubsribe 事件后,从 Key:/dubbo/com.foo.BarService/consumers 下获取消费者地址列表
本文涉及仅有 RedisRegistry 一个类,类图如下:
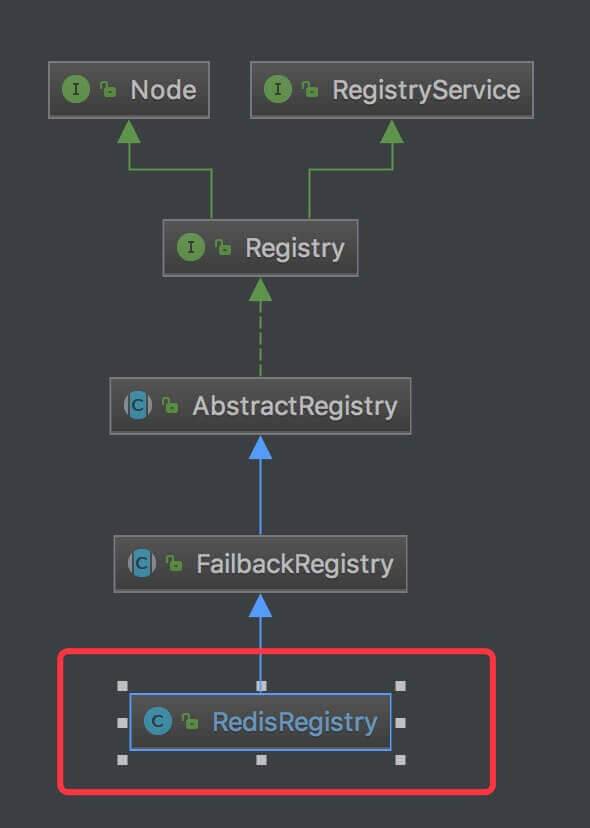
类图
2. RedisRegistry
com.alibaba.dubbo.registry.redis.RedisRegistry ,实现 FailbackRegistry 抽象类,基于 Redis 实现的注册中心实现类。
2.1 构造方法
```plain text plain 1: /** 2: * 默认端口 3: */ 4: private static final int DEFAULT_REDIS_PORT = 6379; 5: /** 6: * 默认 Redis 根节点 7: */ 8: private final static String DEFAULT_ROOT = “dubbo”; 9: 10: /** 11: * Redis Key 过期机制执行器 12: */ 13: private final ScheduledExecutorService expireExecutor = Executors.newScheduledThreadPool(1, new NamedThreadFactory(“DubboRegistryExpireTimer”, true)); 14: /** 15: * Redis Key 过期机制 Future 16: */ 17: private final ScheduledFuture<?> expireFuture; 18: 19: /** 20: * Redis 根节点 21: */ 22: private final String root; 23: 24: /** 25: * JedisPool 集合 26: * 27: * key:ip:port 28: */ 29: private final Map<String, JedisPool> jedisPools = new ConcurrentHashMap<String, JedisPool>(); 30: 31: /** 32: * 通知器集合 33: * 34: * key:Root + Service ,例如 /dubbo/com.alibaba.dubbo.demo.DemoService 35: */ 36: private final ConcurrentMap<String, Notifier> notifiers = new ConcurrentHashMap<String, Notifier>(); 37: 38: /** 39: * 重连周期,单位:毫秒 40: */ 41: private final int reconnectPeriod; 42: /** 43: * 过期周期,单位:毫秒 44: */ 45: private final int expirePeriod; 46: 47: /** 48: * 是否监控中心 49: * 50: * 用于判断脏数据,脏数据由监控中心删除 {@link #clean(Jedis)} 51: */ 52: private volatile boolean admin = false; 53: 54: /** 55: * 是否复制模式 56: */ 57: private boolean replicate; 58: 59: public RedisRegistry(URL url) { 60: super(url); 61: if (url.isAnyHost()) { 62: throw new IllegalStateException(“registry address == null”); 63: } 64: // 创建 GenericObjectPoolConfig 对象 65: GenericObjectPoolConfig config = new GenericObjectPoolConfig(); 66: config.setTestOnBorrow(url.getParameter(“test.on.borrow”, true)); 67: config.setTestOnReturn(url.getParameter(“test.on.return”, false)); 68: config.setTestWhileIdle(url.getParameter(“test.while.idle”, false)); 69: if (url.getParameter(“max.idle”, 0) > 0) 70: config.setMaxIdle(url.getParameter(“max.idle”, 0)); 71: if (url.getParameter(“min.idle”, 0) > 0) 72: config.setMinIdle(url.getParameter(“min.idle”, 0)); 73: if (url.getParameter(“max.active”, 0) > 0) 74: config.setMaxTotal(url.getParameter(“max.active”, 0)); 75: if (url.getParameter(“max.total”, 0) > 0) 76: config.setMaxTotal(url.getParameter(“max.total”, 0)); 77: if (url.getParameter(“max.wait”, url.getParameter(“timeout”, 0)) > 0) 78: config.setMaxWaitMillis(url.getParameter(“max.wait”, url.getParameter(“timeout”, 0))); 79: if (url.getParameter(“num.tests.per.eviction.run”, 0) > 0) 80: config.setNumTestsPerEvictionRun(url.getParameter(“num.tests.per.eviction.run”, 0)); 81: if (url.getParameter(“time.between.eviction.runs.millis”, 0) > 0) 82: config.setTimeBetweenEvictionRunsMillis(url.getParameter(“time.between.eviction.runs.millis”, 0)); 83: if (url.getParameter(“min.evictable.idle.time.millis”, 0) > 0) 84: config.setMinEvictableIdleTimeMillis(url.getParameter(“min.evictable.idle.time.millis”, 0)); 85: 86: // 是否复制模式 87: String cluster = url.getParameter(“cluster”, “failover”); 88: if (!”failover”.equals(cluster) && !”replicate”.equals(cluster)) { 89: throw new IllegalArgumentException(“Unsupported redis cluster: “ + cluster + “. The redis cluster only supported failover or replicate.”); 90: } 91: replicate = “replicate”.equals(cluster); 92: 93: // 解析 94: List
1
2
3
4
5
6
7
8
9
10
11
12
13
14
15
16
17
18
19
20
21
22
23
24
25
26
27
28
29
30
31
32
33
34
35
36
37
38
39
40
41
42
43
44
45

---

- jedisPools
属性,JedisPool 集合,其中键为
ip:port
。在【第 64 至 84 行】和【第 93 至 99 行】和【101 至 121 行】初始化。
    - root**Root**
属性,Redis 根节点,即首图的
层。在【第 126 至 134 行】初始化。
    - replicate
属性,是否复制模式。在【第 86 至 90 行】文档说明如下:
可通过
设置 redis 集群策略,缺省为
failover
:
        - failover
: 只写入和读取任意一台,失败时重试另一台,需要服务器端自行配置数据同步。
        - replicate
: 在客户端同时写入所有服务器,只读取单台,服务器端不需要同步,注册中心集群增大,性能压力也会更大。
- notifiers
属性,通知器集合,其中键为 Root + Service 。Notifier ,用于 Redis Publish/Subscribe 机制中的订阅,实时监听数据的变化。
    - reconnectPeriod**sleep**
属性,重连周期,单位:毫秒。在【第 91 行】初始化。用于订阅发生 Redis 连接异常时,Notifier
,等待重连上。
- expireExecutor
属性,Redis Key 过期机制执行器。
    - expirePeriod
属性,Redis Key 过期周期,单位:毫秒。在【第 137 行】初始化。
    - expireFuture
属性,Redis Key 过期机制任务的 Future 。在【第 138 至 146 行】初始化。
        - 该任务主要有两个逻辑:1)延长未过期的 Key ;2)删除过期的 Key 。
        - 任务间隔为 **一半**
expirePeriod
的
,避免过于频繁,对 Redis 的压力过大;同时,避免过于不频繁,每次执行时,都过期了。
    - admin
属性,是否监控中心,在
#clean(Jedis)
方法,看到具体的使用。

## 2.2 doRegister

```plain text
plain 1: @Override  2: public void doRegister(URL url) {  3:     String key = toCategoryPath(url);  4:     String value = url.toFullString();  5:     // 计算过期时间  6:     String expire = String.valueOf(System.currentTimeMillis() + expirePeriod);  7:     boolean success = false;  8:     RpcException exception = null;  9:     // 向 Redis 注册 10:     for (Map.Entry<String, JedisPool> entry : jedisPools.entrySet()) { 11:         JedisPool jedisPool = entry.getValue(); 12:         try { 13:             Jedis jedis = jedisPool.getResource(); 14:             try { 15:                 // 写入 Redis Map 键 16:                 jedis.hset(key, value, expire); 17:                 // 发布 Redis 注册事件 18:                 jedis.publish(key, Constants.REGISTER); 19:                 success = true; 20:                 //  如果服务器端已同步数据,只需写入单台机器 21:                 if (!replicate) { 22:                     break; //  If the server side has synchronized data, just write a single machine 23:                 } 24:             } finally { 25:                 jedisPool.returnResource(jedis); 26:             } 27:         } catch (Throwable t) { 28:             exception = new RpcException("Failed to register service to redis registry. registry: " + entry.getKey() + ", service: " + url + ", cause: " + t.getMessage(), t); 29:         } 30:     } 31:     // 处理异常 32:     if (exception != null) { 33:         if (success) { // 虽然发生异常,但是结果成功 34:             logger.warn(exception.getMessage(), exception); 35:         } else { // 最终未成功 36:             throw exception; 37:         } 38:     } 39: }
- 第 3 行:调用 分类路径 #toCategoryPath(url) 方法,获得 作为 Key 。
- 第 4 行:调用 URL 字符串 URL#toFullString() 方法,获得 作为 Value 。
- 第 6 行:计算过期时间,当前时间 + expirePeriod 。
- 第 9 至 30 行:向 Redis 注册。
- 第 16 行:调用 注意,过期时间,作为 Map 的值 Jedis#hset(key, value, expire) 方法,写入 Redis Map 中。 。
- 第 18 行:调用 该服务 Jedis#publish(channel, message) 方法,发布 register 事件。这样订阅该 Key 的服务消费者和监控中心,就会实时从 Redis 读取 的最新数据。
- 第 21 至 23 行:如果非 replicate ,意味着 Redis 服务器端已同步数据,只需写入单台机器。因此,结束循环。否则,满足 replicate ,向所有 Redis 写入。
- 第 31 至 38 行:处理异常。这块代码胖友自己看下,注意下 exception 和 success 赋值的地方。这块的打印告警日志的处理方式,也适用于多次重试某个操作,结果发生异常,但是最终成功。例如,HTTP 请求远程服务。
2.1.1 toCategoryPath
```plain text plain /** * 获得分类路径 * * Root + Service + Type * * @param url URL * @return 分类路径 */ private String toCategoryPath(URL url) { return toServicePath(url) + Constants.PATH_SEPARATOR + url.getParameter(Constants.CATEGORY_KEY, Constants.DEFAULT_CATEGORY); }
1
2
3
4
5
6
7

---

## 2.3 doUnregister

```plain text
plain @Override public void doUnregister(URL url) {     String key = toCategoryPath(url);     String value = url.toFullString();     RpcException exception = null;     boolean success = false;     // 向 Redis 注册     for (Map.Entry<String, JedisPool> entry : jedisPools.entrySet()) {         JedisPool jedisPool = entry.getValue();         try {             Jedis jedis = jedisPool.getResource();             try {                 // 删除 Redis Map 键                 jedis.hdel(key, value);                 // 发布 Redis 取消注册事件                 jedis.publish(key, Constants.UNREGISTER);                 success = true;                 //  如果服务器端已同步数据,只需写入单台机器                 if (!replicate) {                     break; //  If the server side has synchronized data, just write a single machine                 }             } finally {                 jedisPool.returnResource(jedis);             }         } catch (Throwable t) {             exception = new RpcException("Failed to unregister service to redis registry. registry: " + entry.getKey() + ", service: " + url + ", cause: " + t.getMessage(), t);         }     }     // 处理异常     if (exception != null) {         if (success) { // 虽然发生异常,但是结果成功             logger.warn(exception.getMessage(), exception);         } else { // 最终未成功             throw exception;         }     } }
- 当服务消费者或服务提供者,关闭时,会调用 键实时 #doUnregister(url) 方法,取消注册。在该方法中,会删除对应 Map 中的
- 发布 unregister 事件,从而 通知订阅者们。因此,正常情况下,就无需监控中心,做脏数据删除的工作。
- 代码比较简单,和 #doRegister() 方法,逻辑相反。
2.4 doSubscribe
```plain text plain 1: @Override 2: public void doSubscribe(final URL url, final NotifyListener listener) { 3: // 获得服务路径,例如:/dubbo/com.alibaba.dubbo.demo.DemoService 4: String service = toServicePath(url); 5: // 获得通知器 Notifier 对象 6: Notifier notifier = notifiers.get(service); 7: // 不存在,则创建 Notifier 对象 8: if (notifier == null) { 9: Notifier newNotifier = new Notifier(service); 10: notifiers.putIfAbsent(service, newNotifier); 11: notifier = notifiers.get(service); 12: if (notifier == newNotifier) { // 保证并发的情况下,有且仅有一个启动 13: notifier.start(); 14: } 15: } 16: boolean success = false; 17: RpcException exception = null; 18: // 循环 jedisPools ,仅向一个 Redis 发起订阅 19: for (Map.Entry<String, JedisPool> entry : jedisPools.entrySet()) { 20: JedisPool jedisPool = entry.getValue(); 21: try { 22: Jedis jedis = jedisPool.getResource(); 23: try { 24: // 处理所有 Service 层的发起订阅,例如监控中心的订阅 25: if (service.endsWith(Constants.ANY_VALUE)) { 26: admin = true; 27: // 获得分类层集合,例如:/dubbo/com.alibaba.dubbo.demo.DemoService/providers 28: Set
1
2
3
4
5
6
7
8
9
10
11
12
13
14
15
16
17
18
19
20
21
22
23
24
25
26
27
28
29
30
31
32
33
34
35
36
37
38
39
40
41
42
43
44
45
46
47
48
49
50
51
52
53
54
55
56
57

---

- ========== 【第一步】Notifier 部分 ==========
- 第 4 行:调用
#toServicePath(url)
方法,获得服务路径,例如:
/dubbo/com.alibaba.dubbo.demo.DemoService
。
- 第 6 行:获得通知器 Notifier 对象。
- 第 8 至 15 行:若不存在,则创建 Notifier 对象,并调用
Notifier#start()
方法。
- ========== 【第二步】获取初始化数据,并进行通知 ==========
- 第 19 行:循环 **直到一个成功两个部分**
jedisPools
,向 Redis 发起订阅,
。我们会看到代码,分成
。
- 【第二部分】第 46 至 49 行,适用服务提供者和服务消费者,处理**指定**
Service 层的初始化数据:
- 第 48 行:调用 **指定**
Jedis#keys(pattern)
方法,获得
Service 层下的所有 URL 们。例如
/dubbo/com.alibaba.dubbo.demo.DemoService/*
。
- 第 48 行:调用
#doNotify(jedis, keys, url, listeners)
方法,通知监听器,初始的数据。
- 【第一部分】第 25 至 45 行,适用注册中心,处理**所有**
Service 层的初始化数据:
- 第 26 行:标记
admin = true
。因为,只有注册中心,才清理脏数据。
- 第 28 行:调用 **所有**
Jedis#keys(pattern)
方法,获得
Service 层下的所有 URL 们。例如
/dubbo/*
。
- 第 31 至 39 行:按照**服务**
聚合 URL 集合。
- 第 42 至 44 行:循环 **每个 Service 层类似**
serviceKeys
,调用
#doNotify(jedis, keys, url, listeners)
方法,按照
,通知监听器,初始的数据。此处,就和【第 48 行】
。

另外,订阅动作(【第一步】)**一定**要在获取初始化数据(【第二步】)**之前**。如果反过来,可能获取数据完后,处理的过程中,有数据的变更,我们就无法收到 registerunregister 的事件。

### 2.4.1 toServicePath

```plain text
plain /**  * 获得服务路径  *  * Root + Type  *  * @param url URL  * @return 服务路径  */ private String toServicePath(URL url) {     return root + url.getServiceInterface(); }
2.4.2 toServicePath
```plain text plain /** * 获得服务路径,主要截掉多余的部分 * * Root + Type * * @param categoryPath 分类路径 * @return 服务路径 */ private String toServicePath(String categoryPath) { int i; if (categoryPath.startsWith(root)) { i = categoryPath.indexOf(Constants.PATH_SEPARATOR, root.length()); } else { i = categoryPath.indexOf(Constants.PATH_SEPARATOR); } return i > 0 ? categoryPath.substring(0, i) : categoryPath; }
1
2
3
4
5
6
7

---

## 2.5 doUnsubscribe

```plain text
plain @Override public void doUnsubscribe(URL url, NotifyListener listener) { }
- 此处目前并未实现,艿艿觉得,此处应该增加取消向 Redis 的订阅( Subscribe ) 。在 ZookeeperRegistry 的该方法中,是移除了对应的监听器。
2.6 doNotify
```plain text plain 1: // @params key 分类数组,例如:/dubbo/com.alibaba.dubbo.demo.DemoService/providers 2: private void doNotify(Jedis jedis, String key) { 3: for (Map.Entry<URL, Set
1
2
3
4
5
6
7
8
9
10
11
12
13
14
15
16
17

---

- 两个重载的
#doNotify(…)
方法,主要差异点在前者少
url
和
listeners
方法参数。所以:
    - 第 3 行:我们可以看到调用 **所有**
#getSubscribed()
方法,获得
监听器。代码如下:

```plain text
plain /**  * 订阅 URL 的监听器集合  *  * key:订阅者的 URL ,例如消费者的 URL  */ private final ConcurrentMap<URL, Set<NotifyListener>> subscribed = new ConcurrentHashMap<URL, Set<NotifyListener>>();
```plain text * x
- 第 3 至 5 行:
循环调用 #doNotify(jedis, keys, url, listeners) 方法,进行通知。但是呢?这样一来,通知的事件( key )和监听器未必匹配,因此在【第 20 至 30 行】的代码,进行匹配。 ```
- 第 15 行:获得分类层( Category ),即分类数组。在 《精尽 Dubbo 源码分析 —— 注册中心(二)之 Zookeeper》「4. 调用」 小节中,我们也看到,不同角色关注不同的分类数据。
- 服务消费者,关注 providers configurations routes 。
- 服务提供者,关注 consumers 。
- 监控中心,关注所有。
- 第 18 行:循环分类层,即每个元素为 Root + Service + Type ,例如: /dubbo/com.alibaba.dubbo.demo.DemoService/providers 。
- 第 32 至 44 行:调用 已过期动态 Jedis#hgetAll(key) 方法,获得所有 URL 数组。并且,获取完成后,会过滤掉 的 节点。
- 第 45 至 51 行:若不存在匹配,则创建 清空 empty:// 的 URL返回,用于 该服务的该分类。
- 第 52 行:添加到 result 中。
- 第 60 至 63 行:全量数据获取完成时,调用 《精尽 Dubbo 源码分析 —— 注册中心(一)之抽象 API》 super#notify(…) 方法,回调 NotifyListener 。该方法,在 有详细解析。
2.6.1 toServiceName
```plain text plain /** * 获得服务名,从服务路径上 * * Service * * @param categoryPath 服务路径 * @return 服务名 */ private String toServiceName(String categoryPath) { String servicePath = toServicePath(categoryPath); return servicePath.startsWith(root) ? servicePath.substring(root.length()) : servicePath; }
1
2
3
4
5
6
7

---

### 2.6.2 toCategoryName

```plain text
plain /**  * 获得分类名,从分类路径上  *  * Type  *  * @param categoryPath 分类路径  * @return 分类名  */ private String toCategoryName(String categoryPath) {     int i = categoryPath.lastIndexOf(Constants.PATH_SEPARATOR);     return i > 0 ? categoryPath.substring(i + 1) : categoryPath; }
2.7 deferExpired
```plain text plain 1: private void deferExpired() { 2: for (Map.Entry<String, JedisPool> entry : jedisPools.entrySet()) { 3: JedisPool jedisPool = entry.getValue(); 4: try { 5: Jedis jedis = jedisPool.getResource(); 6: try { 7: // 循环已注册的 URL 集合 8: for (URL url : new HashSet
1
2
3
4
5
6
7
8
9
10
11
12
13
14

---

- 被
expireExecutor
中的定时调用,整体逻辑类似
#doRegister()
方法。
- 第 8 行:调用
#getRegistered()
方法,获得已注册的 URL 集合。代码如下:

```plain text
plain /**  * 已注册 URL 集合。  *  * 注意,注册的 URL 不仅仅可以是服务提供者的,也可以是服务消费者的  */ private final Set<URL> registered = new ConcurrentHashSet<URL>();
- 第 8 行:循环 URL 集合。
- 第 10 行:判断是否为动态 节点,只有动态节点需要延长过期时间。
- 第 14 行:调用 注意,过期时间,作为 Map 的值 Jedis#hset(key, value, expire) 方法,写入 Redis Map 中。 。
- 第 16 行:若【第 14 行】写入返回的值为 1 ,说明 Map 中该键对应的值不存在(例如,多写 Redis 节点时,有个节点写入失败),发布 register 事件。
- 第 21 至 23 行:若是注册中心( admin = true ) 时,调用 #clean(Jedis) 方法,清理过期脏数据。
- 第 25 至 27 行:如果服务器端已同步数据,只需写入单台机器。
2.7.1 clean
```plain text plain private void clean(Jedis jedis) { // 获得所有服务 Set
1
2
3
4
5
6
7
8
9
10
11
12

---

- 整体逻辑类似
#doUnregister()
方法。
- 胖友自己看方法的注释哈。

## 2.8 isAvailable

```plain text
plain @Override public boolean isAvailable() {     for (JedisPool jedisPool : jedisPools.values()) {         try {             Jedis jedis = jedisPool.getResource();             try {                 if (jedis.isConnected()) { // 至少一个 Redis 节点可用                     return true; // At least one single machine is available.                 }             } finally {                 jedisPool.returnResource(jedis);             }         } catch (Throwable ignored) {         }     }     return false; }
2.9 destroy
```plain text plain @Override public void destroy() { // 父类关闭 super.destroy(); // 关闭定时任务 try { expireFuture.cancel(true); } catch (Throwable t) { logger.warn(t.getMessage(), t); } // 关闭通知器 try { for (Notifier notifier : notifiers.values()) { notifier.shutdown(); } } catch (Throwable t) { logger.warn(t.getMessage(), t); } // 关闭连接池 for (Map.Entry<String, JedisPool> entry : jedisPools.entrySet()) { JedisPool jedisPool = entry.getValue(); try { jedisPool.destroy(); } catch (Throwable t) { logger.warn(“Failed to destroy the redis registry client. registry: “ + entry.getKey() + “, cause: “ + t.getMessage(), t); } } }
1
2
3
4
5
6
7
8
9
10
11
12
13

---

# 3. Notifier

Notifier 是 RedisRegistry 的内部类。

Notifier ,继承 Thread 类,负责向 Redis 发起订阅逻辑。

## 3.1 构造方法

```plain text
plain 1: /**  2:  * 服务名 Root + Service  3:  */  4: private final String service;  5: /**  6:  * Jedis  7:  */  8: private volatile Jedis jedis;  9: /** 10:  * 是否首次 11:  */ 12: private volatile boolean first = true; 13: /** 14:  * 是否运行中 15:  */ 16: private volatile boolean running = true; 17: /** 18:  * 连接次数随机数 19:  */ 20: private volatile int connectRandom; 21: /** 22:  * 需要忽略连接的次数 23:  */ 24: private final AtomicInteger connectSkip = new AtomicInteger(); 25: /** 26:  * 已经忽略连接的次数 27:  */ 28: private final AtomicInteger connectSkiped = new AtomicInteger(); 29: /** 30:  * 随机 31:  */ 32: private final Random random = new Random();
- service 属性,服务名 Root + Service。
- first 属性,是否首次。在 #run() 方法中,查看。
- 【第 13 至 32 行】的属性,相当于重连策略 ,用于和 Redis 断开时,忽略一定次数和 Redis 的连接,避免空跑。涉及方法如下:
- #isSkip() 方法,判断是否忽略本次对 Redis 的连接。代码如下:
```plain text plain 1: private boolean isSkip() { 2: // 获得需要忽略连接的总次数。如果超过 10 ,则加上一个 10 以内的随机数。 3: int skip = connectSkip.get(); // Growth of skipping times 4: if (skip >= 10) { // If the number of skipping times increases by more than 10, take the random number 5: if (connectRandom == 0) { 6: connectRandom = random.nextInt(10); 7: } 8: skip = 10 + connectRandom; 9: } 10: // 自增忽略次数。若忽略次数不够,则继续忽略。 11: if (connectSkiped.getAndIncrement() < skip) { // Check the number of skipping times 12: return true; 13: } 14: // 增加需要忽略的次数 15: connectSkip.incrementAndGet(); 16: // 重置已忽略次数和随机数 17: connectSkiped.set(0); 18: connectRandom = 0; 19: return false; 20: }
1
2
3
4
5
6
7
8
9
10
11
12
13
14
15
16
17
18

---

```plain text
    * <font style="color:rgb(51, 51, 51);">第 2 至 9 行:获得</font>**<font style="color:rgb(51, 51, 51);">需要忽略连接的总次数</font>**<font style="color:rgb(51, 51, 51);">。如果超过 10 ,则加上一个 10 以内的随机数。思路是,连接失败的次数越多,</font>**<font style="color:rgb(51, 51, 51);">每一轮</font>**<font style="color:rgb(51, 51, 51);">加大需要忽略的总次数,并且带有一定的随机性。</font>
    * <font style="color:rgb(51, 51, 51);">第 10 至 13 行:自增忽略次数。若忽略次数不够,则继续忽略,即返回 </font><font style="color:rgb(51, 51, 51);">true</font><font style="color:rgb(51, 51, 51);"> 。</font>
    * <font style="color:rgb(51, 51, 51);">第 15 行:增加需要忽略的次数。也就是说,</font>**<font style="color:rgb(51, 51, 51);">下一轮</font>**<font style="color:rgb(51, 51, 51);">,不考虑随机数,会多一次。如下是一次模拟:</font><font style="color:rgb(51, 51, 51);">第一轮 </font>
        + <font style="color:rgb(51, 51, 51);">connectSkip: 0; connectSkiped: 0</font>
    * <font style="color:rgb(51, 51, 51);">第二轮</font>
        + <font style="color:rgb(51, 51, 51);">connectSkip: 1; connectSkiped: 0</font>
        + <font style="color:rgb(51, 51, 51);">connectSkip: 1; connectSkiped: 1</font>
    * <font style="color:rgb(51, 51, 51);">第三轮</font>
        + <font style="color:rgb(51, 51, 51);">connectSkip: 2; connectSkiped: 0</font>
        + <font style="color:rgb(51, 51, 51);">connectSkip: 2; connectSkiped: 1</font>
        + <font style="color:rgb(51, 51, 51);">connectSkip: 2; connectSkiped: 2</font>
        + <font style="color:rgb(51, 51, 51);">当超过十轮后,增加随机数。</font>
    * <font style="color:rgb(51, 51, 51);">第 16 至 18 行:重置已忽略次数和随机数。</font>
- <font style="color:rgb(51, 51, 51);">#resetSkip()</font><font style="color:rgb(51, 51, 51);"> 方法,重置忽略连接的信息。代码如下:</font>
```plain text plain private void resetSkip() { // 重置需要连接的次数 connectSkip.set(0); // 重置已忽略次数和随机数 connectSkiped.set(0); connectRandom = 0; }
1
2
3
4
5

---

```plain text
    * <font style="color:rgb(51, 51, 51);">x</font>
3.2 run
```plain text plain 1: @Override 2: public void run() { 3: while (running) { 4: try { 5: // 是否跳过本次 Redis 连接 6: if (!isSkip()) { 7: try { 8: for (Map.Entry<String, JedisPool> entry : jedisPools.entrySet()) { 9: JedisPool jedisPool = entry.getValue(); 10: try { 11: jedis = jedisPool.getResource(); 12: try { 13: // 监控中心 14: if (service.endsWith(Constants.ANY_VALUE)) { 15: if (!first) { 16: first = false; 17: Set
1
2
3
4
5
6
7
8
9
10
11
12
13
14
15
16
17

---

- 第 3 行:循环执行,直到关闭。
- 第 6 行:调用
#isSkip()
方法,判断是否跳过本次 Redis 连接。But ,即使跳过,也没有执行类似 sleep 的逻辑,有点奇怪。这样,会导致实际即使跳过,也会快速向 Redis 发起订阅。【TODO 8032】Redis 重连逻辑
- 第 8 行:循环连接池,发起订阅,直到**一个成功**
。
- ======================================================
- 【第一种情况】第 14 至 26 行:监控中心
    - 第 15 至 24 行:目前这块代码有一些问题?!初始时
first=true
,那么这块代码永远无法执行到。笔者猜测这块的意图是,在 ZookeeperRegistry 中,可以实现对连接状态的监听,从而实现断开重连成功后,从 Zookeeper 获取到最新的数据。代码如下:

```plain text
plain zkClient.addStateListener(new StateListener() {             public void stateChanged(int state) {                 if (state == RECONNECTED) {                     try {                         recover();                     } catch (Exception e) {                         logger.error(e.getMessage(), e);                     }                 }             }         });
- 而 JedisPool 中,不提供这样的连接监控机制。那么如果订阅 Redis 发生了异常,我们可以认为 Redis 连接断开了,需要重新发起订阅,并且需要
重新
从 Redis 中获取到最新的数据。 * 那么此处的代码可以这样改: * 第 16 行:
```plain text first = true;
1
2
3
4
5

* 第 42 行:增加

```plain text
first = false;
- 第 26 行:调用
```plain text Jedis#psubscribe(JedisPubSub jedisPubSub, String… patterns)
1
2
3
4
5
6
7
8
9
10
11
12
13

方法,订阅

**所有 Service 层**

。 * 【第二种情况】第 27 至 36 行:服务提供者或消费者。 * 第 29 至 34 行:和【第 15 至 24 行】

**类似**

。 * 第 35 行:调用

```plain text
Jedis#psubscribe(JedisPubSub jedisPubSub, String... patterns)
方法,订阅
指定 Service 层
。 * ====================================================== * 第 37 至 40 行:无法执行到,因为
```plain text Jedis#psubscribe(JedisPubSub jedisPubSub, String… patterns)
1
2
3
4
5
6
7
8
9
10
11
12
13

方法,是

**阻塞**

的。这也是为什么 Notifier 是一个

**Thread**

的原因。 * 第 41 至 45 行:发生异常,说明 Redis 连接断开了。因此,调用

```plain text
#sleep(millis)
方法,等待 Redis 重连成功。通过这样的方式,避免执行,占用大量的 CPU 资源。 ## 3.3 shutdown
```plain text Java public void shutdown() { try { // 停止运行 running = false; // Jedis 断开连接 jedis.disconnect(); } catch (Throwable t) { logger.warn(t.getMessage(), t); } }
1
2
3
4
5
6
7
8
9
10
11

---

# 4. NotifySub

NotifySub 是 RedisRegistry 的内部类。

NotifySub ,实现 redis.clients.jedis.JedisPubSub 抽象类,通知订阅实现类。

```plain text
plain 1: private class NotifySub extends JedisPubSub {  2:   3:     private final JedisPool jedisPool;  4:   5:     public NotifySub(JedisPool jedisPool) {  6:         this.jedisPool = jedisPool;  7:     }  8:   9:     @Override 10:     public void onMessage(String key, String msg) { 11:         if (logger.isInfoEnabled()) { 12:             logger.info("redis event: " + key + " = " + msg); 13:         } 14:         if (msg.equals(Constants.REGISTER) 15:                 || msg.equals(Constants.UNREGISTER)) { 16:             try { 17:                 Jedis jedis = jedisPool.getResource(); 18:                 try { 19:                     doNotify(jedis, key); 20:                 } finally { 21:                     jedisPool.returnResource(jedis); 22:                 } 23:             } catch (Throwable t) { // TODO Notification failure does not restore mechanism guarantee 24:                 logger.error(t.getMessage(), t); 25:             } 26:         } 27:     } 28:  29:     @Override 30:     public void onPMessage(String pattern, String key, String msg) { 31:         onMessage(key, msg); 32:     } 33:  34:     @Override 35:     public void onSubscribe(String key, int num) { 36:     } 37:  38:     @Override 39:     public void onPSubscribe(String pattern, int num) { 40:     } 41:  42:     @Override 43:     public void onUnsubscribe(String key, int num) { 44:     } 45:  46:     @Override 47:     public void onPUnsubscribe(String pattern, int num) { 48:     } 49:  50: }
- 实现了 实时 #onMessage(key, msg) 和 #onPMessage(pattern, key, msg) 方法,收到 register unregister 事件,调用 #doNotify(jedis, key) 方法,通知监听器,数据变化,从而实现 更新。
5. 可靠性
FROM 《Dubbo 用户指南 —— Redis 注册中心》
阿里内部并没有采用 Redis 做为注册中心,而是使用自己实现的基于数据库的注册中心,即:Redis 注册中心并没有在阿里内部长时间运行的可靠性保障,此 Redis 桥接实现只为开源版本提供,其可靠性依赖于 Redis 本身的可靠性。
FROM 《Dubbo 用户指南 —— 成熟度》
Redis注册中心
- Maturity:Stable
- Strength:支持基于客户端双写的集群方式,性能高
- Problem:要求服务器时间同步,用于检查心跳过期脏数据
- Advise:可用于生产环境
做个小笔记,Redis 主从复制的情况下,从节点的订阅( Subscribe ),可以收到主节点的发布( Publish ) 。做这个笔记的原因是,原来担心 “failover” 模式下,Redis 主节点挂了,如果订阅从节点,会不会出现,Redis 主节点恢复后,收不到在其上的发布事件。
666. 彩蛋

知识星球
看了 Redis 的注册中心的实现,收获还是蛮大的。原来的一直纠结,如何解决 Redis 自动过期,怎么监听到。原来,自己的思路错了!!!