CountDownLatch 原理
https://www.iocoder.cn/JUC/sike/CountDownLatch/
1. 简介
在上篇博客中,我们介绍了 Java 四大并发工具之一的 CyclicBarrier ,今天要介绍的CountDownLatch 与 CyclicBarrier 有点儿相似。
CyclicBarrier 所描述的是”允许一组线程互相等待,直到到达某个公共屏障点,才会进行后续任务”,而 CountDownLatch 所描述的是”在完成一组正在其他线程中执行的操作之前,它允许一个或多个线程一直等待”。在API中是这样描述的:
用给定的计数初始化 CountDownLatch。由于调用了 #countDown() 方法,所以在当前计数到达零之前,#await() 方法会一直受阻塞。之后,会释放所有等待的线程,#await() 的所有后续调用都将立即返回。这种现象只出现一次——计数无法被重置。如果需要重置计数,请考虑使用 CyclicBarrier 。
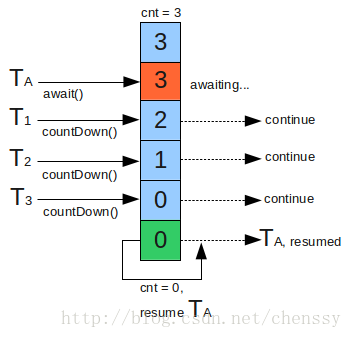
CountDownLatch 是通过一个计数器来实现的,当我们在 new 一个 CountDownLatch 对象的时候,需要带入该计数器值,该值就表示了线程的数量。
- 每当一个线程完成自己的任务后,计数器的值就会减 1 。
- 当计数器的值变为0时,就表示所有的线程均已经完成了任务,然后就可以恢复等待的线程继续执行了。
虽然,CountDownLatch 与 CyclicBarrier 有那么点相似,但是他们还是存在一些区别的:
- CountDownLatch 的作用是允许 1 或 N 个线程等待其他线程完成执行;而 CyclicBarrier 则是允许 N 个线程相互等待。
- CountDownLatch 的计数器无法被重置;CyclicBarrier 的计数器可以被重置后使用,因此它被称为是循环的 barrier 。
2. 实现分析
java.util.concurrent.CountDownLatch 结构如下图:
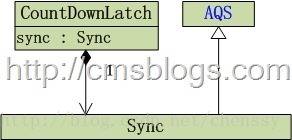
通过上面的结构图我们可以看到,CountDownLatch 内部依赖 Sync 实现,而 Sync 继承 AQS 。
CountDownLatch 仅提供了一个构造方法,代码如下:
1
2
3
4
public CountDownLatch(int count) {
    if (count < 0) throw new IllegalArgumentException("count < 0");
    this.sync = new Sync(count);
}
- 构造一个用给定计数初始化的 CountDownLatch 。
2.1 Sync
sync 变量,为 CountDownLatch 的一个内部类 Sync ,其定义如下:
1
2
3
4
5
6
7
8
9
10
11
12
13
14
15
16
17
18
19
20
21
22
23
24
25
26
27
28
29
30
31
private static final class Sync extends AbstractQueuedSynchronizer {
    private static final long serialVersionUID = 4982264981922014374L;

    Sync(int count) {
        setState(count);
    }

    // 获取同步状态
    int getCount() {
        return getState();
    }

    @Override
    protected int tryAcquireShared(int acquires) {
        return (getState() == 0) ? 1 : -1;
    }

    @Override
    protected boolean tryReleaseShared(int releases) {
        for (;;) {
            int c = getState();
            if (c == 0) {
                return false;
            }
            int nextc = c - 1;
            if (compareAndSetState(c, nextc)) {
                return nextc == 0;
            }
        }
    }
}
- 通过这个内部类 Sync 实现类,我们可以清楚地看到, CountDownLatch 是采用共享锁来实现的。
- #tryAcquireShared(int acquires) 和 #tryReleaseShared(int releases) 方法,结合下文一起理解。
2.2 await
CountDownLatch 提供 #await() 方法,来使当前线程在锁存器倒计数至零之前一直等待,除非线程被中断,定义如下:
1
2
3
public void await() throws InterruptedException {
    sync.acquireSharedInterruptibly(1);
}
- 该方法内部使用 AQS 的 #acquireSharedInterruptibly(int arg) 方法,代码如下:
1
2
3
4
5
// AQS.java
public final void acquireSharedInterruptibly(int arg) throws InterruptedException {
    if (Thread.interrupted()) throw new InterruptedException();
    if (tryAcquireShared(arg) < 0) doAcquireSharedInterruptibly(arg);
}
在内部类 Sync 中重写了 #tryAcquireShared(int arg)方法,代码如下:
1
2
3
4
5
// Sync.java
@Override
protected int tryAcquireShared(int acquires) {
    return (getState() == 0) ? 1 : -1;
}
getState() 方法,获取同步状态,其值等于计数器的值。从这里我们可以看到,如果计数器值不等于 0,则会调用 #doAcquireSharedInterruptibly(int arg) 方法。该方法为一个自旋方法会尝试一直去获取同步状态,代码如下:
1
2
3
4
5
6
7
8
9
10
11
12
13
14
15
16
17
18
19
20
21
22
23
24
25
26
27
// AQS.java
private void doAcquireSharedInterruptibly(int arg) throws InterruptedException {
    final Node node = addWaiter(Node.SHARED);
    boolean failed = true;
    try {
        for (;;) {
            final Node p = node.predecessor();
            if (p == head) {
                int r = tryAcquireShared(arg);
                if (r >= 0) {
                    setHeadAndPropagate(node, r);
                    p.next = null;
                    // help GC
                    failed = false;
                    return;
                }
            }
            if (shouldParkAfterFailedAcquire(p, node) && parkAndCheckInterrupt()) {
                throw new InterruptedException();
            }
        }
    } finally {
        if (failed) {
            cancelAcquire(node);
        }
    }
}
2.3 await
CountDownLatch 提供 #await(long timeout, TimeUnit unit) 方法,来使当前线程在锁存器倒计数至零之前一直等待,除非线程被中断,或者等待超时,定义如下:
1
2
3
public boolean await(long timeout, TimeUnit unit) throws InterruptedException {
    return sync.tryAcquireSharedNanos(1, unit.toNanos(timeout));
}
- 调用 AQS 的 tryAcquireSharedNanos(int acquires, long nanosTimeout) 方法,逻辑和 「2.2 await」 类似。
2.4 countDown
CountDownLatch 提供 #countDown() 方法,递减锁存器的计数。如果计数到达零,则唤醒所有等待的线程。
1
2
3
public void countDown() {
    sync.releaseShared(1);
}
- 内部调用 AQS 的 #releaseShared(int arg) 方法,来释放共享锁同步状态:
1
2
3
4
5
6
7
8
// AQS.java
public final boolean releaseShared(int arg) {
    if (tryReleaseShared(arg)) {
        doReleaseShared();
        return true;
    }
    return false;
}
- #tryReleaseShared(int arg) 方法,被 CountDownLatch 的内部类 Sync 重写,代码如下:
1
2
3
4
5
6
7
8
9
10
11
12
13
14
// Sync.java
@Override
protected boolean tryReleaseShared(int releases) {
    for (;;) {
        // 获取锁状态
        int c = getState();
        // c == 0 直接返回,释放锁成功
        if (c == 0) return false;
        // 计算新"锁计数器"
        int nextc = c - 1;
        // 更新锁状态(计数器)
        if (compareAndSetState(c, nextc)) return nextc == 0;
    }
}
2.5 getCount
1
2
3
public long getCount() {
    return sync.getCount();
}
3. 总结
CountDownLatch 内部通过共享锁实现。
- 在创建 CountDownLatch 实例时,需要传递一个int型的参数:count,该参数为计数器的初始值,也可以理解为该共享锁可以获取的总次数。
- 当某个线程调用 #await() 方法,程序首先判断 count 的值是否为 0 ,如果不为 0 的话,则会一直等待直到为 0 为止。
- 当其他线程调用 #countDown() 方法时,则执行释放共享锁状态,使 count 值 - 1。
- 当在创建 CountDownLatch 时初始化的 count 参数,必须要有 count 线程调用#countDown() 方法,才会使计数器 count 等于 0 ,锁才会释放,前面等待的线程才会继续运行。
- 注意 CountDownLatch 不能回滚重置。
4. 应用示例
示例仍然使用开会案例。老板进入会议室等待 5 个人全部到达会议室才会开会。所以这里有两种线程:老板等待开会线程、员工到达会议室线程:
1
2
3
4
5
6
7
8
9
10
11
12
13
14
15
16
17
18
19
20
21
22
23
24
25
26
27
28
29
30
31
32
33
34
35
public class CountDownLatchTest {
    private static final CountDownLatch countDownLatch = new CountDownLatch(5);

    // Boss线程,等待员工到达开会
    static class BossThread extends Thread {
        @Override
        public void run() {
            System.out.println("Boss在会议室等待,总共有" + countDownLatch.getCount() + "个人开会…");
            try {
                // Boss等待
                countDownLatch.await();
            } catch (InterruptedException e) {
                e.printStackTrace();
            }
            System.out.println("所有人都已经到齐了,开会吧…");
        }
    }

    // 员工到达会议室线程
    static class EmployeeThread extends Thread {
        @Override
        public void run() {
            System.out.println(Thread.currentThread().getName() + ",到达会议室….");
            countDownLatch.countDown();
        }
    }

    public static void main(String[] args) {
        // Boss线程启动
        new BossThread().start();
        for (int i = 0; i < countDownLatch.getCount(); i++) {
            new EmployeeThread().start();
        }
    }
}