外部化配置-集成SpringBoot
本文实际是 《Dubbo 源码分析 —— 集成 Spring Boot》文章。考虑到和 Dubbo 配置比较相关,所以改成这个标题。
1. 概述
本文,我们来分享 https://github.com/apache/incubator-dubbo-spring-boot-project 项目的源码解析,看看 Dubbo 是如何集成到 Spring Boot 中的。
在阅读本文之前,希望胖友能够先熟读 中文文档 。最好呢,当然不强制,可以操练下每个 Demo 。
2. 调试环境搭建
在读源码之前,我们当然是先把调试环境搭建起来。
2.1 依赖工具
- JDK :1.8+
- Maven
- IntelliJ IDEA
2.2 源码拉取
从官方仓库 https://github.com/apache/incubator-dubbo-spring-boot-projectFork 出属于自己的仓库。为什么要 Fork ?既然开始阅读、调试源码,我们可能会写一些注释,有了自己的仓库,可以进行自由的提交。
使用 IntelliJ IDEA 从 Fork 出来的仓库拉取代码。拉取完成后,Maven 会下载依赖包,可能会花费一些时间,耐心等待下。
在等待的过程中,我来简单说下,搭建调试环境的过程:
- 启动 Dubbo Provider
- 启动 Dubbo Consumer
考虑到方便,我们直接使用 dubbo-registry-zookeeper-samples 项目提供的示例。
另外,本文使用的 incubator-dubbo-spring-boot-project 版本是 0.2.1 。
2.3 启动 Dubbo Provider
右键运行
dubbo-registry-zookeeper-samples
项目下的
provider-sample
的 DubboRegistryZooKeeperProviderBootstrap 的
#main(String[] args)
方法,Provider 就启动完成了。输出日志如下图:

Provider 启动日志
这个示例比较有意思的是,提供了 EmbeddedZooKeeper 类,用于启动内嵌的 Zookeeper 。
2.4 启动 Dubbo Consumer
右键运行
dubbo-registry-zookeeper-samples
项目下的
consumer-sample
的 DubboRegistryZooKeeperConsumerBootstrap 的
#main(String[] args)
方法,Consumer 就启动完成了。输出日志如下图:
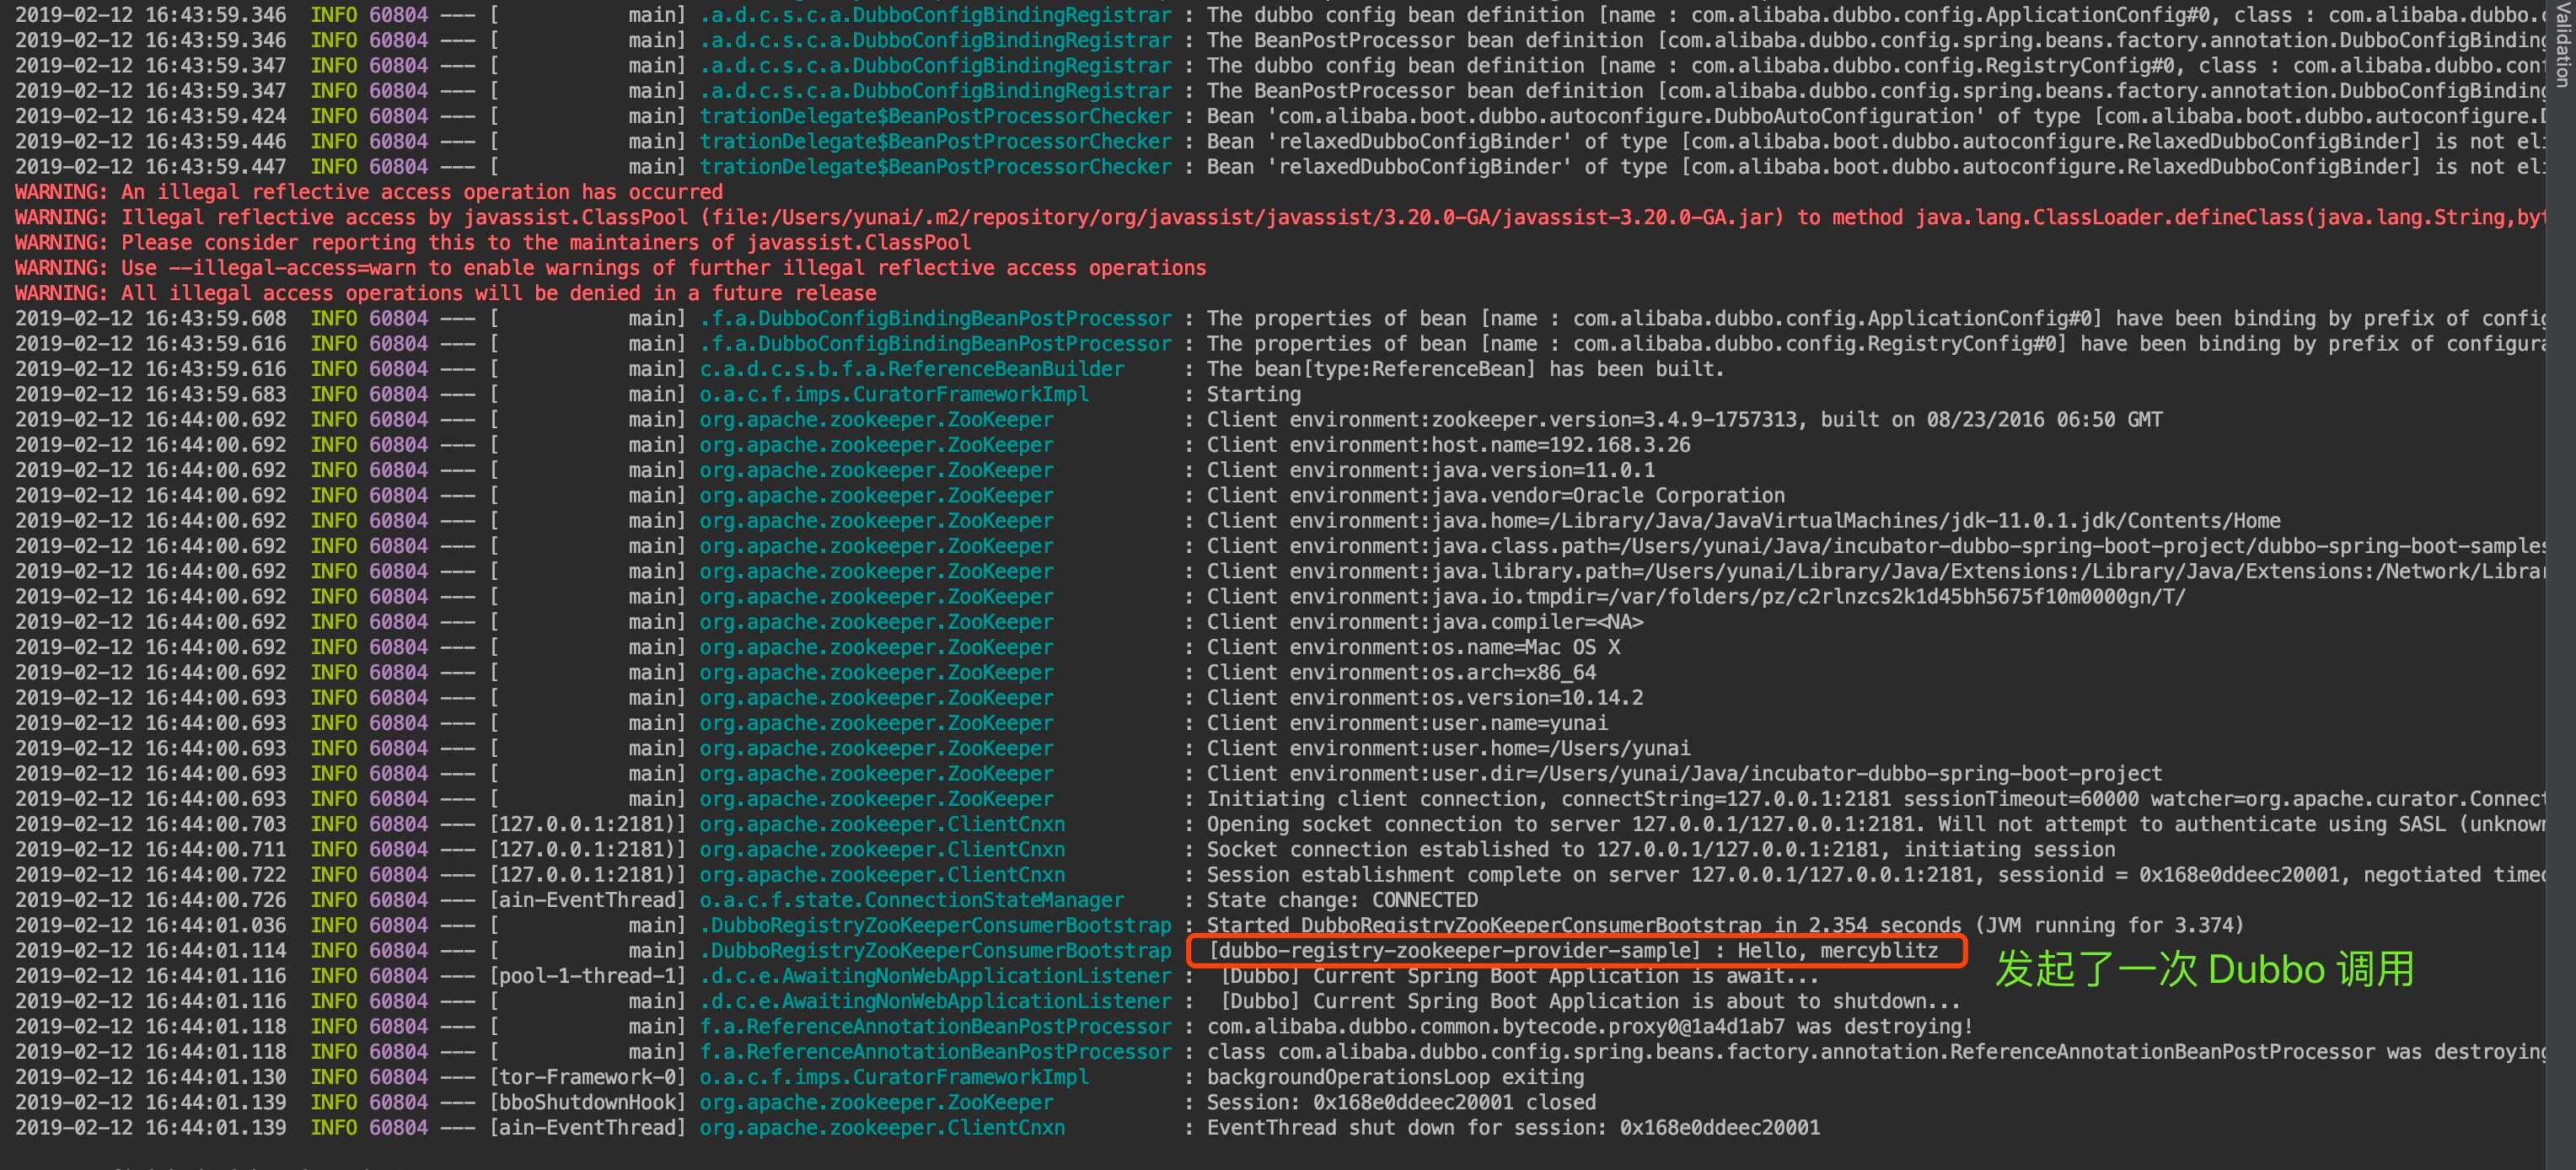
Consumer 启动日志
因为 DubboRegistryZooKeeperConsumerBootstrap 的 Spring Boot 启动调用如下:
1
2
3
4
5
6
7
8
9
10
11
12
// DubboRegistryZooKeeperConsumerBootstrap.java
private final Logger logger = LoggerFactory.getLogger(getClass());
@Reference(version = "${demo.service.version}")
private DemoService demoService;
@Bean
public ApplicationRunner runner() {
    return args -> logger.info(demoService.sayHello("mercyblitz")); // 发起调用
}
public static void main(String[] args) {
    SpringApplication.run(DubboRegistryZooKeeperConsumerBootstrap.class) // 启动
    .close(); // <X> 关闭
}
- 处,所以在发起一次 Dubbo 调用之后,会直接关闭 Spring Boot 应用。因此,JVM 进程就直接结束了。
3. 项目结构一览
本文主要分享 incubator-dubbo-spring-boot-project 的 项目结构。希望通过本文能让胖友对 incubator-dubbo-spring-boot-project 的整体项目有个简单的了解。
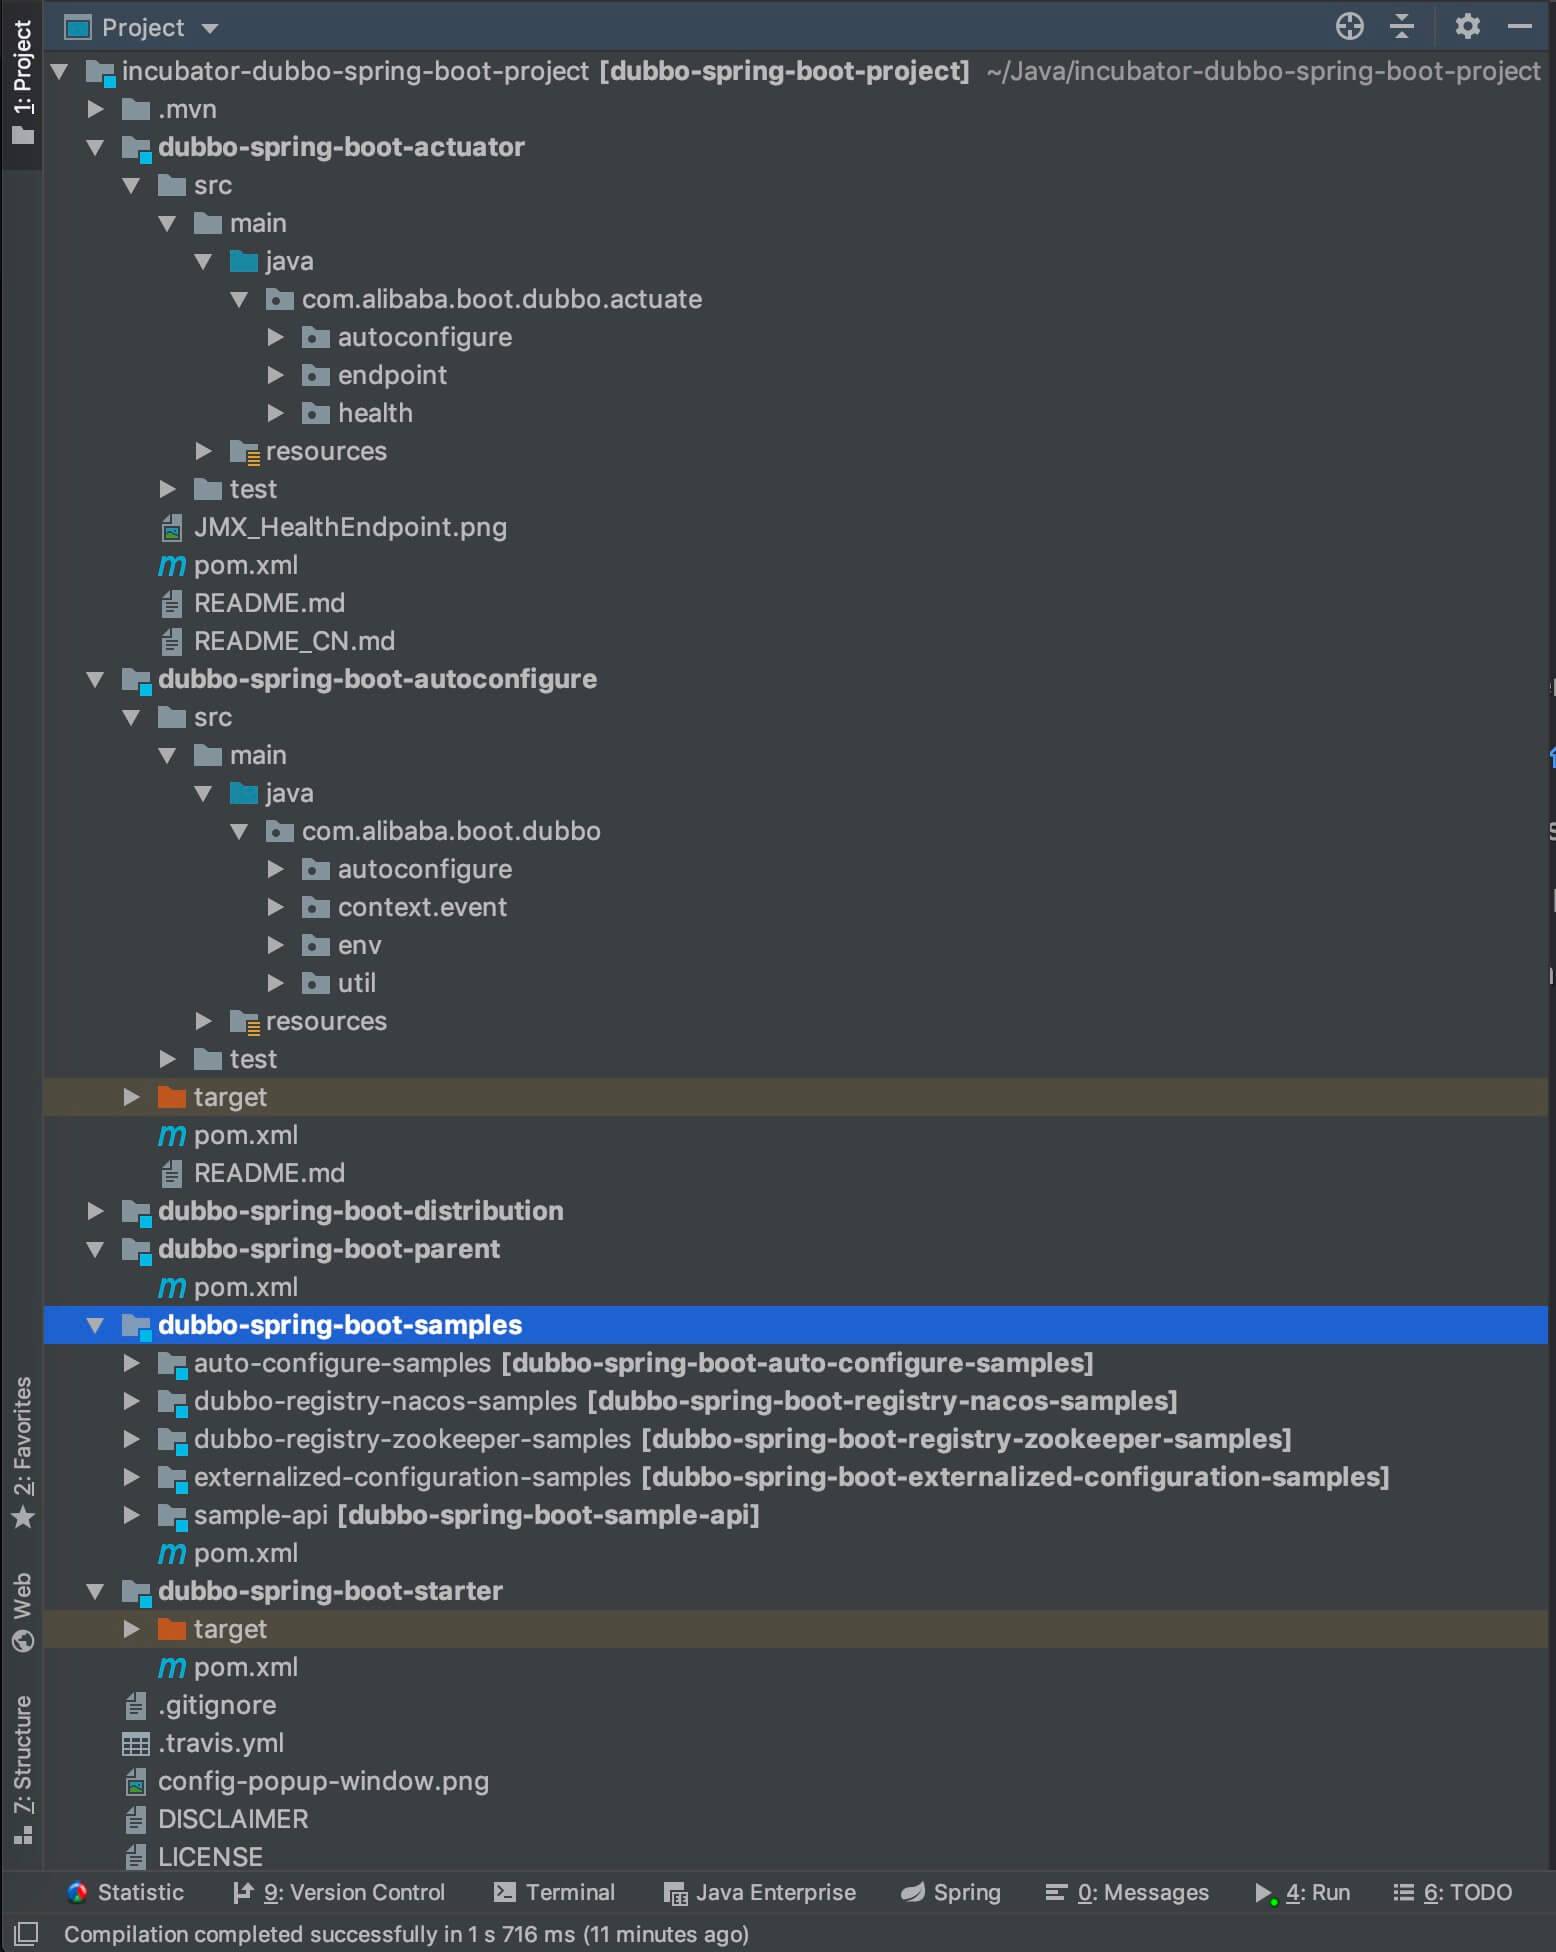
项目结构一览
3.1 代码统计
这里先分享一个小技巧。笔者在开始源码学习时,会首先了解项目的代码量。
第一种方式,使用 IDEA Statistic 插件,统计整体代码量。
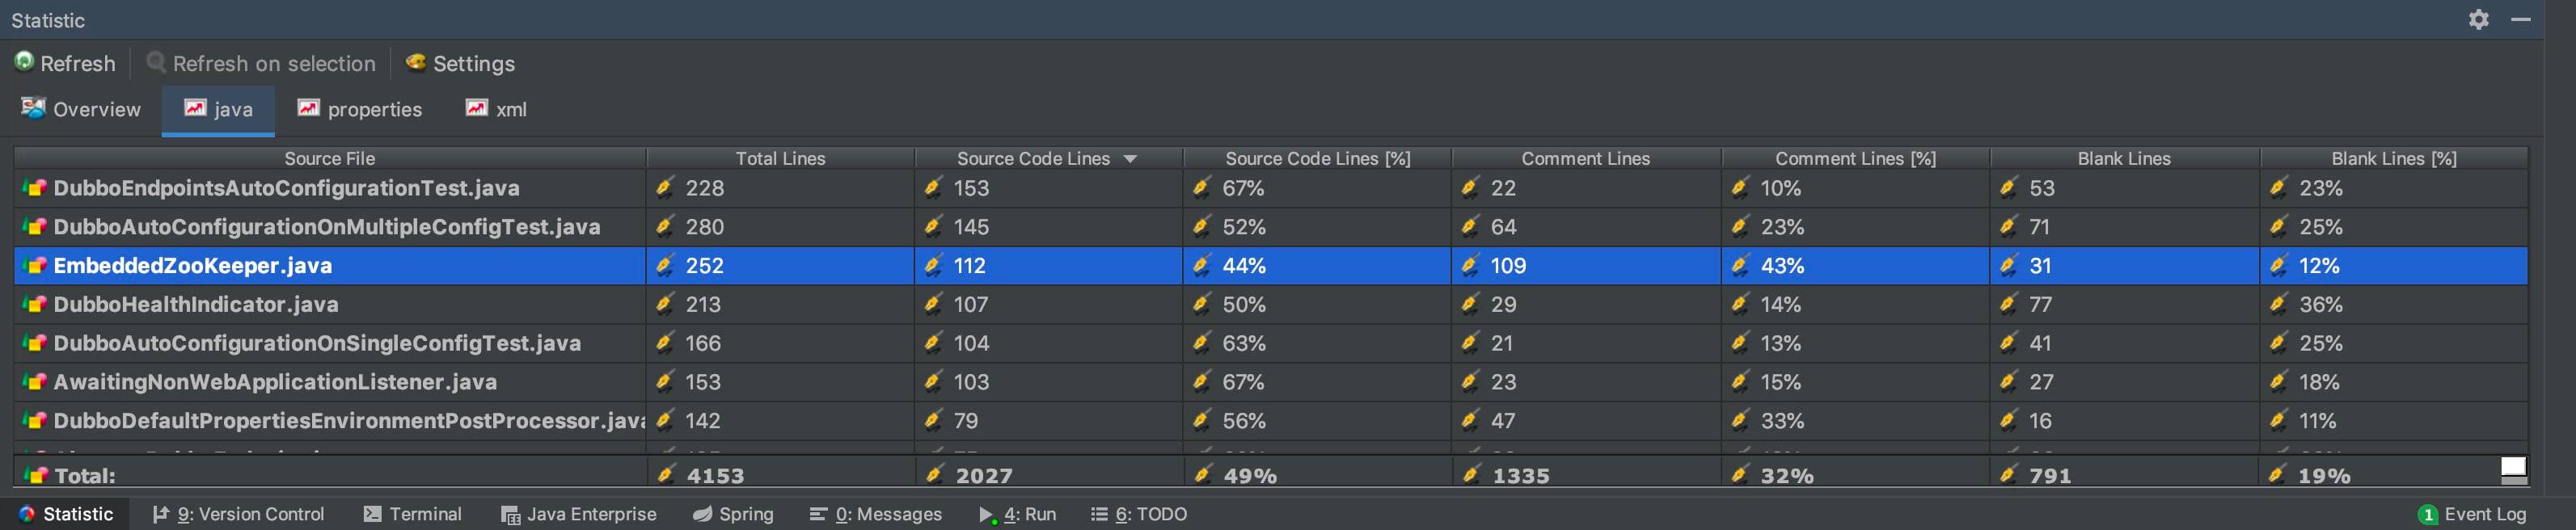
Statistic 统计代码量
我们可以粗略的看到,总的代码量在 2000 行。这其中还包括单元测试,示例等等代码。所以,不慌,一点不慌~
第二种方式,使用 Shell 脚本命令逐个 Maven 模块统计 。
| 一般情况下,笔者使用 find . -name “*.java” | xargs cat | grep -v -e ^$ -e ^//.*$ | wc -l 。这个命令只过滤了部分注释,所以相比 IDEA Statistic 会偏多。 |
当然,考虑到准确性,胖友需要手动 cd 到每个 Maven 项目的 src/main/java 目录下,以达到排除单元测试的代码量。

Shell 脚本统计代码量
统计完后,是不是更加不慌了。哈哈哈哈。
3.2 dubbo-spring-boot-parent 模块
dubbo-spring-boot-parent 模块,无具体代码,作为其它项目的 Maven Parent 项目,例如定义了依赖版本号。
3.3 dubbo-spring-boot-starter 模块
dubbo-spring-boot-starter 模块,无具体代码,作为 Spring Boot Dubbo Starter 模块。其 pom.xml 的代码如下:
1
2
3
4
5
6
7
8
9
10
11
12
13
14
15
16
17
18
19
20
21
22
23
24
25
26
27
28
29
30
31
32
33
34
35
<project xmlns="http://maven.apache.org/POM/4.0.0"  xmlns:xsi="http://www.w3.org/2001/XMLSchema-instance"  xsi:schemaLocation="http://maven.apache.org/POM/4.0.0 http://maven.apache.org/xsd/maven-4.0.0.xsd">
  <parent>
    <groupId>com.alibaba.boot</groupId>
    <artifactId>dubbo-spring-boot-parent</artifactId>
    <version>${revision}</version>
    <relativePath>../dubbo-spring-boot-parent</relativePath>
  </parent>
  <modelVersion>4.0.0</modelVersion>
  <artifactId>dubbo-spring-boot-starter</artifactId>
  <packaging>jar</packaging>
  <name>Dubbo Spring Boot Starter</name>
  <description>Dubbo Spring Boot Starter</description>
  <dependencies>
    <!-- Spring Boot dependencies -->    <dependency>
      <groupId>org.springframework.boot</groupId>
      <artifactId>spring-boot-starter</artifactId>
      <optional>true</optional>
    </dependency>
    <!-- ZK -->    <dependency>
      <groupId>org.apache.zookeeper</groupId>
      <artifactId>zookeeper</artifactId>
      <optional>true</optional>
    </dependency>
    <dependency>
      <groupId>org.apache.curator</groupId>
      <artifactId>curator-framework</artifactId>
      <optional>true</optional>
    </dependency>
    <dependency>
      <groupId>com.alibaba.boot</groupId>
      <artifactId>dubbo-spring-boot-autoconfigure</artifactId>
      <version>${revision}</version>
    </dependency>
  </dependencies>
</project>
3.4 dubbo-spring-boot-distribution 模块
dubbo-spring-boot-distribution 模块,无具体代码,用于 Spring Boot Dubbo 使用 maven-assembly-plugin 插件,打包出我们后续使用的 Releases 。
3.5 dubbo-spring-boot-autoconfigure 模块
dubbo-spring-boot-autoconfigure 模块,754 行代码,提供了 Spring Boot Dubbo 的自动配置(AutoConfigure)的具体实现。
3.6 dubbo-spring-boot-actuator 模块
dubbo-spring-boot-actuator 模块,782 行代码,提供了 Spring Boot Dubbo 的 Actuator 的具体实现。
Spring Boot Actuator 的关键特性,是在应用程序里提供众多 HTTP 接口,通过它们了解应用程序运行时的内部状况。
3.7 dubbo-spring-boot-samples 模块
dubbo-spring-boot-samples 模块,708 行代码,提供了四个示例。比较重点可以看的是两个:
- dubbo-registry-zookeeper-samples 模块,提供基于 Zookeeper 作为注册中心的使用示例。
- externalized-configuration-samples 模块,提供了外部化配置的示例。
3.8 小结
貌似也没啥好小结的。想要偷懒的话,只要看 dubbo-spring-boot-autoconfigure 模块,一共是 754 行代码。哈哈哈~
当然,真的要深入的话,还是要看 Dubbo 本身的代码的。
4. dubbo-spring-boot-autoconfigure 源码
dubbo-spring-boot-autoconfigure
模块,所有类如下图:
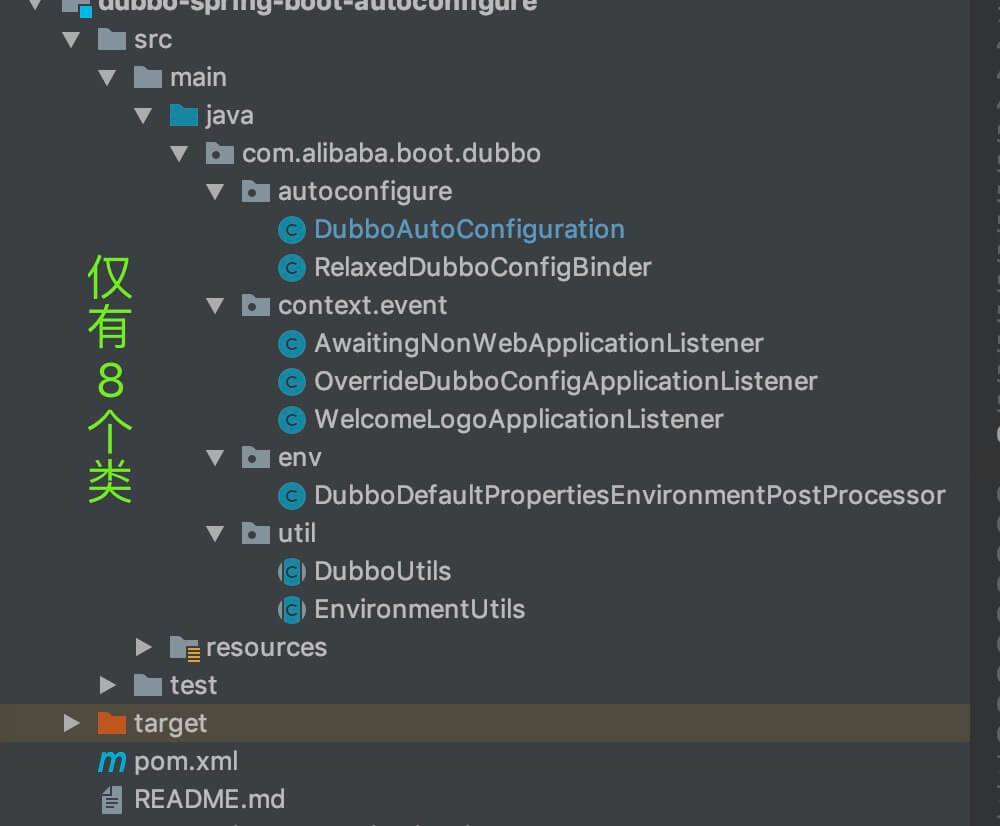
dubbo-spring-boot-autoconfigure 模块
如下开始,是 autoconfigure 包下。
4.1 DubboAutoConfiguration
com.alibaba.boot.dubbo.autoconfigure.DubboAutoConfiguration ,Dubbo 自动配置类。代码如下:
1
2
3
4
5
6
7
8
9
10
// DubboAutoConfiguration.java
@Configuration // 配置类
@ConditionalOnProperty(prefix = DUBBO_PREFIX, name = "enabled", matchIfMissing = true, havingValue = "true")
// 要求配置了 "dubbo.enabled=true" 或者,"dubbo.enabled" 未配置
@ConditionalOnClass(AbstractConfig.class)
// AbstractConfig 类存在的时候,即用于判断有 Dubbo 库
public class DubboAutoConfiguration {
    // ... 省略其它代码
}
- 类上的每个注解的作用,请看其后的注释。
4.1.1 serviceAnnotationBeanPostProcessor
#serviceAnnotationBeanPostProcessor() 方法,创建 ServiceAnnotationBeanPostProcessor Bean 对象。代码如下:
1
2
3
4
5
6
7
8
9
10
11
12
// DubboAutoConfiguration.java
@ConditionalOnProperty(name = BASE_PACKAGES_PROPERTY_NAME)
// 配置了 "dubbo.scan.base-package" 属性,即要扫描 Dubbo 注解的包
@ConditionalOnClass(ConfigurationPropertySources.class)
// 有 Spring Boot 配置加载的功能
@Bean
public ServiceAnnotationBeanPostProcessor serviceAnnotationBeanPostProcessor(Environment environment) {
    // <1> 获得 "dubbo.scan.base-package" 属性
    Set<String> packagesToScan = environment.getProperty(BASE_PACKAGES_PROPERTY_NAME, Set.class, emptySet());
    // <2> 创建 ServiceAnnotationBeanPostProcessor 对象
    return new ServiceAnnotationBeanPostProcessor(packagesToScan);
}
- <1> 处,获得 “dubbo.scan.base-package” 属性,即要扫描 Dubbo 注解的包。
- <2> 处,创建 ServiceAnnotationBeanPostProcessor 对象。后续,ServiceAnnotationBeanPostProcessor 会扫描 packagesToScan 包的 Dubbo @Service 注解,创建对应的 Dubbo Service Bean 对象们。
- ServiceAnnotationBeanPostProcessor 属于 Dubbo 项目本身,所以本文就不解析逻。
4.1.2 referenceAnnotationBeanPostProcessor
#referenceAnnotationBeanPostProcessor() 方法,创建 Bean 名字为 “referenceAnnotationBeanPostProcessor” 的 ReferenceAnnotationBeanPostProcessor Bean 对象。代码如下:
1
2
3
4
5
6
7
8
// DubboAutoConfiguration.java
@ConditionalOnMissingBean // 不存在 ReferenceAnnotationBeanPostProcessor Bean 的时候
@Bean(name = ReferenceAnnotationBeanPostProcessor.BEAN_NAME) // Bean 的名字是 referenceAnnotationBeanPostProcessor
public ReferenceAnnotationBeanPostProcessor referenceAnnotationBeanPostProcessor() {
    return new ReferenceAnnotationBeanPostProcessor();
}
- 后续,ReferenceAnnotationBeanPostProcessor 会扫描 Dubbo @Reference 注解,创建对应的 Dubbo Service Bean 对象们。
- ReferenceAnnotationBeanPostProcessor 属于 Dubbo 项目本身,所以本文就不解析逻。
4.1.3 relaxedDubboConfigBinder
#relaxedDubboConfigBinder() 方法,创建 RelaxedDubboConfigBinder Bean 对象。代码如下:
1
2
3
4
5
6
7
8
9
// DubboAutoConfiguration.java
@ConditionalOnClass(Binder.class) // 存在 Binder 类的时候
@Bean
@Scope(scopeName = SCOPE_PROTOTYPE) // 多例
public RelaxedDubboConfigBinder relaxedDubboConfigBinder() {
    return new RelaxedDubboConfigBinder();
}
- RelaxedDubboConfigBinder ,用于将具体的属性,设置到相应的 AbstractConfig 对象中。
- 为什么 多例 @Scope(scopeName = SCOPE_PROTOTYPE) 注解是 呢?因为有多个 AbstractConfig 对象呀~
- 详细的解析,见 「4.2 RelaxedDubboConfigBinder」 。
4.1.4 XXXDubboConfigConfiguration
1
2
3
4
5
6
7
8
9
10
11
12
13
14
15
16
17
18
19
20
21
22
23
24
// DubboAutoConfiguration.java
/**
* Single Dubbo Config Configuration
*
* @see EnableDubboConfig
* @see DubboConfigConfiguration.Single
*/
@EnableDubboConfig
protected static class SingleDubboConfigConfiguration {
}

/**
* Multiple Dubbo Config Configuration , equals
* @EnableDubboConfig.multiple() == <code>true</code>
*
* @see EnableDubboConfig
* @see DubboConfigConfiguration.Multiple
*/
@ConditionalOnProperty(name = MULTIPLE_CONFIG_PROPERTY_NAME, havingValue = "true")
// 要求配置 "dubbo.config.multiple=true" 。默认情况下,Dubbo 自带 "dubbo.config.multiple=true"
@EnableDubboConfig(multiple = true)
protected static class MultipleDubboConfigConfiguration {
}
- 关于 《Dubbo 新编程模型之外部化配置 —— @EnableDubboConfig》 @EnableDubboConfig 注解的介绍,可以看看 。
- SingleDubboConfigConfiguration 对应 @EnableDubboConfig(multiple = false) 。
- 无任何条件,所以会创建。
- 引入了单个 Dubbo 配置绑定 Bean 的配置。即配置文件如下属性:
1
2
3
4
5
6
7
dubbo.application
dubbo.module
dubbo.registry
dubbo.protocol
dubbo.monitor
dubbo.provider
dubbo.consumer
1
2
3
4
5
6
7
8
9
10
11
12
13
14
15
16
17
18
19
20
    * ~```

- MultipleDubboConfigConfiguration 对应
@EnableDubboConfig(multiple = true)
。
    - 要求配置
"dubbo.config.multiple=true"
。默认情况下,Dubbo 自带
"dubbo.config.multiple=true"
,所以也会创建。
    - 引入了多个 Dubbo 配置绑定 Bean 的配置。即配置文件如下属性:

```text
dubbo.applications
dubbo.modules
dubbo.registries
dubbo.protocols
dubbo.monitors
dubbo.providers
dubbo.consumers
1
2
3
4
5
6
7
8
9
10
11
12
13
14
15
16
17
18
19
20
21
22
23
24
25
26
27
28
29
    * ~```

## 4.2 RelaxedDubboConfigBinder

com.alibaba.boot.dubbo.autoconfigure.RelaxedDubboConfigBinder ,继承 AbstractDubboConfigBinder 抽象类,负责将 Spring Boot 的配置属性,注入到 Dubbo AbstractConfig 配置对象中。代码 如下:

```java
// RelaxedDubboConfigBinder.java
@Override
public <C extends AbstractConfig> void bind(String prefix, C dubboConfig) {
    // <1.1> 获得 PropertySource 数组
    Iterable<PropertySource<?>> propertySources = getPropertySources();
    // Converts ConfigurationPropertySources
    // <1.2> 转换成 ConfigurationPropertySource 数组
    Iterable<ConfigurationPropertySource> configurationPropertySources = from(propertySources);
    // Wrap Bindable from DubboConfig instance
    // <2> 将 dubboConfig 包装成 Bindable 对象
    Bindable<C> bindable = Bindable.ofInstance(dubboConfig);
    // <3.1> 创建 Binder 对象
    Binder binder = new Binder(configurationPropertySources, new PropertySourcesPlaceholdersResolver(propertySources));
    // Get BindHandler
    // <3.2> 获得 BindHandler 对象
    BindHandler bindHandler = getBindHandler();
    // Bind
    // <3.3> 执行绑定,会将 propertySources 属性,注入到 dubboConfig 对象中
    binder.bind(prefix, bindable, bindHandler);
}
- AbstractDubboConfigBinder 属于 Dubbo 项目本身,所以本文就不解析逻。
- <1.1> 处,调用父类的 #getPropertySources() 方法,获得 PropertySource 数组。
- <1.2> 处,调用 ConfigurationPropertySources#from(Iterable<PropertySource<?» sources) 方法,转换成 ConfigurationPropertySource 数组。上述两个变量的值,如下图所示:
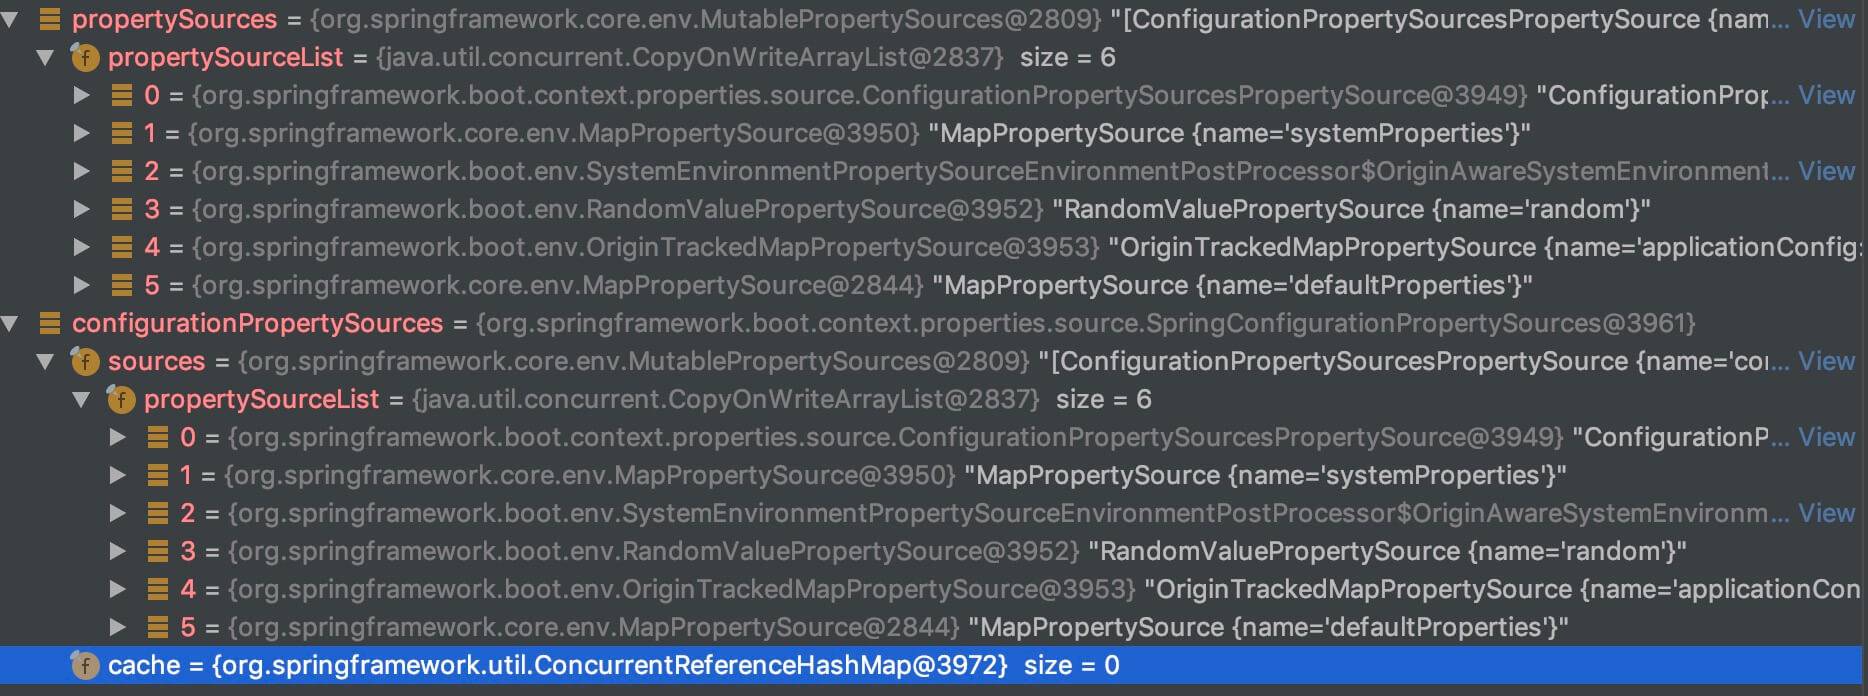
configurationPropertySources属性 - <2> 处,调用 Bindable#ofInstance(T instance) 方法,将 dubboConfig 包装成 Bindable 对象。
- <3.1> 处,创建 Binder 对象。
- <3.2> 处,调用 #getBindHandler() 方法,获得 BindHandler 对象。代码如下:
1
2
3
4
5
6
7
8
9
10
11
12
13
14
15
// RelaxedDubboConfigBinder.java
private BindHandler getBindHandler() {
    // 获得默认的 BindHandler 处理器
    BindHandler handler = BindHandler.DEFAULT;
    // 进一步包装成 IgnoreErrorsBindHandler 对象
    if (isIgnoreInvalidFields()) {
        handler = new IgnoreErrorsBindHandler(handler);
    }
    // 进一步包装成 NoUnboundElementsBindHandler 对象
    if (!isIgnoreUnknownFields()) {
        UnboundElementsSourceFilter filter = new UnboundElementsSourceFilter();
        handler = new NoUnboundElementsBindHandler(handler, filter);
    }
    return handler;
}
1
2
3
4
5
6
7
8
9
10
11
12
13
14
15
16
17
18
19
20
21
22
23
24
- 关于 BindHandler 类,胖友不用深究,只要知道如下即可。</font>有时候,绑定时可能需要实现额外的逻辑,而BindHandler接口提供了一个很好的方法来实现这一点。 每个BindHandler都可以实现onStart,onSuccess,onFailure和onFinish方法来覆盖行为。</font>Spring Boot提供了一些处理程序,主要用于支持现有的@ConfigurationProperties绑定。 例如,ValidationBindHandler可用于对绑定对象应用Validator验证。```
- <3.3>
处,调用
Binder#bind(String name, Bindable target, BindHandler handler)
方法,将配置中,指定前缀(
prefix
)的属性,注入到 AbstractConfig 配置对象中。例如下图:
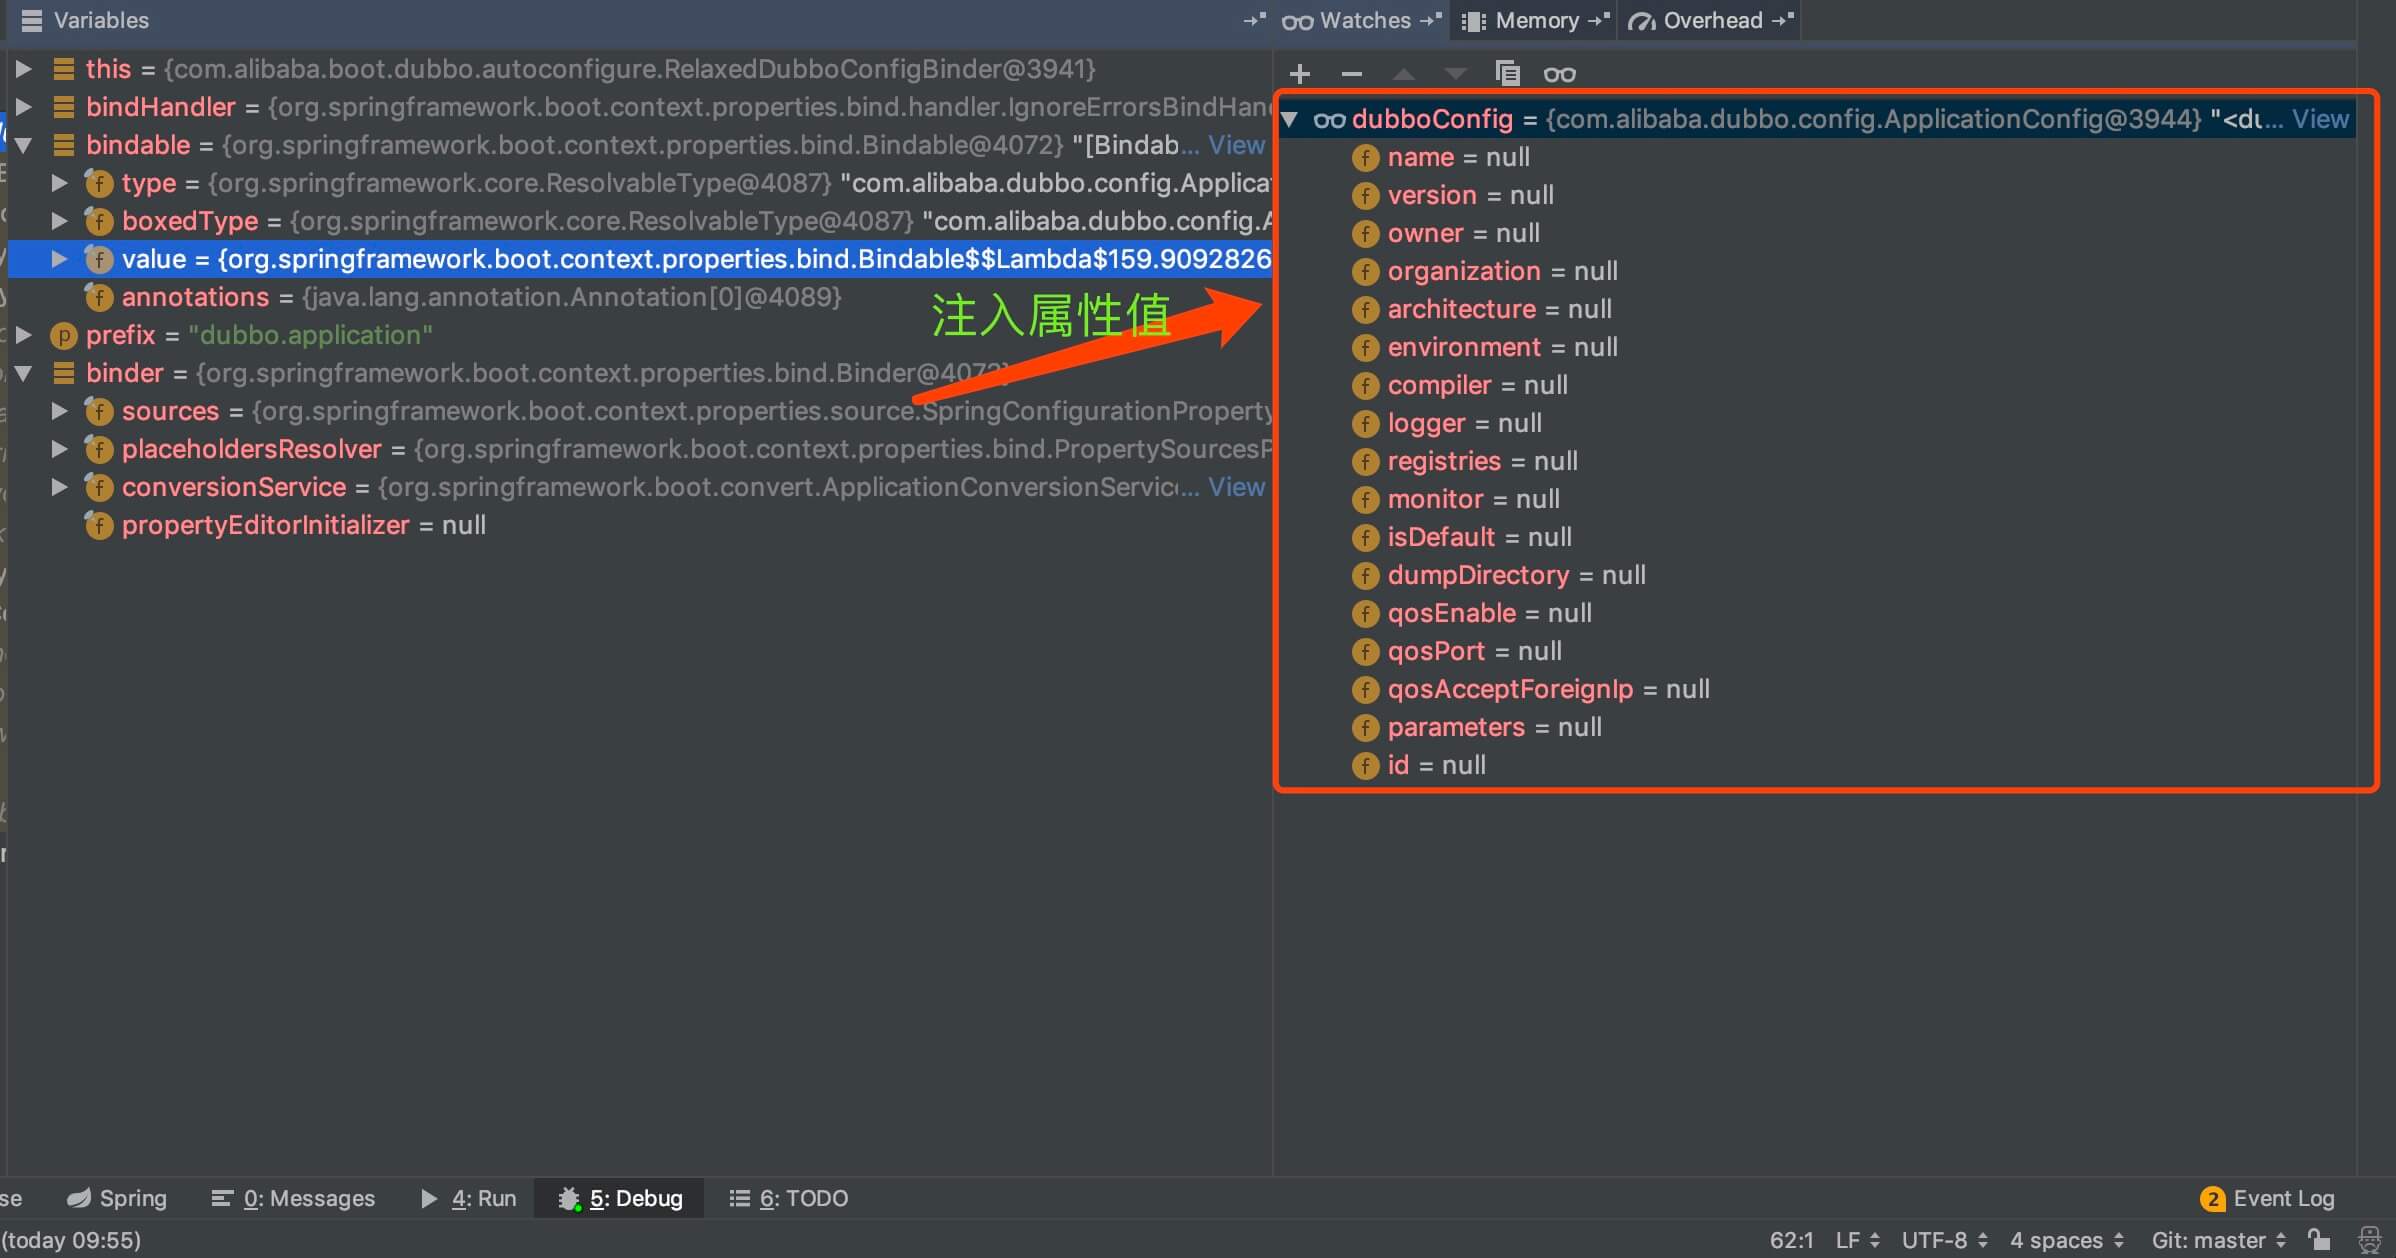
`dubboConfig` 属性
如下开始,是 env 包下。
## 4.3 DubboDefaultPropertiesEnvironmentPostProcessor
com.alibaba.boot.dubbo.env.DubboDefaultPropertiesEnvironmentPostProcessor ,实现 EnvironmentPostProcessor、Ordered 接口,生成 Dubbo 默认的配置,添加到 environment 中。而需要生成的 Dubbo 默认的配置如下:
```text
# 直接复用 spring.application.name
dubbo.application.name=
# 默认为 true
dubbo.config.multiple=true
# 默认为 false
dubbo.config.qos-enable=false
- 因此,我们只要配置了 “spring.application.name” 的属性, “dubbo.application.name” 就会自动生成。
4.3.1 postProcessEnvironment
实现 #postProcessEnvironment(ConfigurableEnvironment environment, SpringApplication application) 方法,自动生成 Dubbo 默认配置。代码如下:
1
2
3
4
5
6
7
8
9
10
11
12
13
// DubboDefaultPropertiesEnvironmentPostProcessor.java
@Override
public void postProcessEnvironment(ConfigurableEnvironment environment, SpringApplication application) {
    MutablePropertySources propertySources = environment.getPropertySources();
    // <1> 生成 Dubbo 默认配置
    Map<String, Object> defaultProperties = createDefaultProperties(environment);
    // <2> 有默认配置,则添加到 environment 中
    if (!CollectionUtils.isEmpty(defaultProperties)) {
        addOrReplace(propertySources, defaultProperties);
    }
}
- <1> 处,调用 #createDefaultProperties(ConfigurableEnvironment environment) 方法,生成 Dubbo 默认配置。代码如下:
1
2
3
4
5
6
7
8
9
10
11
12
13
14
15
16
17
18
19
20
21
22
23
24
25
26
27
28
29
30
31
32
33
34
35
36
37
38
39
40
41
42
43
44
45
46
47
48
49
50
51
52
53
54
55
56
57
58
// DubboDefaultPropertiesEnvironmentPostProcessor.java
/**
* The property name of Spring Application
*
* @see ContextIdApplicationContextInitializer
*/
private static final String SPRING_APPLICATION_NAME_PROPERTY = "spring.application.name";

/**
* The property name of {@link ApplicationConfig}
*
* @see EnableDubboConfig
* @see EnableDubboConfigBinding
*/
private static final String DUBBO_APPLICATION_NAME_PROPERTY = "dubbo.application.name";

/**
* The property name of
{
    @link EnableDubboConfig#multiple();
}
* @EnableDubboConfig.multiple()
*/
private static final String DUBBO_CONFIG_MULTIPLE_PROPERTY = "dubbo.config.multiple";

/**
* The property name of
{
    @link ApplicationConfig#getQosEnable() application's QOS enable;
}
*/
private static final String DUBBO_APPLICATION_QOS_ENABLE_PROPERTY = "dubbo.application.qos-enable";

private Map<String, Object> createDefaultProperties(ConfigurableEnvironment environment) {
    Map<String, Object> defaultProperties = new HashMap<String, Object>();
    // "dubbo.application.name"
    setDubboApplicationNameProperty(environment, defaultProperties);
    // "dubbo.config.multiple"
    setDubboConfigMultipleProperty(defaultProperties);
    // "dubbo.application.qos-enable"
    setDubboApplicationQosEnableProperty(defaultProperties);
    return defaultProperties;
}

private void setDubboApplicationNameProperty(Environment environment, Map<String, Object> defaultProperties) {
    String springApplicationName = environment.getProperty(SPRING_APPLICATION_NAME_PROPERTY);
    if (StringUtils.hasLength(springApplicationName) && !environment.containsProperty(DUBBO_APPLICATION_NAME_PROPERTY)) {
        defaultProperties.put(DUBBO_APPLICATION_NAME_PROPERTY, springApplicationName);
    }
}

private void setDubboConfigMultipleProperty(Map<String, Object> defaultProperties) {
    defaultProperties.put(DUBBO_CONFIG_MULTIPLE_PROPERTY, Boolean.TRUE.toString());
}

private void setDubboApplicationQosEnableProperty(Map<String, Object> defaultProperties) {
    defaultProperties.put(DUBBO_APPLICATION_QOS_ENABLE_PROPERTY, Boolean.FALSE.toString());
}
1
2
3
4
5
6
7
8
9
10
11
12
13
14
15
16
17
18
19
20
21
22
23
24
25
26
27
28
29
30
31
32
33
34
35
- 虽然比较长,但是比较简单。```

- <2>
处,有 Dubbo 默认配置,则添加到
environment
中。代码如下:

```java
// DubboDefaultPropertiesEnvironmentPostProcessor.java
private static final String PROPERTY_SOURCE_NAME = "defaultProperties";

private void addOrReplace(MutablePropertySources propertySources, Map<String, Object> map) {
    // 情况一,获得到 "defaultProperties" 对应的 PropertySource 对象,则进行替换
    MapPropertySource target = null;
    if (propertySources.contains(PROPERTY_SOURCE_NAME)) {
        PropertySource<?> source = propertySources.get(PROPERTY_SOURCE_NAME);
        if (source instanceof MapPropertySource) {
            // 找到
            target = (MapPropertySource) source;
            // 遍历 map 数组,进行替换到 "defaultProperties" 中
            for (String key : map.keySet()) {
                if (!target.containsProperty(key)) {
                    target.getSource().put(key, map.get(key));
                }
            }
        }
    }
    // 情况二,不存在 "defaultProperties" 对应的 PropertySource 对象,则进行添加
    if (target == null) {
        target = new MapPropertySource(PROPERTY_SOURCE_NAME, map);
    }
    if (!propertySources.contains(PROPERTY_SOURCE_NAME)) {
        propertySources.addLast(target);
    }
}
1
2
3
4
5
6
7
8
9
10
11
12
13
14
15
16
17
18
19
20
21
22
23
24
25
26
27
28
29
30
31
32
33
34
35
36
37
38
39
40
41
42
43
44
45
46
47
48
49
50
51
52
53
54
55
56
57
58
59
60
61
62
- 分成两种情况,也比较简单。胖友自己瞅瞅~```

如下开始,是 context.event 包下。

## 4.4 WelcomeLogoApplicationListener

com.alibaba.boot.dubbo.context.event.WelcomeLogoApplicationListener ,实现 ApplicationListener 接口,处理 ApplicationEnvironmentPreparedEvent 事件,从而打印 Dubbo Banner 文本。代码如下:

```java
// WelcomeLogoApplicationListener.java
@Order(LoggingApplicationListener.DEFAULT_ORDER + 1)
public class WelcomeLogoApplicationListener implements ApplicationListener<ApplicationEnvironmentPreparedEvent> {
    /**
    * 是否执行过
    *
    * 通过该变量,保证有且仅处理一次 ApplicationEnvironmentPreparedEvent 事件
    */
    private static AtomicBoolean processed = new AtomicBoolean(false);

    @Override
    public void onApplicationEvent(ApplicationEnvironmentPreparedEvent event) {
        // Skip if processed before, prevent duplicated execution in Hierarchical ApplicationContext
        // 如果已经处理,则直接跳过
        if (processed.get()) {
            return;
        }
        // 获得 Logger 对象
        /**
        * Gets Logger After LoggingSystem configuration ready
        *
        * @see LoggingApplicationListener
        */
        final Logger logger = LoggerFactory.getLogger(getClass());
        // 获得 Dubbo Banner 文本
        String bannerText = buildBannerText();
        if (logger.isInfoEnabled()) {
            logger.info(bannerText);
        } else {
            System.out.print(bannerText);
        }
        // mark processed to be true
        // 标记已执行
        processed.compareAndSet(false, true);
    }

    String buildBannerText() {
        StringBuilder bannerTextBuilder = new StringBuilder();
        bannerTextBuilder
        .append(LINE_SEPARATOR)
        .append(LINE_SEPARATOR)
        .append(" :: Dubbo Spring Boot (v").append(Version.getVersion(getClass(), "1.0.0")).append(") : ")
        .append(DUBBO_SPRING_BOOT_GITHUB_URL)
        .append(LINE_SEPARATOR)
        .append(" :: Dubbo (v").append(Version.getVersion()).append(") : ")
        .append(DUBBO_GITHUB_URL)
        .append(LINE_SEPARATOR)
        .append(" :: Discuss group : ")
        .append(DUBBO_MAILING_LIST)
        .append(LINE_SEPARATOR);
        return bannerTextBuilder.toString();
    }
}
- 简单,就不多做解释了。
4.5 OverrideDubboConfigApplicationListener
com.alibaba.boot.dubbo.context.event.OverrideDubboConfigApplicationListener ,实现 ApplicationListener 接口,也是处理 ApplicationEnvironmentPreparedEvent 事件,根据 “dubbo.config.override” 的属性值,若为 true 时,则覆盖 environment 中 “dubbo.” 开头的配置,添加到 Dubbo Properties 对象中。代码如下:
1
2
3
4
5
6
7
8
9
10
11
12
13
14
15
16
17
18
19
20
21
22
23
24
25
26
27
28
29
30
31
32
33
34
35
36
37
38
39
40
// OverrideDubboConfigApplicationListener.java
@Order // LOWEST_PRECEDENCE Make sure last execution
public class OverrideDubboConfigApplicationListener implements ApplicationListener<ApplicationEnvironmentPreparedEvent> {
    @Override
    public void onApplicationEvent(ApplicationEnvironmentPreparedEvent event) {
        // 获得 Logger 对象
        /**
        * Gets Logger After LoggingSystem configuration ready
        *
        * @see LoggingApplicationListener
        */
        final Logger logger = LoggerFactory.getLogger(getClass());
        // <1> 获得 "dubbo.config.override" 属性对应的值。默认情况下为 true
        ConfigurableEnvironment environment = event.getEnvironment();
        boolean override = environment.getProperty(OVERRIDE_CONFIG_PROPERTY_NAME, boolean.class, DEFAULT_OVERRIDE_CONFIG_PROPERTY_VALUE);
        // <2> 如果要重写,则覆盖添加到 Dubbo Properties 中
        if (override) {
            // <2.1> 从 environment 中,提取 "dubbo." 开头的配置
            SortedMap<String, Object> dubboProperties = filterDubboProperties(environment);
            // <2.2> 添加到 Dubbo Properties 中
            ConfigUtils.getProperties().putAll(dubboProperties);
            if (logger.isInfoEnabled()) {
                logger.info("Dubbo Config was overridden by externalized configuration
                {
                }
                ", dubboProperties);
            }
        } else {
            if (logger.isInfoEnabled()) {
                logger.info("Disable override Dubbo Config caused by property
                {
                } =
                {
                }
            }
            ", OVERRIDE_CONFIG_PROPERTY_NAME, override);
        }
    }
}
}
- <1> 处,获得 “dubbo.config.override” 属性对应的值。默认情况下为 true 。代码如下:
1
2
3
4
5
6
7
8
9
10
11
12
13
14
15
16
// DubboUtils.java
/**
* The property name of override Dubbo config
* <p>
* The default value is
{
    @link #DEFAULT_OVERRIDE_CONFIG_PROPERTY_VALUE;
}
*/
public static final String OVERRIDE_CONFIG_PROPERTY_NAME = DUBBO_CONFIG_PREFIX + PROPERTY_NAME_SEPARATOR + "override";

/**
* The default property value of override Dubbo config
*/
public static final boolean DEFAULT_OVERRIDE_CONFIG_PROPERTY_VALUE = true;
- <2> 处,如果要重写,则覆盖添加到 Dubbo Properties 中。
- <2.1> 处,调用 DubboUtils#filterDubboProperties(ConfigurableEnvironment environment) 方法,从 environment 中,提取 “dubbo.” 开头的配置。代码如下:
1
2
3
4
5
6
7
8
9
10
11
12
13
14
15
16
17
18
19
20
21
22
23
24
25
26
27
28
29
30
31
32
33
34
35
36
37
// DubboUtils.java
/**
* The separator of property name
*/
public static final String PROPERTY_NAME_SEPARATOR = ".";

/**
* The prefix of property name of Dubbo
*/
public static final String DUBBO_PREFIX = "dubbo";

/**
* Filters Dubbo Properties from
{
    @link ConfigurableEnvironment;
}
*
* @param environment
{
    @link ConfigurableEnvironment;
}
* @return Read-only SortedMap
*/
public static SortedMap<String, Object> filterDubboProperties(ConfigurableEnvironment environment) {
    SortedMap<String, Object> dubboProperties = new TreeMap<>();
    // 获得所有的配置
    Map<String, Object> properties = EnvironmentUtils.extractProperties(environment);
    // 遍历配置,如果以 "dubbo." 开头,则添加到 dubboProperties 中
    for (Map.Entry<String, Object> entry : properties.entrySet()) {
        String propertyName = entry.getKey();
        if (propertyName.startsWith(DUBBO_PREFIX + PROPERTY_NAME_SEPARATOR) && entry.getValue() != null) {
            dubboProperties.put(propertyName, entry.getValue().toString());
        }
    }
    // 返回 dubboProperties
    return Collections.unmodifiableSortedMap(dubboProperties);
}
1
2
3
4
5
6
7
8
9
10
11
12
13
14
15
16
17
18
19
20
21
22
23
24
25
26
27
28
29
30
31
32
- 其中,</font>EnvironmentUtils#extractProperties(ConfigurableEnvironment environment)</font> 方法,获得所有的配置。考虑到篇幅就不赘述,艿艿已经添加注释,点击 </font>[链接](https://github.com/YunaiV/incubator-dubbo-spring-boot-project/blob/master/dubbo-spring-boot-autoconfigure/src/main/java/com/alibaba/boot/dubbo/util/EnvironmentUtils.java) 查看。```

- <2.2>
处,调用 Dubbo 的
ConfigUtils#getProperties()
方法,获得 Dubbo Properties 。然后再将
dubboProperties
变量,添加到 Dubbo Properties 中。

## 4.6 AwaitingNonWebApplicationListener

com.alibaba.boot.dubbo.context.event.AwaitingNonWebApplicationListener ,实现 SmartApplicationListener 接口,实现在非 Web 的环境下,提供 JVM 不退出关闭的功能,即 JVM 一直运行着。

胖友可以试试,启动一个非 Web 环境的 Spring Boot 应用,然后会发现,JVM 会在启动完 Spring Boot 应用后,自动关闭。

### 4.6.1 supportsEventType

实现 #supportsEventType(Class<? extends ApplicationEvent> eventType) 方法,判断支持的事件类型是 ApplicationReadyEvent 和 ContextClosedEvent 。代码如下:

```java
// AwaitingNonWebApplicationListener.java
private static final Class<? extends ApplicationEvent>[] SUPPORTED_APPLICATION_EVENTS =
of(ApplicationReadyEvent.class, ContextClosedEvent.class);

@Override
public boolean supportsEventType(Class<? extends ApplicationEvent> eventType) {
    return ObjectUtils.containsElement(SUPPORTED_APPLICATION_EVENTS, eventType);
}

private static <T> T[] of(T... values) {
    return values;
}
- 为什么呢,我们接着往下看。
4.6.2 supportsSourceType
实现 #supportsSourceType(Class<?> sourceType) 方法,判断支持的事件来源。代码如下:
1
2
3
4
5
6
7
// AwaitingNonWebApplicationListener.java
@Override
public boolean supportsSourceType(Class<?> sourceType) {
    return true;
}
- 全部返回 true ,意味支持所有的事件来源。
4.6.3 onApplicationEvent
1
2
3
4
5
6
7
8
9
10
11
// AwaitingNonWebApplicationListener.java
@Override
public void onApplicationEvent(ApplicationEvent event) {
    if (event instanceof ApplicationReadyEvent) {
        onApplicationReadyEvent((ApplicationReadyEvent) event); // <1>
    } else if (event instanceof ContextClosedEvent) {
        onContextClosedEvent((ContextClosedEvent) event); // <2>
    }
}
- <1>「4.6.3.1 onApplicationReadyEvent」 处,当是 ApplicationReadyEvent 事件时,调用 #onApplicationReadyEvent(ApplicationReadyEvent event) 方法,处理 ApplicationReadyEvent 事件。详细解析,见 。
- <2>「4.6.3.2 onContextClosedEvent」 处,当是 ContextClosedEvent 事件时,调用 #onApplicationReadyEvent(ContextClosedEvent event) 方法,处理 ApplicationReadyEvent 事件。详细解析,见 。
4.6.3.1 onApplicationReadyEvent
#onApplicationReadyEvent(ApplicationReadyEvent event) 方法,处理 ApplicationReadyEvent 事件。代码如下:
1
2
3
4
5
6
7
8
9
10
// AwaitingNonWebApplicationListener.java
protected void onApplicationReadyEvent(ApplicationReadyEvent event) {
    // <1> 如果是 Web 环境,则直接返回
    final SpringApplication springApplication = event.getSpringApplication();
    if (!WebApplicationType.NONE.equals(springApplication.getWebApplicationType())) {
        return;
    }
    // <2> 启动一个用户线程,从而实现等待
    await();
}
- <1> 处,如果是 Web 环境,则直接返回。因为,已经提供了 JVM 不退出关闭的功能。
- <2> 处,调用 #await() 方法,启动一个用户线程,从而实现等待。代码如下:
1
2
3
4
5
6
7
8
9
10
11
12
13
14
15
16
17
18
19
20
21
22
23
24
25
26
27
28
29
30
31
32
33
34
35
36
37
38
39
40
// AwaitingNonWebApplicationListener.java
/**
* 是否已经等待完成
*/
private static final AtomicBoolean awaited = new AtomicBoolean(false);

private final Lock lock = new ReentrantLock();
private final Condition condition = lock.newCondition();
private final ExecutorService executorService = Executors.newSingleThreadExecutor();

protected void await() {
    // has been waited, return immediately
    // 如果已经处于阻塞等待,直接返回
    if (awaited.get()) {
        return;
    }
    // 创建任务,实现阻塞
    executorService.execute(() -> executeMutually(() -> {
        while (!awaited.get()) {
            if (logger.isInfoEnabled()) {
                logger.info(" [Dubbo] Current Spring Boot Application is await...");
            }
            try {
                condition.await();
            } catch (InterruptedException e) {
                Thread.currentThread().interrupt();
            }
        }
    }));
}

private void executeMutually(Runnable runnable) {
    try {
        lock.lock();
        // <X> 执行
        runnable.run();
    } finally {
        lock.unlock();
    }
}
1
2
3
4
5
6
7
8
9
10
11
12
13
14
15
16
- 基于 Lock + Condition 实现等待通知。- #executeMutually(Runnable runnable)</font> 方法,被 </font>executorService</font> 创建任务所调用。而该任务因为调用 </font>Condition#await()</font> 方法,阻塞等待。那么此时,JVM 至少有一个该用户线程未运行结束,那么此时 </font>[JVM 关闭的条件](https://blog.csdn.net/hongxingxiaonan/article/details/50528041) 不被满足,所以就不会退出。```

### 4.6.3.2 onApplicationReadyEvent

#onApplicationReadyEvent(ContextClosedEvent event) 方法,处理 ContextClosedEvent 事件。代码如下:

```java
// AwaitingNonWebApplicationListener.java
protected void onContextClosedEvent(ContextClosedEvent event) {
    // <1> 释放
    release();
    // <2> 关闭线程池
    shutdown();
}
- <1> 处,调用 #release() 方法,进行释放。代码如下:
1
2
3
4
5
6
7
8
9
10
11
12
13
// AwaitingNonWebApplicationListener.java
protected void release() {
    executeMutually(() -> {
        // CAS 设置 awaited 为 true
        while (awaited.compareAndSet(false, true)) {
            if (logger.isInfoEnabled()) {
                logger.info(" [Dubbo] Current Spring Boot Application is about to shutdown...");
            }
            // 通知 Condition
            condition.signalAll();
        }
    });
}
1
2
3
4
5
6
7
8
9
10
11
12
13
14
15
16
17
- 通过调用 </font>Condition#signalAll()</font> 方法,通知 Condition 。从而在 </font>[「4.6.3.1 onApplicationReadyEvent」](http://svip.iocoder.cn/Dubbo/configuration-Externalized/#) 中,启动的线程的阻塞,进行停止。```

- <2>
处,调用
#shutdown()
方法,关闭线程池。代码如下:

```java
// AwaitingNonWebApplicationListener.java
private void shutdown() {
    if (!executorService.isShutdown()) {
        // Shutdown executorService
        executorService.shutdown();
    }
}
5. dubbo-spring-boot-actuator 源码
dubbo-spring-boot-autoconfigure
模块,所有类如下图:
dubbo-spring-boot-autoconfigure 模块
5.1 使用指南
使用时,需要导入 dubbo-spring-boot-actuator 依赖。即如下:
1
2
3
4
5
6
7
8
9
10
11
12
<!-- 导入 WEB 环境 --><dependency>
  <groupId>org.springframework.boot</groupId>
  <artifactId>spring-boot-starter-web</artifactId>
</dependency>
<!-- 导入 Spring Boot Actuator --><dependency>
  <groupId>org.springframework.boot</groupId>
  <artifactId>spring-boot-starter-actuator</artifactId>
</dependency>
<!-- 导入 Dubbo Spring Boot Actuator --><dependency>
  <groupId>com.alibaba.boot</groupId>
  <artifactId>dubbo-spring-boot-actuator</artifactId>
</dependency>
| 观看本小节,胖友需要对 Spring Boot Actuator 有相关的了解。如果不知道,可以看看 [《一起来学 SpringBoot 2.x | 第十四篇:强大的 Actuator 服务监控与管理》](http://www.iocoder.cn/Spring-Boot/battcn/v2-actuator-introduce/) 文章。 |
另外,《Dubbo 官方文档 —— Dubbo Spring Boot Production-Ready》 文章,也是需要先瞅瞅的。
如果胖友使用的是 Spring Boot 2,有一个坑要注意,因为 《Spring Boot 2.0 的 Actuator 只暴露 health 和 info》 ,所以需要手动在配置文件中,添加要开启的 Dubbo Endpoint 。例如:
1
2
3
# application.properties

management.endpoints.web.exposure.include=health,info,dubbo,dubboconfigs
- 此时,我们多开启了 dubbo 和 dubboconfigs 这两个 EndPoint 。T T 坑了自己好久~
如下开始,是 autoconfigure 包下。
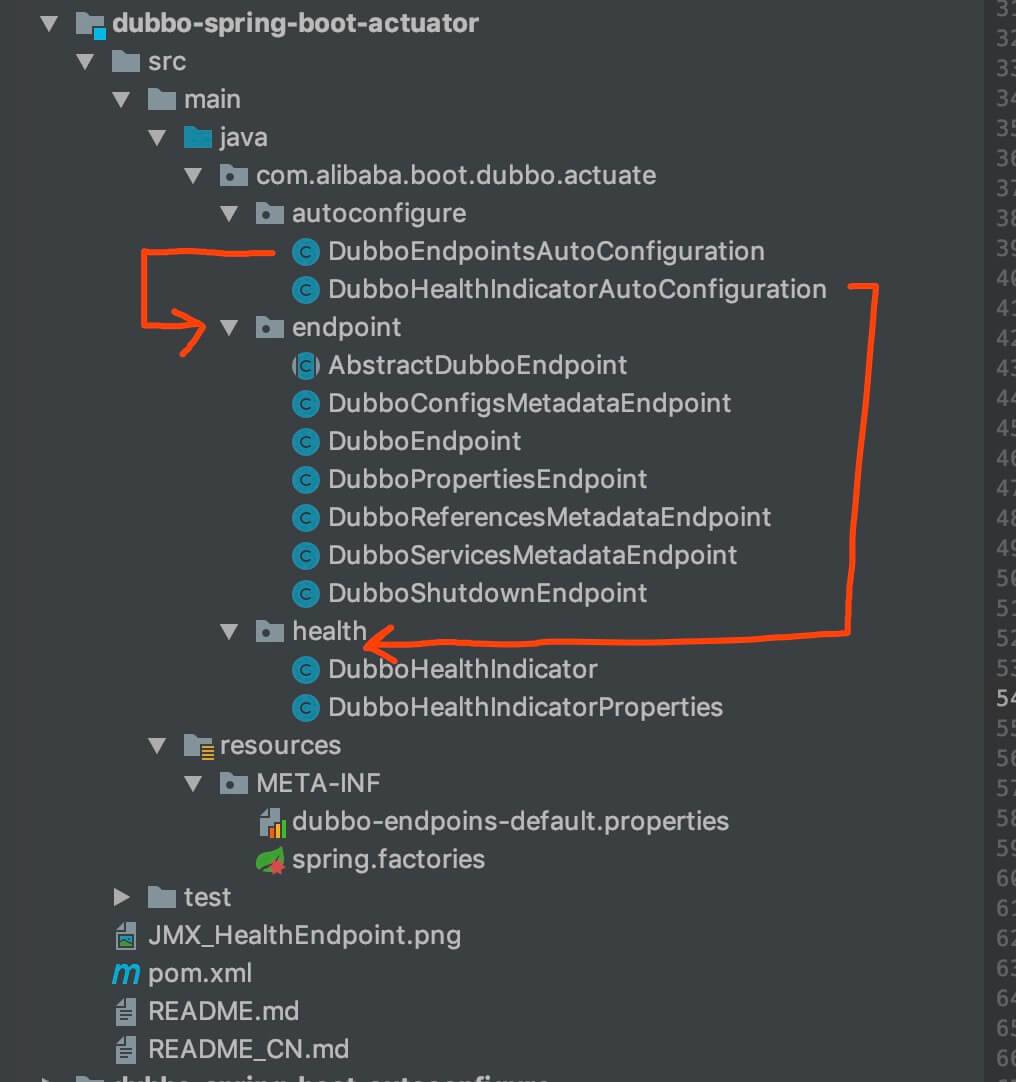
5.2 DubboEndpointsAutoConfiguration
com.alibaba.boot.dubbo.actuate.autoconfigure.DubboEndpointsAutoConfiguration ,Dubbo Endpoint 自动配置类。代码如下:
1
2
3
4
5
6
7
8
9
10
11
12
13
14
15
16
17
18
19
20
21
22
23
24
25
26
27
28
29
30
31
32
33
34
35
36
37
38
39
40
41
42
43
44
45
46
47
// DubboEndpointsAutoConfiguration.java
@Configuration
@PropertySource(name = "Dubbo Endpoints Default Properties", value = "classpath:/META-INF/dubbo-endpoins-default.properties")
// 导入该配置文件
public class DubboEndpointsAutoConfiguration {
    @Bean
    @ConditionalOnMissingBean
    @ConditionalOnEnabledEndpoint
    public DubboEndpoint dubboEndpoint() {
        return new DubboEndpoint();
    }

    @Bean
    @ConditionalOnMissingBean
    @ConditionalOnEnabledEndpoint
    public DubboConfigsMetadataEndpoint dubboConfigsMetadataEndpoint() {
        return new DubboConfigsMetadataEndpoint();
    }

    @Bean
    @ConditionalOnMissingBean
    @ConditionalOnEnabledEndpoint
    public DubboPropertiesEndpoint dubboPropertiesEndpoint() {
        return new DubboPropertiesEndpoint();
    }

    @Bean
    @ConditionalOnMissingBean
    @ConditionalOnEnabledEndpoint
    public DubboReferencesMetadataEndpoint dubboReferencesMetadataEndpoint() {
        return new DubboReferencesMetadataEndpoint();
    }

    @Bean
    @ConditionalOnMissingBean
    @ConditionalOnEnabledEndpoint
    public DubboServicesMetadataEndpoint dubboServicesMetadataEndpoint() {
        return new DubboServicesMetadataEndpoint();
    }

    @Bean
    @ConditionalOnMissingBean
    @ConditionalOnEnabledEndpoint
    public DubboShutdownEndpoint dubboShutdownEndpoint() {
        return new DubboShutdownEndpoint();
    }
}
- 每个方法,创建一个 Dubbo Endpint Bean 。一共有 6 个。
- @PropertySource 注解,导入 “classpath:/META-INF/dubbo-endpoins-default.properties” 配置文件。代码如下:
1
2
3
4
5
6
7
8
9
10
11
12
13
14
15
16
17
18
19
20
21
22
# dubbo-endpoins-default.properties

# Dubbo Endpoints Default Properties is loaded by @PropertySource with low order,
# those values of properties can be override by higher PropertySource
# @see DubboEndpointsAutoConfiguration

# Set enabled for Dubbo Endpoints 设置 Dubbo Endpoints 是否开启
management.endpoint.dubbo.enabled = true
management.endpoint.dubboshutdown.enabled = false
management.endpoint.dubboconfigs.enabled = true
management.endpoint.dubboservices.enabled = false
management.endpoint.dubboreferences.enabled = false
management.endpoint.dubboproperties.enabled = true

# "management.endpoints.web.base-path" should not be configured in this file

# Re-defines path-mapping of Dubbo Web Endpoints 重命名 Dubbo Web Endpoints 路径
management.endpoints.web.path-mapping.dubboshutdown = dubbo/shutdown
management.endpoints.web.path-mapping.dubboconfigs = dubbo/configs
management.endpoints.web.path-mapping.dubboservices = dubbo/services
management.endpoints.web.path-mapping.dubboreferences = dubbo/references
management.endpoints.web.path-mapping.dubboproperties = dubbo/properties
5.3 DubboHealthIndicatorAutoConfiguration
com.alibaba.boot.dubbo.actuate.autoconfigure.DubboHealthIndicatorAutoConfiguration ,Dubbo Health Indicator 自动配置类。代码如下:
1
2
3
4
5
6
7
8
9
10
11
12
13
14
15
16
17
18
19
20
21
22
// DubboHealthIndicatorAutoConfiguration.java
@Configuration
@ConditionalOnClass(
{
    HealthIndicator.class;
}
) // 存在 HealthIndicator 类的情况
@AutoConfigureBefore(
{
    EndpointAutoConfiguration.class;
}
) // 在 EndpointAutoConfiguration 自动配置类之前初始化
@AutoConfigureAfter(DubboAutoConfiguration.class) // 在 DubboAutoConfiguration 自动配置类之后初始化
@ConditionalOnEnabledHealthIndicator("dubbo")
@EnableConfigurationProperties(DubboHealthIndicatorProperties.class) // 自动配置 DubboHealthIndicatorProperties 类
public class DubboHealthIndicatorAutoConfiguration {
    @Bean
    @ConditionalOnMissingBean
    public DubboHealthIndicator dubboHealthIndicator() {
        return new DubboHealthIndicator();
    }
}
- 每个注解,看后面的代码注释。
- 唯一的方法,创建 DubboHealthIndicator Bean 对象。详细解析,见 「5.5 DubboHealthIndicator」 。
5.4 DubboHealthIndicatorProperties
com.alibaba.boot.dubbo.actuate.health.DubboHealthIndicatorProperties ,Dubbo Health Indicator Properties 类。代码代码如下:
1
2
3
4
5
6
7
8
9
10
11
12
13
14
15
16
17
18
19
20
21
22
23
24
25
26
27
28
29
30
31
32
33
34
35
36
37
38
39
40
41
42
43
44
45
46
47
48
49
50
51
52
53
54
55
// DubboHealthIndicatorProperties.java
@ConfigurationProperties(prefix = PREFIX, ignoreUnknownFields = false) // "management.health.dubbo" 开头的配置
public class DubboHealthIndicatorProperties {
    /**
    * The prefix of
    {
        @link DubboHealthIndicatorProperties;
    }
    */
    public static final String PREFIX = "management.health.dubbo";

    private Status status = new Status();

    // ... 省略 setting/getting 方法

    /**
    * The nested class for
    {
        @link StatusChecker;
    }
    's names
    * <pre>
    * registry=com.alibaba.dubbo.registry.status.RegistryStatusChecker
    * spring=com.alibaba.dubbo.config.spring.status.SpringStatusChecker
    * datasource=com.alibaba.dubbo.config.spring.status.DataSourceStatusChecker
    * memory=com.alibaba.dubbo.common.status.support.MemoryStatusChecker
    * load=com.alibaba.dubbo.common.status.support.LoadStatusChecker
    * server=com.alibaba.dubbo.rpc.protocol.dubbo.status.ServerStatusChecker
    * threadpool=com.alibaba.dubbo.rpc.protocol.dubbo.status.ThreadPoolStatusChecker
    * </pre>
    *
    * @see StatusChecker
    */
    public static class Status {
        /**
        * The defaults names of {@link StatusChecker}
        * <p>
        * The defaults : "memory", "load"
        */
        private Set<String> defaults = new LinkedHashSet<>(Arrays.asList("memory", "load"));

        /**
        * The extra names of {@link StatusChecker}
        *
        * 配置的 "management.health.dubbo.extras" 集合
        *
        * 每个元素,是 StatusChecker 的实现类
        */
        private Set<String> extras = new LinkedHashSet<>();

        // ... 省略 setting/getting 方法
    }
}
- 读取以 “management.health.dubbo” 开头的配置。
如下开始,是 health 包下。
5.5 DubboHealthIndicator
com.alibaba.boot.dubbo.actuate.health.DubboHealthIndicator ,继承 AbstractHealthIndicator 抽象类,Dubbo Health Indicator 实现类。代码如下:
5.4.1 doHealthCheck
实现 #doHealthCheck(Health.Builder builder) 方法,执行健康检查。代码如下:
在请求 /actuator/health 接口时,也会调用该方法。
1
2
3
4
5
6
7
8
9
10
11
12
13
14
15
16
17
18
19
20
21
22
23
24
25
26
27
28
29
30
31
32
33
34
35
36
37
38
39
40
41
42
43
44
45
46
// DubboHealthIndicator.java
@Override
protected void doHealthCheck(Health.Builder builder) throws Exception {
    // <1> 获得 StatusChecker 对应的 Dubbo ExtensionLoader 对象
    ExtensionLoader<StatusChecker> extensionLoader = getExtensionLoader(StatusChecker.class);
    // <2> 解析 StatusChecker 的名字的 Map
    Map<String, String> statusCheckerNamesMap = resolveStatusCheckerNamesMap();
    // <3> 声明 hasError、hasUnknown 变量
    boolean hasError = false; // 是否有错误的返回
    boolean hasUnknown = false; // 是否有未知的返回
    // Up first
    // <4> 先 builder 标记状态是 UP
    builder.up();
    // <5> 遍历 statusCheckerNamesMap 元素
    for (Map.Entry<String, String> entry : statusCheckerNamesMap.entrySet()) {
        // <6.1> 获得 StatusChecker 的名字
        String statusCheckerName = entry.getKey();
        // <6.2> 获得 source
        String source = entry.getValue();
        // <6.3> 获得 StatusChecker 对象
        StatusChecker checker = extensionLoader.getExtension(statusCheckerName);
        // <6.4> 执行校验
        com.alibaba.dubbo.common.status.Status status = checker.check();
        // <7.1> 获得校验结果
        com.alibaba.dubbo.common.status.Status.Level level = status.getLevel();
        // <7.2> 如果是 ERROR 检验结果,则标记 hasError 为 true ,并标记 builder 状态为 down
        if (!hasError // 不存在 hasError 的时候
        && level.equals(com.alibaba.dubbo.common.status.Status.Level.ERROR)) {
            hasError = true;
            builder.down();
        }
        // <7.3> 如果是 UNKNOWN 检验结果,则标记 hasUnknown 为 true ,并标记 builder 状态为 unknown
        if (!hasError && !hasUnknown // 不存在 hasError 且不存在 hasUnknown
        && level.equals(com.alibaba.dubbo.common.status.Status.Level.UNKNOWN)) {
            hasUnknown = true;
            builder.unknown();
        }
        // <8.1> 创建 detail Map
        Map<String, Object> detail = new LinkedHashMap<>();
        // <8.2> 设置 detail 属性值
        detail.put("source", source);
        detail.put("status", status); // 校验结果
        // <8.3> 添加到 builder 中
        builder.withDetail(statusCheckerName, detail);
    }
}
- 大体比较简单,胖友顺着注释来瞅瞅即可。
- <2>「5.4.2 resolveStatusCheckerNamesMap」 处,调用 #resolveStatusCheckerNamesMap() 方法,解析 StatusChecker 的名字的 Map 。因为这个对后续逻辑非常关键,所以胖友先跳到 中。看完之后,在回到此处。
- 最终返回 builder 的结果,如下图:
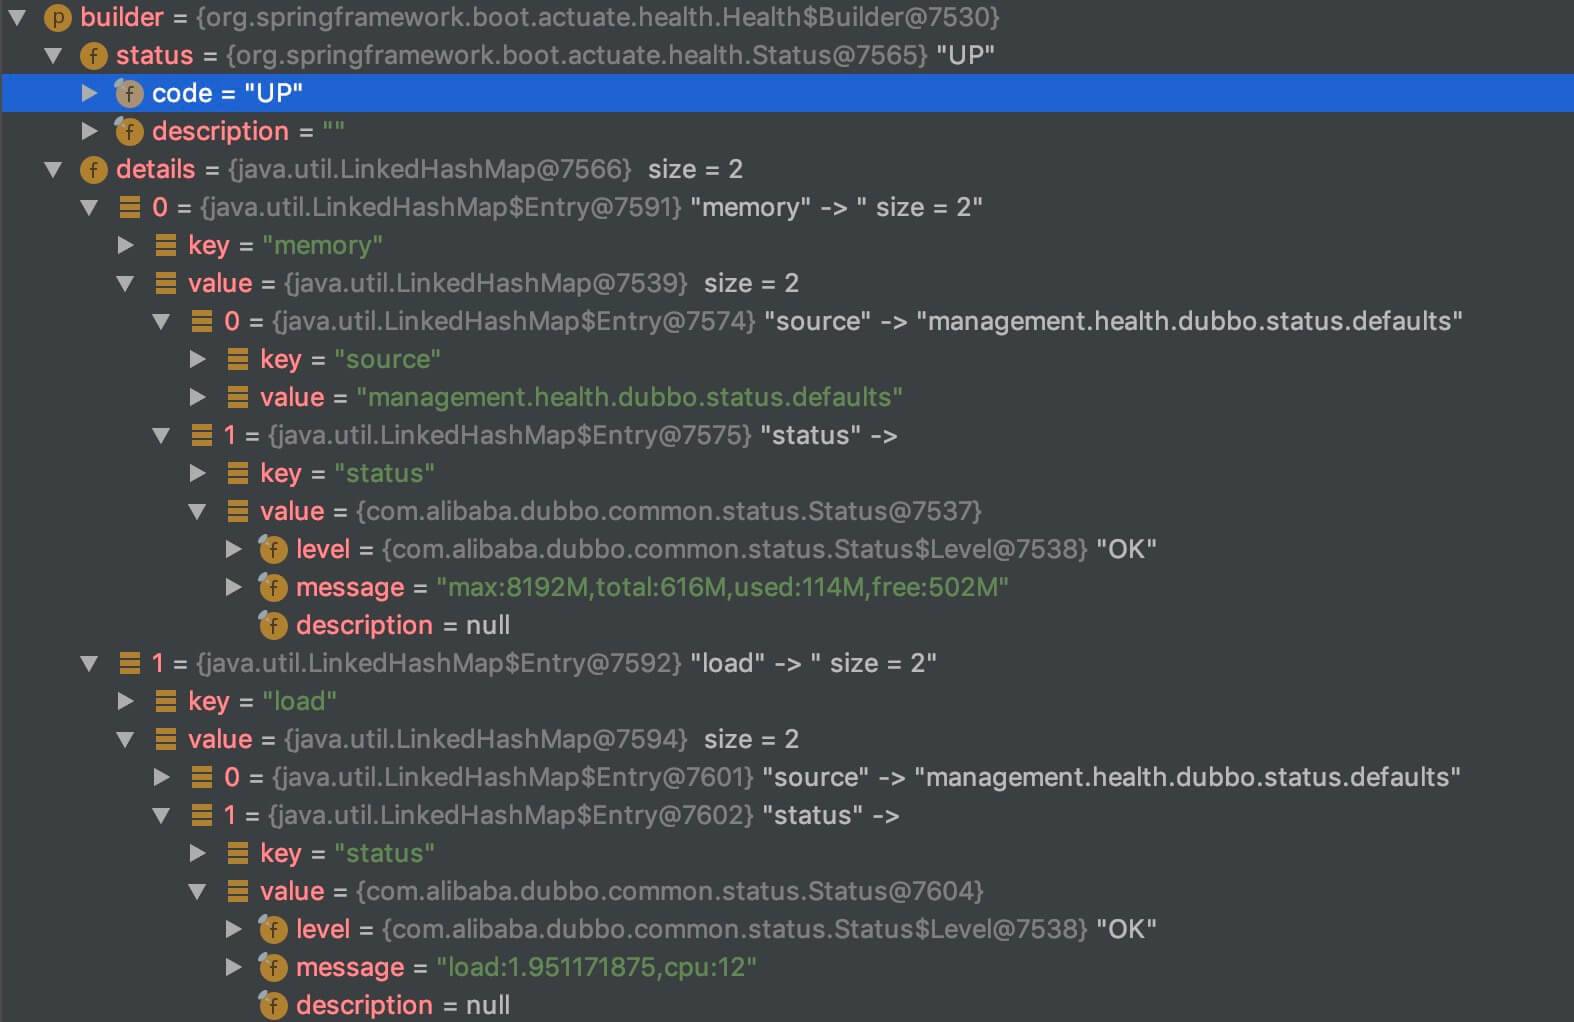
builder结果
5.4.2 resolveStatusCheckerNamesMap
#resolveStatusCheckerNamesMap() 方法,解析 StatusChecker 的名字的 Map。代码如下:
1
2
3
4
5
6
7
8
9
10
11
12
13
14
15
16
17
18
19
20
21
22
23
24
25
26
// DubboHealthIndicator.java
/**
* Resolves the map of
{
    @link StatusChecker;
}
's name and its' source.
*
* 解析 StatusChecker 的名字的 Map
*
* KEY:StatusChecker 的名字
* VALUE:配置的来源
*
* @return non-null {@link Map}
*/
protected Map<String, String> resolveStatusCheckerNamesMap() {
    // 创建 Map
    Map<String, String> statusCheckerNamesMap = new LinkedHashMap<>();
    // <1> 从 DubboHealthIndicatorProperties 中获取
    statusCheckerNamesMap.putAll(resolveStatusCheckerNamesMapFromDubboHealthIndicatorProperties());
    // <2> 从 ProtocolConfig 中获取
    statusCheckerNamesMap.putAll(resolveStatusCheckerNamesMapFromProtocolConfigs());
    // <3> 从 ProviderConfig 中获取
    statusCheckerNamesMap.putAll(resolveStatusCheckerNamesMapFromProviderConfig());
    return statusCheckerNamesMap;
}
- <1> 处,调用 #resolveStatusCheckerNamesMapFromDubboHealthIndicatorProperties() 方法,从 DubboHealthIndicatorProperties 中获取。代码如下:
1
2
3
4
5
6
7
8
9
10
11
12
13
14
15
16
17
18
19
// DubboHealthIndicator.java
@Autowired
private DubboHealthIndicatorProperties dubboHealthIndicatorProperties;

private Map<String, String> resolveStatusCheckerNamesMapFromDubboHealthIndicatorProperties() {
    // 获得 DubboHealthIndicatorProperties.Status
    DubboHealthIndicatorProperties.Status status = dubboHealthIndicatorProperties.getStatus();
    // 创建 Map
    Map<String, String> statusCheckerNamesMap = new LinkedHashMap<>();
    // 1. 读取 defaults 属性
    for (String statusName : status.getDefaults()) {
        statusCheckerNamesMap.put(statusName, PREFIX + ".status.defaults");
    }
    // 2. 读取 extras 属性
    for (String statusName : status.getExtras()) {
        statusCheckerNamesMap.put(statusName, PREFIX + ".status.extras");
    }
    return statusCheckerNamesMap;
}
- <2> 处,调用 #resolveStatusCheckerNamesMapFromProtocolConfigs() 方法,从 ProtocolConfig 中获取。代码如下:
1
2
3
4
5
6
7
8
9
10
11
12
13
14
15
16
17
18
19
20
21
22
23
24
25
26
27
28
29
30
31
32
33
34
35
36
37
38
39
// DubboHealthIndicator.java
@Autowired(required = false)
private Map<String, ProtocolConfig> protocolConfigs = Collections.emptyMap();

private Map<String, String> resolveStatusCheckerNamesMapFromProtocolConfigs() {
    // 创建 Map
    Map<String, String> statusCheckerNamesMap = new LinkedHashMap<>();
    // 遍历 protocolConfigs
    for (Map.Entry<String, ProtocolConfig> entry : protocolConfigs.entrySet()) {
        // 获得 Bean 的名字
        String beanName = entry.getKey();
        // 获得 ProtocolConfig 对象
        ProtocolConfig protocolConfig = entry.getValue();
        // 获得 ProtocolConfig 的 StatusChecker 的名字的集合
        Set<String> statusCheckerNames = getStatusCheckerNames(protocolConfig);
        // 遍历 statusCheckerNames 数组
        for (String statusCheckerName : statusCheckerNames) {
            // 构建 source 属性
            String source = buildSource(beanName, protocolConfig);
            // 添加到 statusCheckerNamesMap 中
            statusCheckerNamesMap.put(statusCheckerName, source);
        }
    }
    return statusCheckerNamesMap;
}

private Set<String> getStatusCheckerNames(ProtocolConfig protocolConfig) {
    String status = protocolConfig.getStatus();
    return StringUtils.commaDelimitedListToSet(status);
}

private Set<String> getStatusCheckerNames(ProviderConfig providerConfig) {
    String status = providerConfig.getStatus();
    return StringUtils.commaDelimitedListToSet(status);
}

private String buildSource(String beanName, Object bean) {
    return beanName + "@" + bean.getClass().getSimpleName() + ".getStatus()";
}
- <3> 处,调用 #resolveStatusCheckerNamesMapFromProviderConfig() 方法,从 ProviderConfig 中获取。代码如下:
1
2
3
4
5
6
7
8
9
10
11
12
13
14
15
16
17
18
19
20
21
22
23
24
25
// DubboHealthIndicator.java
@Autowired(required = false)
private Map<String, ProviderConfig> providerConfigs = Collections.emptyMap();

private Map<String, String> resolveStatusCheckerNamesMapFromProviderConfig() {
    // 创建 Map
    Map<String, String> statusCheckerNamesMap = new LinkedHashMap<>();
    // 遍历 providerConfigs
    for (Map.Entry<String, ProviderConfig> entry : providerConfigs.entrySet()) {
        // 获得 Bean 的名字
        String beanName = entry.getKey();
        // 获得 ProviderConfig 对象
        ProviderConfig providerConfig = entry.getValue();
        // 获得 ProtocolConfig 的 StatusChecker 的名字的集合
        Set<String> statusCheckerNames = getStatusCheckerNames(providerConfig);
        // 遍历 statusCheckerNames 数组
        for (String statusCheckerName : statusCheckerNames) {
            // 构建 source 属性
            String source = buildSource(beanName, providerConfig);
            // 添加到 statusCheckerNamesMap 中
            statusCheckerNamesMap.put(statusCheckerName, source);
        }
    }
    return statusCheckerNamesMap;
}
- 最终的结果,示例如下图:

statusCheckerNamesMap属性
如下开始,是 endpoint 包下。
5.6 AbstractDubboEndpoint
com.alibaba.boot.dubbo.actuate.endpoint.AbstractDubboEndpoint ,实现 ApplicationContextAware、EnvironmentAware 接口,Dubbo Endpoint 抽象类,提供给子类工具方法。
5.6.1 基本属性
1
2
3
4
5
6
7
8
9
10
11
12
13
14
15
16
17
// AbstractDubboEndpoint.java
protected ApplicationContext applicationContext;
protected ConfigurableEnvironment environment;

@Override
public void setApplicationContext(ApplicationContext applicationContext) throws BeansException {
    this.applicationContext = applicationContext;
}

@Override
public void setEnvironment(Environment environment) {
    if (environment instanceof ConfigurableEnvironment) {
        this.environment = (ConfigurableEnvironment) environment;
    }
}
5.6.2 resolveBeanMetadata
#resolveBeanMetadata(Object bean) 方法,获得 Bean 的元数据。代码如下:
1
2
3
4
5
6
7
8
9
10
11
12
13
14
15
16
17
18
19
20
21
22
23
24
25
26
27
28
29
30
31
32
33
34
35
// AbstractDubboEndpoint.java
protected Map<String, Object> resolveBeanMetadata(final Object bean) {
    // 创建 Map
    final Map<String, Object> beanMetadata = new LinkedHashMap<>();
    try {
        // 获得 BeanInfo 对象
        BeanInfo beanInfo = Introspector.getBeanInfo(bean.getClass());
        // 获得 PropertyDescriptor 数组
        PropertyDescriptor[] propertyDescriptors = beanInfo.getPropertyDescriptors();
        // 遍历 PropertyDescriptor 数组
        for (PropertyDescriptor propertyDescriptor : propertyDescriptors) {
            // 获得 Method 对象
            Method readMethod = propertyDescriptor.getReadMethod();
            // 读取属性,添加到 beanMetadata 中
            if (readMethod != null && isSimpleType(propertyDescriptor.getPropertyType())) {
                String name = Introspector.decapitalize(propertyDescriptor.getName());
                Object value = readMethod.invoke(bean);
                beanMetadata.put(name, value);
            }
        }
    } catch (Exception e) {
        throw new RuntimeException(e);
    }
    return beanMetadata;
}

private static boolean isSimpleType(Class<?> type) {
    return isPrimitiveOrWrapper(type) // 基本类型 or 包装类型
    || type == String.class
    || type == BigDecimal.class
    || type == BigInteger.class
    || type == Date.class
    || type == URL.class
    || type == Class.class;
}
- 目的是读取 Bean 的基本属性。示例如下图:
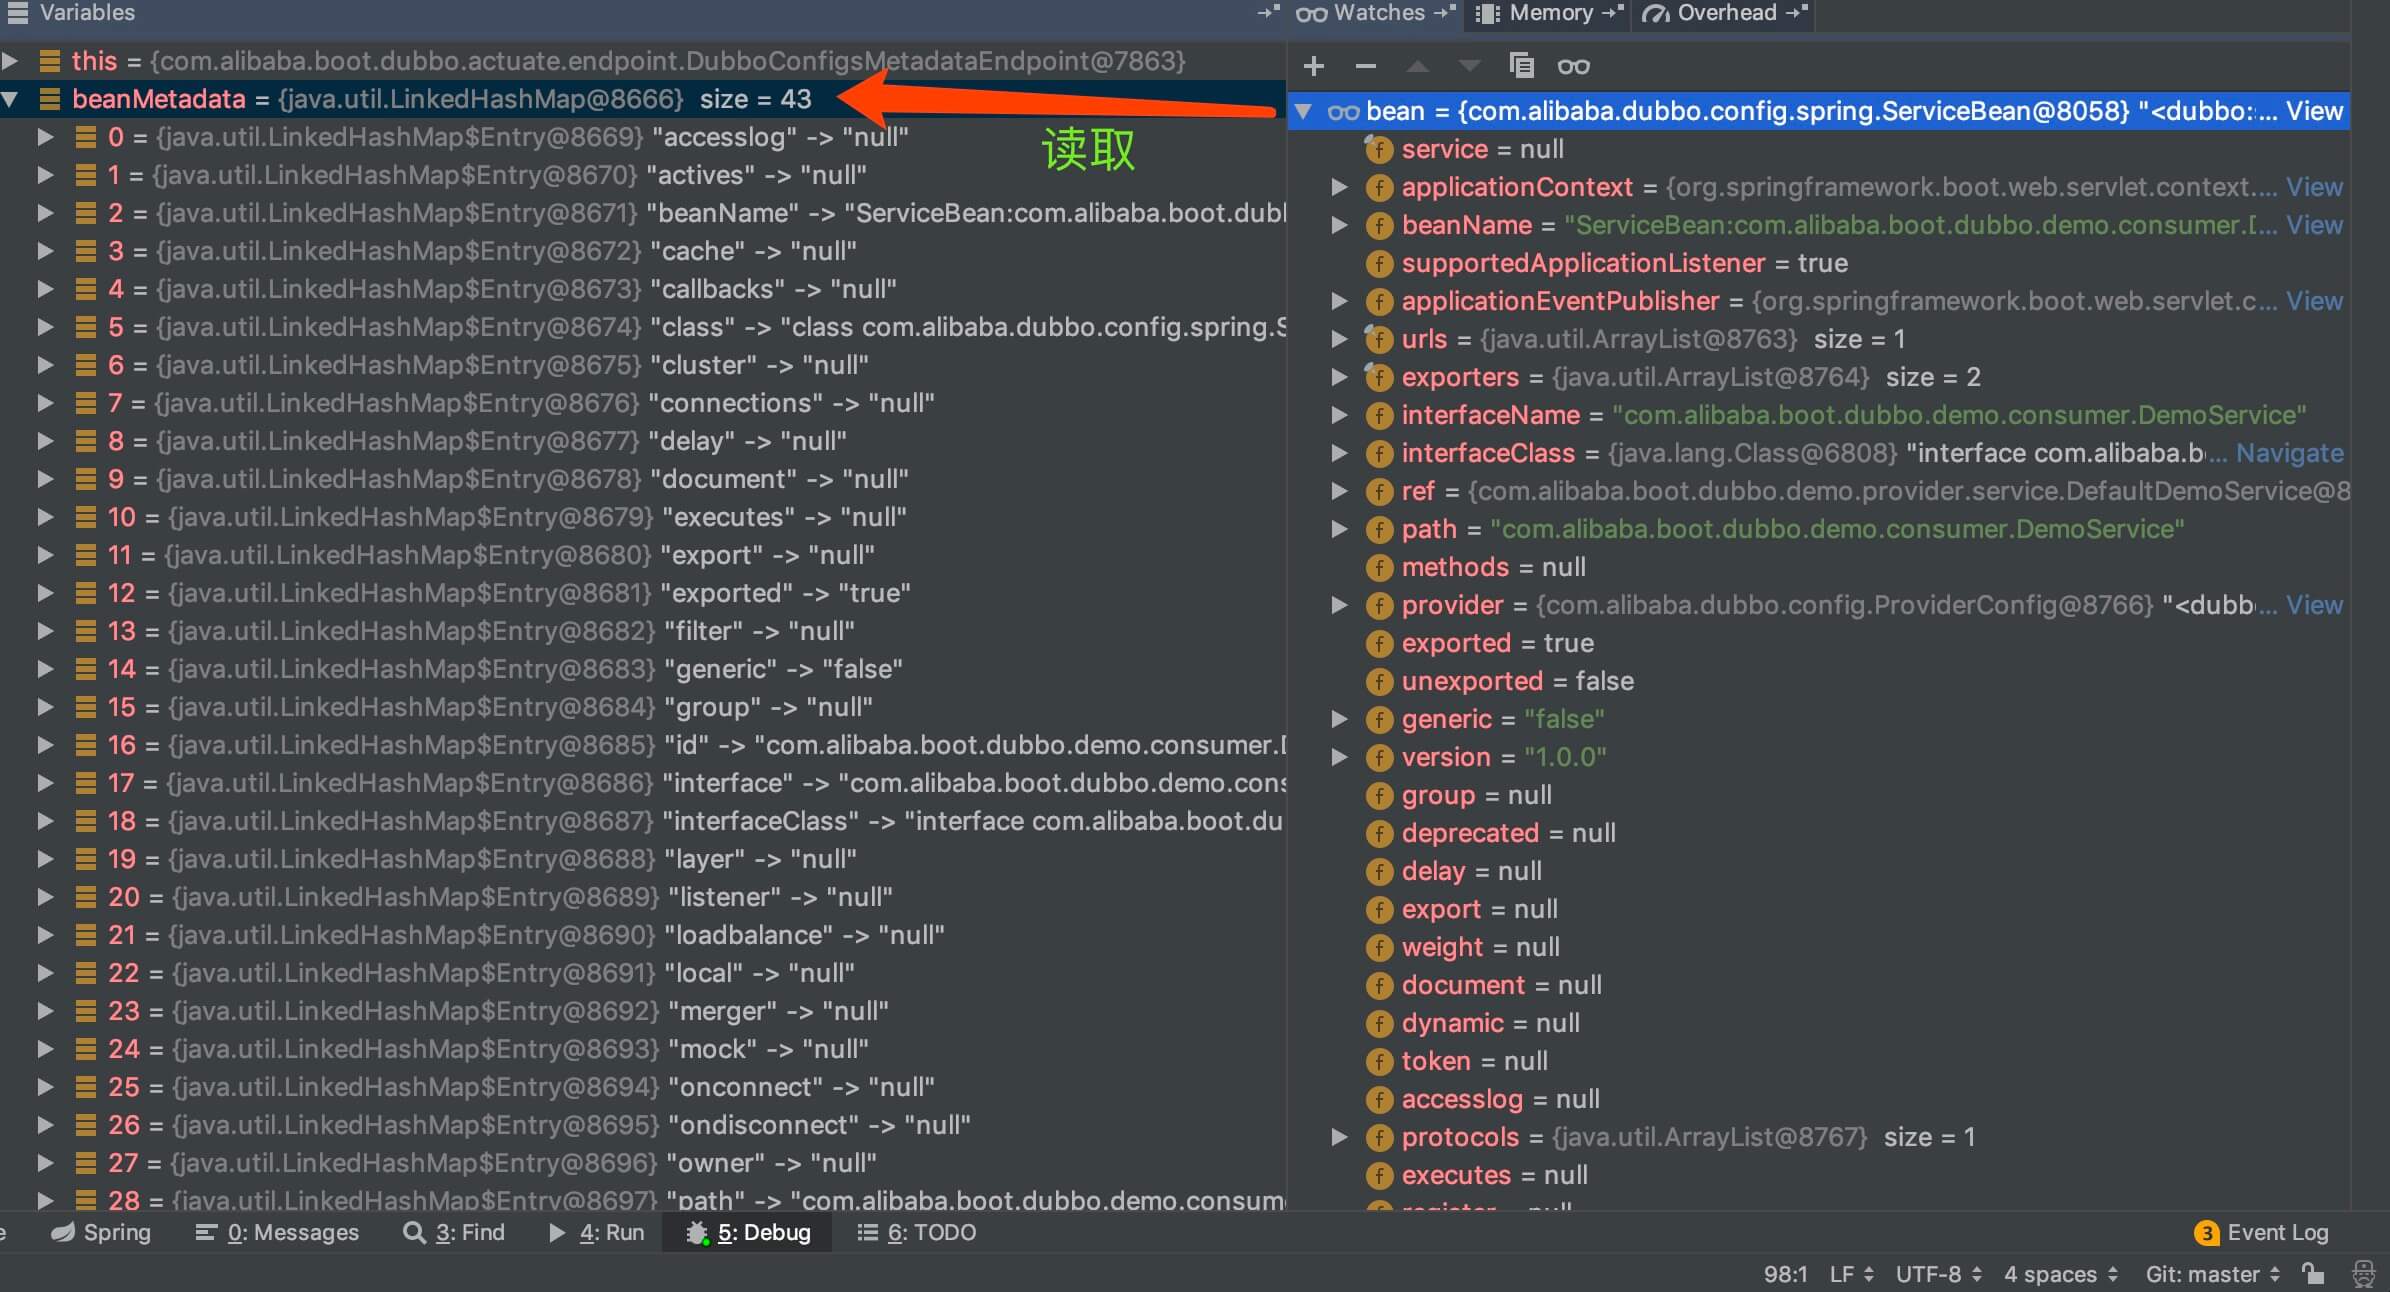
beanMetadata结果
5.6.3 getServiceBeansMap
#getServiceBeansMap() 方法,获得所有 ServiceBean 。代码如下:
1
2
3
4
5
6
// AbstractDubboEndpoint.java
protected Map<String, ServiceBean> getServiceBeansMap() {
    return BeanFactoryUtils.beansOfTypeIncludingAncestors(applicationContext, ServiceBean.class);
}
5.6.4 getProtocolConfigsBeanMap
#getProtocolConfigsBeanMap() 方法,获得所有 ProtocolConfig 。代码如下:
1
2
3
4
5
6
// AbstractDubboEndpoint.java
protected Map<String, ProtocolConfig> getProtocolConfigsBeanMap() {
    return BeanFactoryUtils.beansOfTypeIncludingAncestors(applicationContext, ProtocolConfig.class);
}
5.6.5 getReferenceAnnotationBeanPostProcessor
#getReferenceAnnotationBeanPostProcessor() 方法,获得 ReferenceAnnotationBeanPostProcessor Bean 对象。代码如下:
1
2
3
4
5
6
// AbstractDubboEndpoint.java
protected ReferenceAnnotationBeanPostProcessor getReferenceAnnotationBeanPostProcessor() {
    return applicationContext.getBean(ReferenceAnnotationBeanPostProcessor.BEAN_NAME, ReferenceAnnotationBeanPostProcessor.class);
}
5.7 DubboEndpoint
com.alibaba.boot.dubbo.actuate.endpoint.DubboEndpoint ,Dubbo Endpoint ,获得 Dubbo Meta Data(元数据)。代码如下:
1
2
3
4
5
6
7
8
9
10
11
12
13
14
15
16
17
18
19
20
21
22
23
24
25
26
27
28
29
30
31
32
// DubboEndpoint.java
/**
* Actuator
{
    @link Endpoint;
}
to expose Dubbo Meta Data
*/
@Endpoint(id = "dubbo")
public class DubboEndpoint {
    @ReadOperation
    public Map<String, Object> invoke() {
        // 创建 Map
        Map<String, Object> metaData = new LinkedHashMap<>();
        // timestamp
        metaData.put("timestamp", System.currentTimeMillis());
        // versions
        Map<String, String> versions = new LinkedHashMap<>();
        versions.put("dubbo-spring-boot", Version.getVersion(DubboUtils.class, "1.0.0"));
        versions.put("dubbo", Version.getVersion());
        // urls
        Map<String, String> urls = new LinkedHashMap<>();
        urls.put("dubbo", DUBBO_GITHUB_URL);
        urls.put("mailing-list", DUBBO_MAILING_LIST);
        urls.put("github", DUBBO_SPRING_BOOT_GITHUB_URL);
        urls.put("issues", DUBBO_SPRING_BOOT_ISSUES_URL);
        urls.put("git", DUBBO_SPRING_BOOT_GIT_URL);
        metaData.put("versions", versions);
        metaData.put("urls", urls);
        return metaData;
    }
}
5.8 DubboConfigsMetadataEndpoint
com.alibaba.boot.dubbo.actuate.endpoint.DubboConfigsMetadataEndpoint ,继承 AbstractDubboEndpoint 抽象类,获得 所有的 Dubbo 配置类的元数据。代码如下:
1
2
3
4
5
6
7
8
9
10
11
12
13
14
15
16
17
18
19
20
21
22
23
24
25
26
27
28
29
30
31
32
33
34
35
36
37
38
39
40
41
42
43
44
45
46
47
48
49
50
// DubboConfigsMetadataEndpoint.java
/**
* Dubbo Configs Metadata {@link Endpoint}
*/
@Endpoint(id = "dubboconfigs")
public class DubboConfigsMetadataEndpoint extends AbstractDubboEndpoint {
    @ReadOperation
    public Map<String, Map<String, Map<String, Object>>> configs() {
        // 创建 Map
        // KEY:获得类的简称。例如:ApplicationConfig、ConsumerConfig
        // KEY2:Bean 的名称
        // VALUE:Bean 的元数据
        Map<String, Map<String, Map<String, Object>>> configsMap = new LinkedHashMap<>();
        // 遍历每个配置类,添加其的 Bean 们,到 configsMap 中
        addDubboConfigBeans(ApplicationConfig.class, configsMap);
        addDubboConfigBeans(ConsumerConfig.class, configsMap);
        addDubboConfigBeans(MethodConfig.class, configsMap);
        addDubboConfigBeans(ModuleConfig.class, configsMap);
        addDubboConfigBeans(MonitorConfig.class, configsMap);
        addDubboConfigBeans(ProtocolConfig.class, configsMap);
        addDubboConfigBeans(ProviderConfig.class, configsMap);
        addDubboConfigBeans(ReferenceConfig.class, configsMap);
        addDubboConfigBeans(RegistryConfig.class, configsMap);
        addDubboConfigBeans(ServiceConfig.class, configsMap);
        return configsMap;
    }

    private void addDubboConfigBeans(Class<? extends AbstractConfig> dubboConfigClass,
    Map<String, Map<String, Map<String, Object>>> configsMap) {
        // 获得指定类 dubboConfigClass 的 Map
        Map<String, ? extends AbstractConfig> dubboConfigBeans =
        BeanFactoryUtils.beansOfTypeIncludingAncestors(applicationContext, dubboConfigClass);
        // 获得类的简称。例如:ApplicationConfig、ConsumerConfig
        String name = dubboConfigClass.getSimpleName();
        // 创建 Map
        Map<String, Map<String, Object>> beansMetadata = new TreeMap<>();
        // 遍历 dubboConfigBeans 数组
        for (Map.Entry<String, ? extends AbstractConfig> entry : dubboConfigBeans.entrySet()) {
            // 获得 Bean 的名字
            String beanName = entry.getKey();
            // 获得 Bean 的元数据
            AbstractConfig configBean = entry.getValue();
            Map<String, Object> configBeanMeta = super.resolveBeanMetadata(configBean);
            // 添加到 beansMetadata 中
            beansMetadata.put(beanName, configBeanMeta);
        }
        // 添加到 configsMap 中
        configsMap.put(name, beansMetadata);
    }
}
5.7 DubboPropertiesEndpoint
com.alibaba.boot.dubbo.actuate.endpoint.DubboPropertiesEndpoint ,继承 AbstractDubboEndpoint 抽象类,获得 Dubbo Properties 。代码如下:
1
2
3
4
5
6
7
8
9
10
11
// DubboPropertiesEndpoint.java
/**
* Dubbo Properties {@link Endpoint}
*/
@Endpoint(id = "dubboproperties")
public class DubboPropertiesEndpoint extends AbstractDubboEndpoint {
    @ReadOperation
    public SortedMap<String, Object> properties() {
        return DubboUtils.filterDubboProperties(environment);
    }
}
5.8 DubboReferencesMetadataEndpoint
com.alibaba.boot.dubbo.actuate.endpoint.DubboReferencesMetadataEndpoint ,继承 AbstractDubboEndpoint 抽象类,获得所有的 Dubbo @Reference Bean 的元数据。代码如下:
1
2
3
4
5
6
7
8
9
10
11
12
13
14
15
16
17
18
19
20
21
22
23
24
25
26
27
28
29
30
31
32
33
34
35
36
37
38
39
40
41
42
43
44
45
46
47
48
// DubboReferencesMetadataEndpoint.java
/**
* Dubbo
{
    @link Reference} Metadata
    {
        @link Endpoin;
    }
}
*/
@Endpoint(id = "dubboreferences")
public class DubboReferencesMetadataEndpoint extends AbstractDubboEndpoint {
    @ReadOperation
    public Map<String, Map<String, Object>> references() {
        // 创建 Map
        // KEY:Bean 的名字
        // VALUE:Bean 的元数据
        Map<String, Map<String, Object>> referencesMetadata = new LinkedHashMap<>();
        // 获得 ReferenceAnnotationBeanPostProcessor Bean 对象
        ReferenceAnnotationBeanPostProcessor beanPostProcessor = super.getReferenceAnnotationBeanPostProcessor();
        // injected Field ReferenceBean Cache
        referencesMetadata.putAll(buildReferencesMetadata(beanPostProcessor.getInjectedFieldReferenceBeanMap()));
        // injected Method ReferenceBean Cache
        referencesMetadata.putAll(buildReferencesMetadata(beanPostProcessor.getInjectedMethodReferenceBeanMap()));
        return referencesMetadata;
    }

    private Map<String, Map<String, Object>> buildReferencesMetadata(
    Map<InjectionMetadata.InjectedElement, ReferenceBean<?>> injectedElementReferenceBeanMap) {
        // 创建 Map
        // KEY:Bean 的名字
        // VALUE:Bean 的元数据
        Map<String, Map<String, Object>> referencesMetadata = new LinkedHashMap<>();
        // 遍历 injectedElementReferenceBeanMap 元素
        for (Map.Entry<InjectionMetadata.InjectedElement, ReferenceBean<?>> entry : injectedElementReferenceBeanMap.entrySet()) {
            InjectionMetadata.InjectedElement injectedElement = entry.getKey();
            // 获得 ReferenceBean 对象
            ReferenceBean<?> referenceBean = entry.getValue();
            // 获得 Bean 元数据
            Map<String, Object> beanMetadata = super.resolveBeanMetadata(referenceBean);
            // 获得 invoker 属性
            beanMetadata.put("invoker", super.resolveBeanMetadata(referenceBean.get()));
            // 添加到 referencesMetadata 中
            referencesMetadata.put(String.valueOf(injectedElement.getMember()), beanMetadata);
        }
        return referencesMetadata;
    }
}
5.9 DubboServicesMetadataEndpoint
com.alibaba.boot.dubbo.actuate.endpoint.DubboServicesMetadataEndpoint ,继承 AbstractDubboEndpoint 抽象类,获得所有的 Dubbo @Service Bean 的元数据。代码如下:
1
2
3
4
5
6
7
8
9
10
11
12
13
14
15
16
17
18
19
20
21
22
23
24
25
26
27
28
29
30
31
32
33
34
35
36
37
38
39
40
41
42
43
44
45
46
47
48
49
// DubboServicesMetadataEndpoint.java
/**
* Dubbo {
    @link Service;
}
Metadata
*/
@Endpoint(id = "dubboservices")
public class DubboServicesMetadataEndpoint extends AbstractDubboEndpoint {
    @ReadOperation
    public Map<String, Map<String, Object>> services() {
        // 获得所有的 ServiceBean
        Map<String, ServiceBean> serviceBeansMap = super.getServiceBeansMap();
        // 创建 Map
        // KEY:Bean 的名字
        // VALUE:Bean 的元数据
        Map<String, Map<String, Object>> servicesMetadata = new LinkedHashMap<>(serviceBeansMap.size());
        // 遍历 serviceBeansMap 元素
        for (Map.Entry<String, ServiceBean> entry : serviceBeansMap.entrySet()) {
            // 获得 Bean 的名字
            String serviceBeanName = entry.getKey();
            // 获得 ServiceBean 对象
            ServiceBean serviceBean = entry.getValue();
            // 获得 Bean 的元数据
            Map<String, Object> serviceBeanMetadata = super.resolveBeanMetadata(serviceBean);
            // 获得 Service 对象。若获得到,则添加到 serviceBeanMetadata 中
            Object service = resolveServiceBean(serviceBeanName, serviceBean);
            if (service != null) {
                // Add Service implementation class
                serviceBeanMetadata.put("serviceClass", service.getClass().getName());
            }
            // 添加到 servicesMetadata 中
            servicesMetadata.put(serviceBeanName, serviceBeanMetadata);
        }
        return servicesMetadata;
    }

    private Object resolveServiceBean(String serviceBeanName, ServiceBean serviceBean) {
        int index = serviceBeanName.indexOf("#");
        if (index > -1) {
            Class<?> interfaceClass = serviceBean.getInterfaceClass();
            String serviceName = serviceBeanName.substring(index + 1);
            if (applicationContext.containsBean(serviceName)) {
                return applicationContext.getBean(serviceName, interfaceClass);
            }
        }
        return null;
    }
}
5.10 DubboShutdownEndpoint
com.alibaba.boot.dubbo.actuate.endpoint.DubboShutdownEndpoint ,继承 AbstractDubboEndpoint 抽象类,关闭 Dubbo 。代码如下:
1
2
3
4
5
6
7
8
9
10
11
12
13
14
15
16
17
18
19
20
21
22
23
24
25
26
27
28
29
30
31
32
33
34
35
36
37
38
39
40
41
42
43
44
45
46
// DubboShutdownEndpoint.java
/**
* Dubbo Shutdown
*/
@Endpoint(id = "dubboshutdown")
public class DubboShutdownEndpoint extends AbstractDubboEndpoint {
    @WriteOperation
    public Map<String, Object> shutdown() throws Exception {
        // 创建 Map
        Map<String, Object> shutdownCountData = new LinkedHashMap<>();
        // registries
        // 获得注册的数量
        int registriesCount = AbstractRegistryFactory.getRegistries().size();
        // protocols
        // 获得 Protocol 的数量
        int protocolsCount = super.getProtocolConfigsBeanMap().size();
        // 销毁 ProtocolConfig
        ProtocolConfig.destroyAll();
        // 添加到 shutdownCountData 中
        shutdownCountData.put("registries", registriesCount);
        shutdownCountData.put("protocols", protocolsCount);
        // Service Beans
        // 获得所有 ServiceBean ,然后逐个销毁
        Map<String, ServiceBean> serviceBeansMap = super.getServiceBeansMap();
        if (!serviceBeansMap.isEmpty()) {
            for (ServiceBean serviceBean : serviceBeansMap.values()) {
                serviceBean.destroy();
            }
        }
        // 添加到 shutdownCountData 中
        shutdownCountData.put("services", serviceBeansMap.size());
        // Reference Beans
        // 获得 ReferenceAnnotationBeanPostProcessor 对象
        ReferenceAnnotationBeanPostProcessor beanPostProcessor = super.getReferenceAnnotationBeanPostProcessor();
        // 获得 Reference Bean 的数量
        int referencesCount = beanPostProcessor.getReferenceBeans().size();
        // 销毁所有 Reference Bean
        beanPostProcessor.destroy();
        // 添加到 shutdownCountData 中
        shutdownCountData.put("references", referencesCount);
        // Set Result to complete
        Map<String, Object> shutdownData = new TreeMap<>();
        shutdownData.put("shutdown.count", shutdownCountData);
        return shutdownData;
    }
}
- 通过调用该接口,我们就可以远程关闭 Dubbo 服务。
666. 彩蛋
总的来说,比较简单。实际上,比较重的逻辑,在 Dubbo 本身上。所以呢,感兴趣的胖友,可以自己去撸一撸。嘻嘻嘻