集群容错(六)之Configurator实现
本文基于 Dubbo 2.6.1 版本,望知悉。
1. 概述
本文接 《精尽 Dubbo 源码解析 —— 集群容错(五)之 Merger 实现》 一文,分享 dubbo-cluster 模块, configurator 包,实现 Dubbo 的配置规则功能。
Configurator 相关类,如下图:
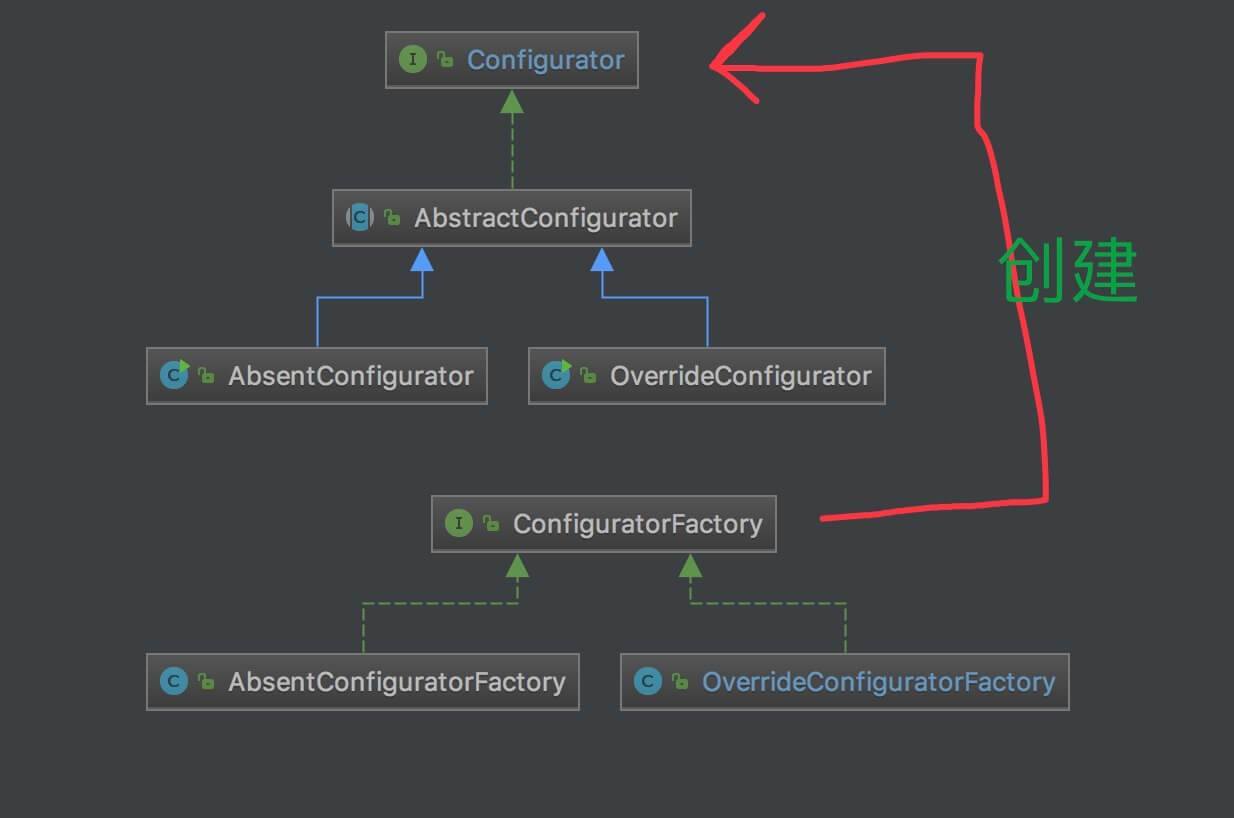
Configurator 相关类
老艿艿:本文对应 《Dubbo 用户指南 —— 配置规则》 文档。如果之前没了解过该功能的胖友,请先阅读了解下哈。
2. ConfiguratorFactory
com.alibaba.dubbo.rpc.cluster.ConfiguratorFactory ,Configurator 工厂接口,代码如下:
```plain text plain @SPI public interface ConfiguratorFactory { /** * get the configurator instance. * * @param url - configurator url. * @return configurator instance. */ @Adaptive(“protocol”) Configurator getConfigurator(URL url); }
1
2
3
4
5
6
7
8
9
10
11
12
13
14
15
16
17
18
19

---

- @SPI**拓展点**
注解,Dubbo SPI
,无默认值。
- @Adaptive(“protocol”)
注解,基于 Dubbo SPI Adaptive 机制,加载对应的 Configurator 实现,使用
URL.protocol
属性。
- #getConfigurator(URL url)
接口方法,获得 Configurator 对象。

## 2.1 OverrideConfiguratorFactory

com.alibaba.dubbo.rpc.cluster.configurator.override.OverrideConfiguratorFactory ,实现 ConfiguratorFactory 接口,**OverrideConfigurator** 工厂。代码如下:

```plain text
plain public class OverrideConfiguratorFactory implements ConfiguratorFactory {      @Override     public Configurator getConfigurator(URL url) {         return new OverrideConfigurator(url);     }  }
2.2 AbsentConfiguratorFactory
com.alibaba.dubbo.rpc.cluster.configurator.absent.AbsentConfiguratorFactory ,实现 ConfiguratorFactory 接口,AbsentConfigurator 工厂。代码如下:
```plain text plain public class AbsentConfiguratorFactory implements ConfiguratorFactory { @Override public Configurator getConfigurator(URL url) { return new AbsentConfigurator(url); } }
1
2
3
4
5
6
7
8
9

---

# 3. Configurator

com.alibaba.dubbo.rpc.cluster.Configurator ,实现 Comparable 接口,**配置规则**接口。代码如下:

```plain text
plain public interface Configurator extends Comparable<Configurator> {      /**      * get the configurator url.      *      * 配置规则      *      * @return configurator url.      */     URL getUrl();      /**      * Configure the provider url.      *      * 配置到 URL 中      *      * @param url - old rovider url.      * @return new provider url.      */     URL configure(URL url);  }
- 一个 Configurator 对象,对应一条配置规则 。
- Configurator 有优先级 的要求,所以实现 Comparable 接口。
- #getUrl() 接口方法,获得配置 URL ,里面带有配置规则。
- #configure(Url url)设置 接口方法, 配置规则到指定 URL 中。
3.1 AbstractConfigurator
com.alibaba.dubbo.rpc.cluster.configurator.AbstractConfigurator ,实现 Configurator 接口,实现公用的配置规则的匹配、排序的逻辑。
3.1.1 getUrl
```plain text plain /** * 配置规则 URL */ private final URL configuratorUrl; public AbstractConfigurator(URL url) { if (url == null) { throw new IllegalArgumentException(“configurator url == null”); } this.configuratorUrl = url; } @Override public URL getUrl() { return configuratorUrl; }
1
2
3
4
5
6
7

---

### 3.1.2 configure

```plain text
plain 1: @Override  2: public URL configure(URL url) {  3:     if (configuratorUrl.getHost() == null || url == null || url.getHost() == null) {  4:         return url;  5:     }  6:     // If override url has port, means it is a provider address. We want to control a specific provider with this override url, it may take effect on the specific provider instance or on consumers holding this provider instance.  7:     // 配置规则,URL 带有端口( port ),意图是控制提供者机器。可以在提供端生效 也可以在消费端生效  8:     if (configuratorUrl.getPort() != 0) {  9:         if (url.getPort() == configuratorUrl.getPort()) { 10:             return configureIfMatch(url.getHost(), url); 11:         } 12:     // override url don't have a port, means the ip override url specify is a consumer address or 0.0.0.0 13:     // 配置规则,URL 没有端口,override 输入消费端地址 或者 0.0.0.0 14:     } else { 15:         // 1.If it is a consumer ip address, the intention is to control a specific consumer instance, it must takes effect at the consumer side, any provider received this override url should ignore; 16:         // 2.If the ip is 0.0.0.0, this override url can be used on consumer, and also can be used on provider 17:         // 1. 如果是消费端地址,则意图是控制消费者机器,必定在消费端生效,提供端忽略; 18:         // 2. 如果是0.0.0.0可能是控制提供端,也可能是控制提供端 19:         if (url.getParameter(Constants.SIDE_KEY, Constants.PROVIDER).equals(Constants.CONSUMER)) { 20:             // NetUtils.getLocalHost是消费端注册到zk的消费者地址 21:             return configureIfMatch(NetUtils.getLocalHost(), url);// NetUtils.getLocalHost is the ip address consumer registered to registry. 22:         } else if (url.getParameter(Constants.SIDE_KEY, Constants.CONSUMER).equals(Constants.PROVIDER)) { 23:             // 控制所有提供端,地址必定是0.0.0.0,否则就要配端口从而执行上面的if分支了 24:             return configureIfMatch(Constants.ANYHOST_VALUE, url);// take effect on all providers, so address must be 0.0.0.0, otherwise it won't flow to this if branch 25:         } 26:     } 27:     return url; 28: }
- 我们可以看到,【第 6 至 26 行】一共有三种 情况的判断:
- 【第一种】第 8 行: 端口( port )指定一个 configuratorUrl 带有 ,意图是匹配 服务提供者,因此使用 url.host 属性。
- 【第二种】第 19 行: url 的 side = consumer ,意图是匹配服务消费者,因此使用 NetUtils#getLocalHost() 属性。
- 【第三种】第 22 行:全部指定机器 url 的 side = provider ,意图是匹配 服务提供者,因此使用 Constants.ANYHOST_VALUE = * 属性。 也就是说,目前暂不支持 服务提供者。
- 第 10 行 || 第 21 行 || 第 24 行:调用 #configureIfMatch(host, url) 方法,配置到 url 中,若配置规则匹配。
3.1.2.1 configureIfMatch
```plain text plain 1: private URL configureIfMatch(String host, URL url) { 2: // 匹配 Host 3: if (Constants.ANYHOST_VALUE.equals(configuratorUrl.getHost()) || host.equals(configuratorUrl.getHost())) { 4: // 匹配 “application” 5: String configApplication = configuratorUrl.getParameter(Constants.APPLICATION_KEY, configuratorUrl.getUsername()); // TODO 芋艿,为啥 username 6: String currentApplication = url.getParameter(Constants.APPLICATION_KEY, url.getUsername()); 7: if (configApplication == null || Constants.ANY_VALUE.equals(configApplication) 8: || configApplication.equals(currentApplication)) { 9: // 配置 URL 中的条件 KEYS 集合。其中下面四个 KEY ,不算是条件,而是内置属性。考虑到下面要移除,所以添加到该集合中。 10: Set
1
2
3
4
5
6
7
8
9
10
11
12
13
14
15
16
17
18
19
20
21
22
23
24
25
26
27
28
29
30
31
32
33
34
35
36
37

---

- 第 3 行:匹配 **HOST**
。
- 第 4 至 8 行:匹配 **“application”**
。
- 第 9 至 14 行:配置 URL 中的**条件 KEYS 集合内置属性**
。其中下面四个 KEY ,不算是条件,而是
。考虑到下面要移除,所以添加到该集合中。
- 第 15 至 27 行:判断传入的 **带有 “~” 开头的 KEY ,也是条件**
url
是否匹配配置规则 URL 的条件。除了
“application”
和
“side”
之外,
。
    - 第 21 至 25 行: 若**不相等不匹配**
,则
配置规则,直接返回
url
。
- 第 29 行:从 **移除抽象子类配置规则**
configuratorUrl
条件 KEYS 集合,并调用
#doConfigure(URL currentUrl, URL configUrl)
方法,实现
设置
到
url
中。

### 3.1.2.2 doConfigure

```plain text
plain protected abstract URL doConfigure(URL currentUrl, URL configUrl);
3.1.3 compareTo
```plain text plain @Override public int compareTo(Configurator o) { if (o == null) { return -1; } // host 升序 int ipCompare = getUrl().getHost().compareTo(o.getUrl().getHost()); // 若 host 相同,按照 priority 降序 if (ipCompare == 0) {//host is the same, sort by priority int i = getUrl().getParameter(Constants.PRIORITY_KEY, 0); int j = o.getUrl().getParameter(Constants.PRIORITY_KEY, 0); if (i < j) { return -1; } else if (i > j) { return 1; } else { return 0; } } else { return ipCompare; } }
1
2
3
4
5
6
7
8
9
10
11
12
13
14
15
16
17
18
19
20

---

- 优先,按照 host **升序特定高anyhost**
,即
host
于
(
“0.0.0.0”
) 。
- 其次,按照 **降序**
“priority”
。

## 3.2 OverrideConfigurator

com.alibaba.dubbo.rpc.cluster.configurator.override.OverrideConfigurator ,实现 AbstractConfigurator 抽象类,override Configurator 实现类。代码如下:

```plain text
plain public class OverrideConfigurator extends AbstractConfigurator {      public OverrideConfigurator(URL url) {         super(url);     }      @Override     public URL doConfigure(URL currentUrl, URL configUrl) {         return currentUrl.addParameters(configUrl.getParameters()); // 覆盖添加     }  }
- 覆盖 添加。
3.3 AbsentConfigurator
com.alibaba.dubbo.rpc.cluster.configurator.absent.AbsentConfigurator ,实现 AbstractConfigurator 抽象类,absent Configurator 实现类。代码如下:
```plain text plain public class AbsentConfigurator extends AbstractConfigurator { public AbsentConfigurator(URL url) { super(url); } @Override public URL doConfigure(URL currentUrl, URL configUrl) { return currentUrl.addParametersIfAbsent(configUrl.getParameters()); // 不存在时添加 } }
1
2
3
4
5
6
7
8
9
10
11
12
13
14
15
16
17
18
19
20
21
22
23
24
25
26
---
- **不存在时**
添加。
从目前 dubbo-admin 项目来看,目前**暂未使用**absent 的配置规则。
# 4. 集成 Configurator 模块
如下图所示,我们可以看到,有**三个类**,调用 Configurator#configure(URL url) 方法,集成 Configurator 模块。

集成
## 4.1 RegistryDirectory
RegistryDirectory 将配置规则集成到其中,从而集成到**服务消费者**中。
### 4.1.1 toConfigurators
#toConfigurators(List urls) 方法,官方注释如下:
```plain text
plain /** * 将overrideURL 转换为 map,供重新 refer 时使用. * 每次下发全部规则,全部重新组装计算 * * @param urls 契约: * </br>1.override://0.0.0.0/...(或override://ip:port...?anyhost=true)¶1=value1...表示全局规则(对所有的提供者全部生效) * </br>2.override://ip:port...?anyhost=false 特例规则(只针对某个提供者生效) * </br>3.不支持override://规则... 需要注册中心自行计算. * </br>4.不带参数的override://0.0.0.0/ 表示清除override * * @return Configurator 集合 */ public static List<Configurator> toConfigurators(List<URL> urls) { // ...省略代码 }
- 实际上,该注释说明了配置规则,在 RegistryDirectory 中,是如何集成配置规则模块四条 。特别是 契约,胖友好好理解下。
该方法的真正注释,应该是:将配置规则 URL 集合,转换成对应的 Configurator 集合。代码如下:
```plain text plain 1: public static List
1
2
3
4
5
6
7
8
9
10
11
12
13
14
15
16
17
18
19
20
21
22
23
24

---

- 第 2 至 5 行:**忽略**
,若
urls
集合为空。
- 的 8 行:创建 Configurator 集合
configurators
变量。
- 第 9 至 26 行:**循环转换**
urls
集合,
成对应的 Configurator 集合。 中间的过程,胖友看下注释。
- 第 28 行:将 **排序**[「3.13 compareTo」](http://svip.iocoder.cn/Dubbo/cluster-6-impl-configurator/#)
configurators
集合,
。具体的排序规则,在
已经解析。

### 4.1.2 mergeUrl

```plain text
plain 1: private URL mergeUrl(URL providerUrl) {  2:     // 合并消费端参数  3:     providerUrl = ClusterUtils.mergeUrl(providerUrl, queryMap); // Merge the consumer side parameters  4:   5:     // 合并配置规则  6:     List<Configurator> localConfigurators = this.configurators; // local reference  7:     if (localConfigurators != null && !localConfigurators.isEmpty()) {  8:         for (Configurator configurator : localConfigurators) {  9:             providerUrl = configurator.configure(providerUrl); 10:         } 11:     } 12:  13:     // 不检查连接是否成功,总是创建 Invoker ! 14:     providerUrl = providerUrl.addParameter(Constants.CHECK_KEY, String.valueOf(false)); // Do not check whether the connection is successful or not, always create Invoker! 15:  16:     // The combination of directoryUrl and override is at the end of notify, which can't be handled here 17:     // 仅合并提供者参数,因为 directoryUrl 与 override 合并是在 notify 的最后,这里不能够处理 18:     this.overrideDirectoryUrl = this.overrideDirectoryUrl.addParametersIfAbsent(providerUrl.getParameters()); // Merge the provider side parameters 19:  20:     // 【忽略】因为是对 1.0 版本的兼容 21:     if ((providerUrl.getPath() == null || providerUrl.getPath().length() == 0) 22:             && "dubbo".equals(providerUrl.getProtocol())) { // Compatible version 1.0 23:         //fix by tony.chenl DUBBO-44 24:         String path = directoryUrl.getParameter(Constants.INTERFACE_KEY); 25:         if (path != null) { 26:             int i = path.indexOf('/'); 27:             if (i >= 0) { 28:                 path = path.substring(i + 1); 29:             } 30:             i = path.lastIndexOf(':'); 31:             if (i >= 0) { 32:                 path = path.substring(0, i); 33:             } 34:             providerUrl = providerUrl.setPath(path); 35:         } 36:     } 37:  38:     // 返回服务提供者 URL 39:     return providerUrl; 40: }
- 第 5 至 11 行:循环 配置规则 configurators 集合,调用 Configurator#configure(URL url) 方法,合并 到 providerUrl 中。
- 第 14 行:仅最后 合并提供者参数到 overrideDirectoryUrl 中,因为 directoryUrl 与配置规则的合并是在 #notify(List urls) 方法的 ,因而这里不能够处理。代码如下图所示:
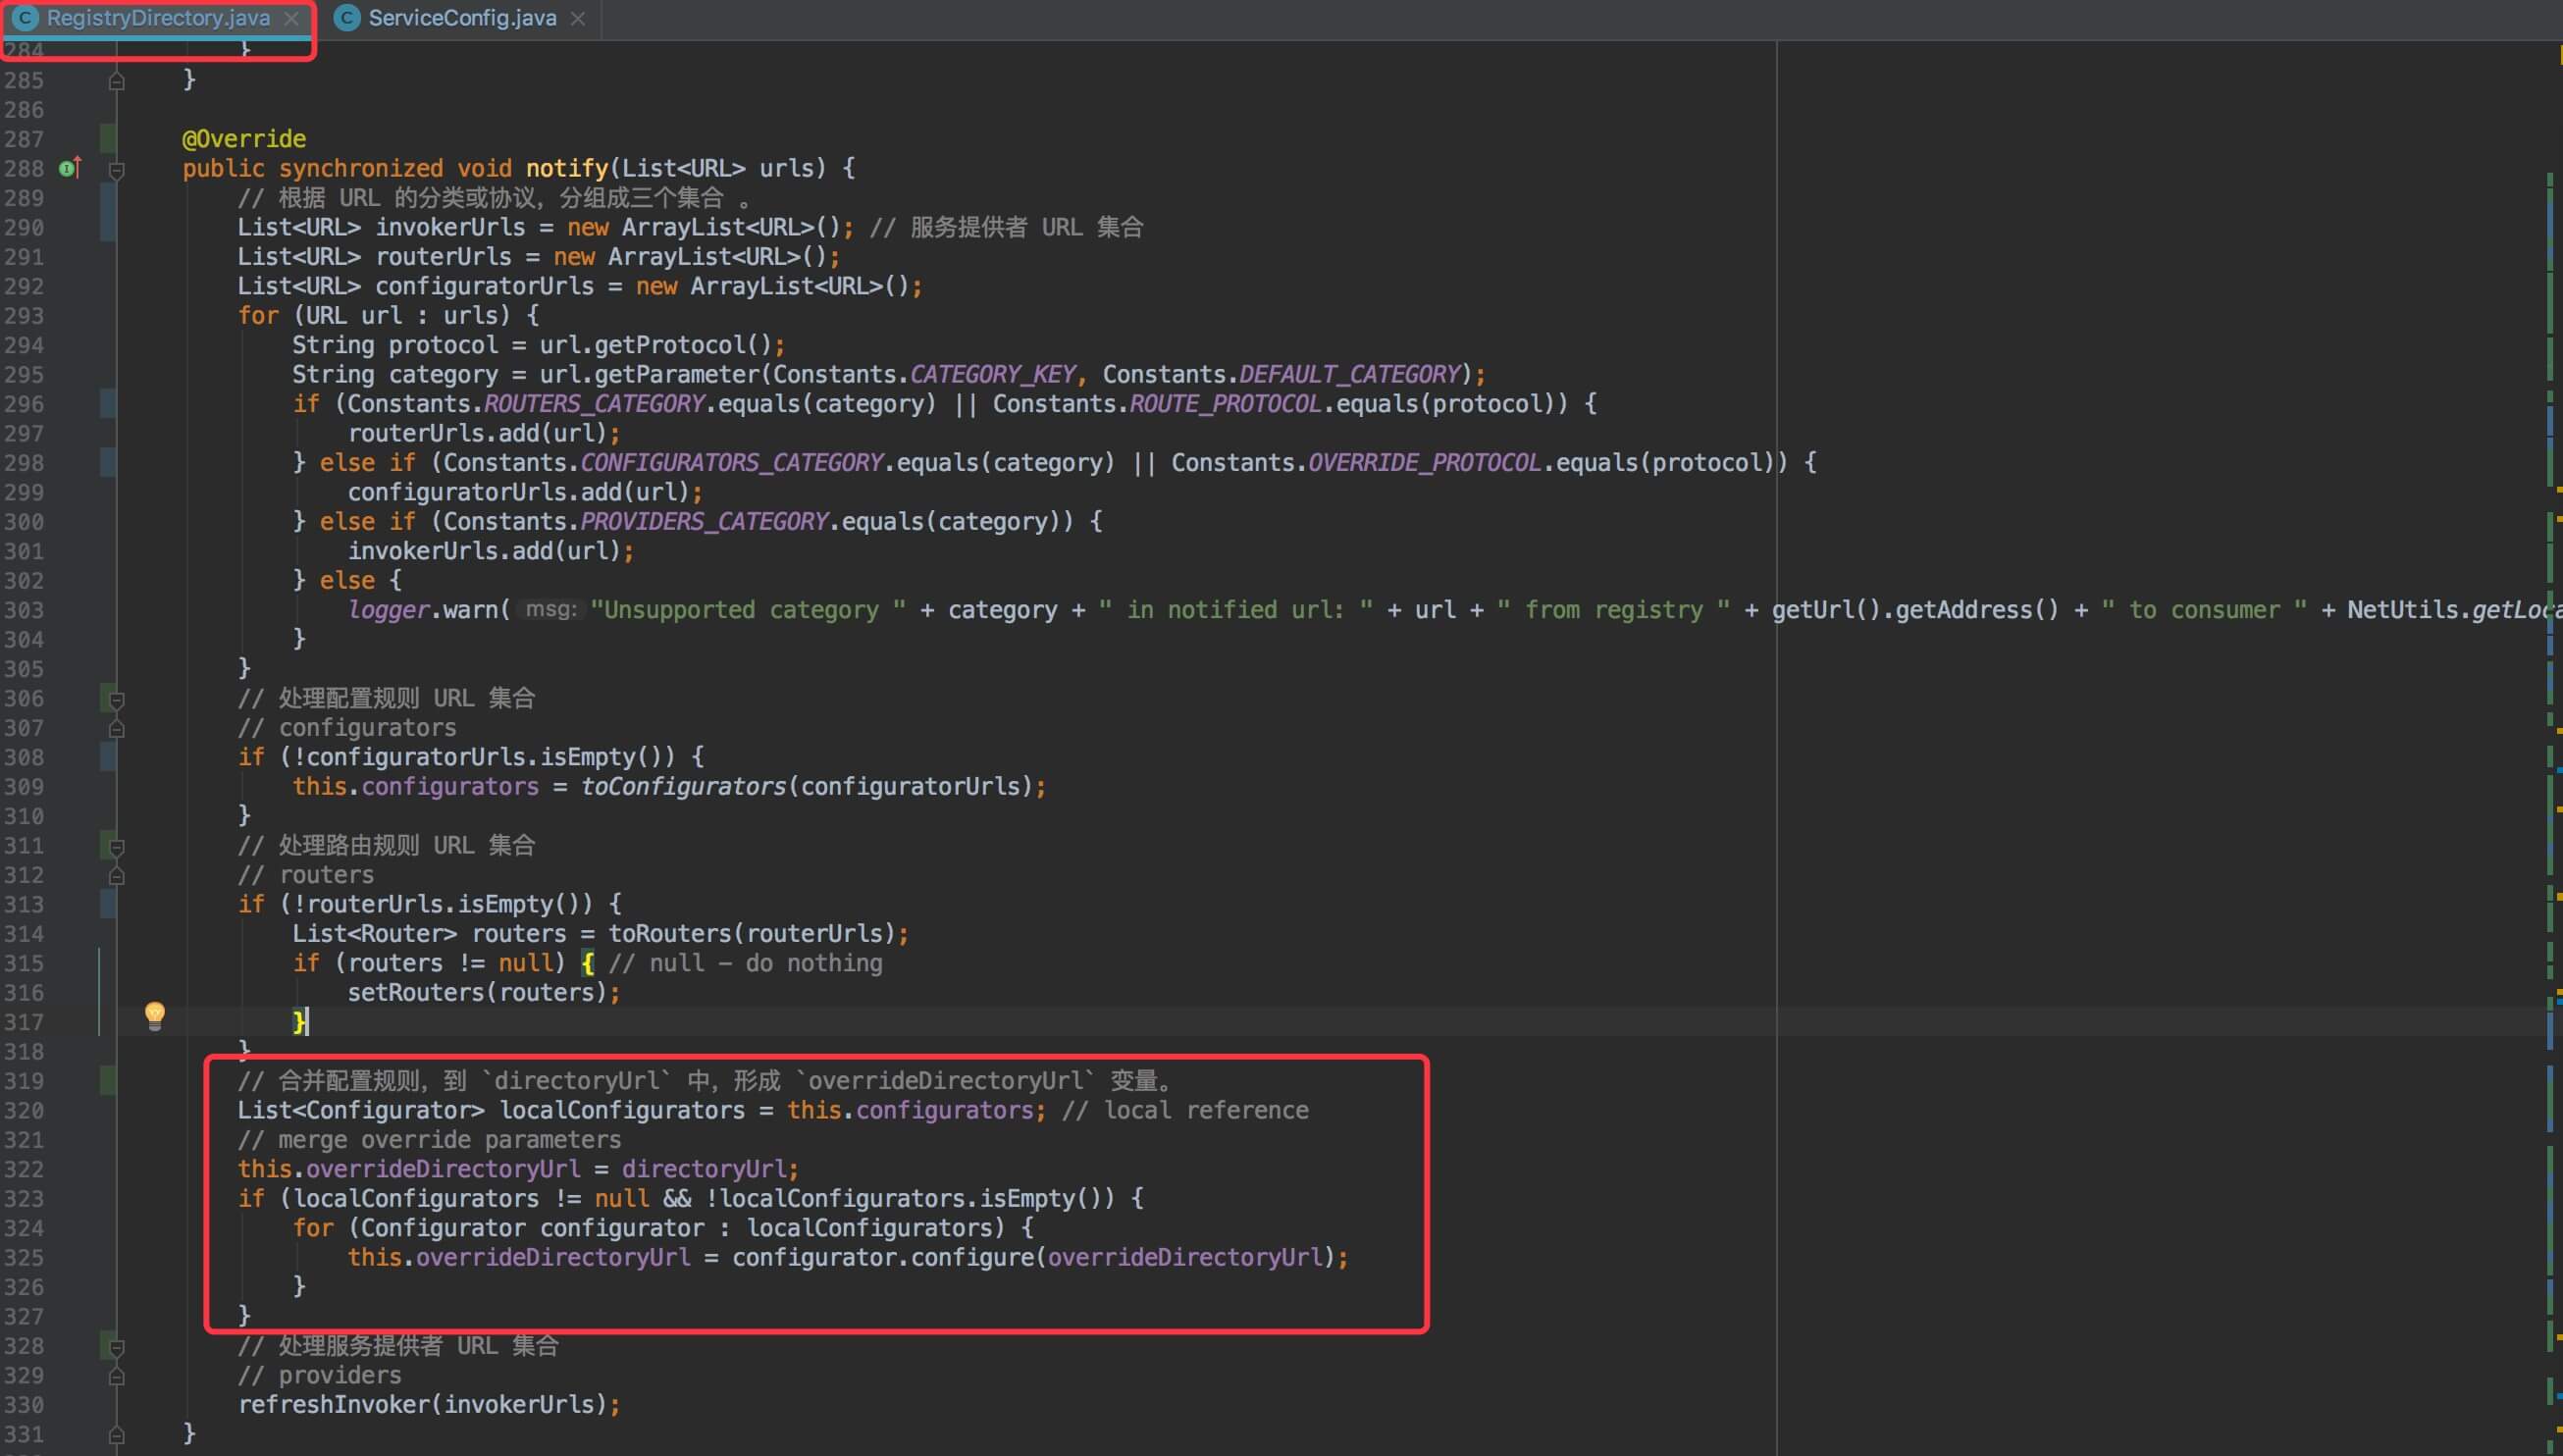 notify
4.2 RegistryProtocol
RegistryProtocol 通过向注册中心注册 OverrideListener 监听器,从而集成配置规则到服务提供者中。
4.2.1 export
```plain text plain 1: @Override 2: public
1
2
3
4
5
6
7
8
9
10
11
12

---

- 第 29 至 38 行:使用 **OverrideListener**
对象,订阅配置规则。
    - 第 33 行:调用 **订阅配置规则**
#getSubscribedOverrideUrl(registedProviderUrl)
方法,创建
的 URL 。代码如下:

```plain text
plain private URL getSubscribedOverrideUrl(URL registedProviderUrl) {     return registedProviderUrl.setProtocol(Constants.PROVIDER_PROTOCOL)             .addParameters(Constants.CATEGORY_KEY, Constants.CONFIGURATORS_CATEGORY, // configurators                     Constants.CHECK_KEY, String.valueOf(false)); // 订阅失败,不校验 }
```plain text * x
- 第 34 至 36 行:创建
OverrideListener 对象,并添加到 overrideListeners 中。
- 第 38 行:调用 Registry#subscribe(overrideSubscribeUrl, overrideSubscribeListener) 方法,向注册中心注册
OverrideListener 监听器,订阅配置规则的变化。 ```
4.2.2 OverrideListener
OverrideListener 是 RegistryProtocol 内部类,实现 NotifyListener 接口,官方注释如下:
```plain text plain /** * 重新 export :protocol 中的 exporter destroy 问题 * * 1. 要求 registry protocol 返回的 exporter 可以正常 destroy * 2. notify 后不需要重新向注册中心注册 * 3. export 方法传入的 invoker 最好能一直作为 exporter 的 invoker. */
1
2
3
4
5
6
7
8
9

---

- 初看有点绕,我们来瞅瞅代码。

### 4.2.2.1 构造方法

```plain text
plain /**  * 订阅 URL 对象  */ private final URL subscribeUrl; /**  * 原始 Invoker 对象  */ private final Invoker originInvoker;  public OverrideListener(URL subscribeUrl, Invoker originalInvoker) {     this.subscribeUrl = subscribeUrl;     this.originInvoker = originalInvoker; }
4.2.2.2 notify
```plain text plain 1: @Override 2: public synchronized void notify(List
1
2
3
4
5
6
7
8
9
10

---

- 第 3 至 10 行:调用 **规则配置**
#getMatchedUrls(List configuratorUrls, URL currentSubscribe)
方法,获得匹配的
URL 集合。代码如下:

```plain text
plain private List<URL> getMatchedUrls(List<URL> configuratorUrls, URL currentSubscribe) {     List<URL> result = new ArrayList<URL>();     for (URL url : configuratorUrls) {         URL overrideUrl = url;         // 【忽略】,兼容老版本         // Compatible with the old version         if (url.getParameter(Constants.CATEGORY_KEY) == null                 && Constants.OVERRIDE_PROTOCOL.equals(url.getProtocol())) {             overrideUrl = url.addParameter(Constants.CATEGORY_KEY, Constants.CONFIGURATORS_CATEGORY);         }         // 判断是否匹配         // Check whether url is to be applied to the current service         if (UrlUtils.isMatch(currentSubscribe, overrideUrl)) {             result.add(url);         }     }     return result; }
```plain text
- 通过调用 UrlUtils#isMatch(currentSubscribe, overrideUrl) 方法,进行判断
是否匹配。该方法具体实现的逻辑,比较简单,所以判断自己查看。 ```
- 第 12 行:调用 转换 RegistryDirectory#toConfigurators(matchedUrls) 方法,将配置规则 URL 集合, 成对应的 Configurator 集合。
- 第 14 至 23 行:获得真实对应 的 Invoker 和 的 URL 对应。
- 第 25 至 31 行:忽略 ,若对应的 Exporter 对象不存在。
========== 重点
- 第 35 行:通过 当前可能已经被之前的配置规则合并过 exporter 的 Invoker ,获得 Invoker 的 URL 对象, 。
- 第 38 行:调用 合并配置规则新的 #getConfigedInvokerUrl(configurators,originUrl) 方法,基于 originUrl 对象, ,生成 newUrl 对象。代码如下:
```plain text plain private URL getConfigedInvokerUrl(List
1
2
3
4
5
6
7
8
9
10
11
12
13
14

---

- 第 39 至 43 行:判断新老 URL 若**不匹配重新暴露**[「4.2.3 doChangeLocalExport」](http://svip.iocoder.cn/Dubbo/cluster-6-impl-configurator/#)
,调用
RegistryProtocol#doChangeLocalExport(originInvoker, newUrl)
方法,
Invoker 对象。详细解析,见
。

### 4.2.3 doChangeLocalExport

```plain text
plain 1: private <T> void doChangeLocalExport(final Invoker<T> originInvoker, URL newInvokerUrl) {  2:     // 校验对应的 Exporter 是否存在。若不存在,打印告警日志。  3:     String key = getCacheKey(originInvoker);  4:     final ExporterChangeableWrapper<T> exporter = (ExporterChangeableWrapper<T>) bounds.get(key);  5:     if (exporter == null) {  6:         logger.warn(new IllegalStateException("error state, exporter should not be null"));  7:     } else {  8:         // 创建 InvokerDelegete 对象  9:         final Invoker<T> invokerDelegete = new InvokerDelegete<T>(originInvoker, newInvokerUrl); 10:         // 重新暴露 Invoker 11:         // 设置到 ExporterChangeableWrapper 中 12:         exporter.setExporter(protocol.export(invokerDelegete)); 13:     } 14: }
- 第 2 至 6 行:校验告警 对应的 ExporterChangeableWrapper 是否存在。若不存在,打印 日志。
- 第 9 行:创建 InvokerDelegete 对象。
- 第 12 行:调用 重新暴露销毁不需要 Protocol$Adaptive#export(Invoker) 方法, Invoker 对象。 可能会有机智的胖友会问,原来的 Exporter 不进行 么?实际上 ,原因有两点:
- 1、每个协议初始化的 Server 有缓存缓存 ,所以重新初始化,可以重用 中的 Server 。
- 2、如果销毁缓存而且,即使不销毁,原有 Exporter 也就是一个对象,可以被回收掉 原有 Exporter ,会导致 的 Server 也一起销毁。 。
- 第 12 行:调用 新的 ExporterChangeableWrapper#setExporter(exporter) 方法,设置 Exporter 对象。
4.3 ServiceConfig
TODO 8038 ServiceConfig 为啥判断了 url.protocol