服务调用(六)之远程调用(REST)
本文基于 Dubbo 2.6.1 版本,望知悉。
1. 概述
本文,我们分享 rest:// 协议的远程调用,主要分成三个部分:
- 服务暴露
- 服务引用
- 服务调用
对应项目为 dubbo-rpc-rest 。
对应文档为 《在Dubbo中开发REST风格的远程调用(RESTful Remoting)》 。
我们基于标准的 Java REST API——JAX-RS 2.0(Java API for RESTful Web Services s的简写),为 dubbo 提供了接近透明的 REST 调用支持。由于完全兼容 Java 标准 AP I,所以为 dubbo 开发的所有REST服务,未来脱离 dubbo 或者任何特定的 REST 底层实现一般也可以正常运行。
下面,我们来看看 JAX-RS 的简介:
JAX-RS 是标准的 Java REST API ,得到了业界的广泛支持和应用,其著名的开源实现就有很多,包括 Oracle 的 Jersey ,RedHat 的 Resteasy ,Apache 的 CXF 和 Wink ,以及restlet 等等。另外,所有支持 JavaEE 6.0 以上规范的商用 JavaEE 应用服务器都对 JAX-RS 提供了支持。因此,JAX-RS 是一种已经非常成熟的解决方案,并且采用它没有任何所谓 vendor lock-in 的问题。
在 dubbo-rpc-rest 项目中,目前使用使用的是 RedHat 的 Resteasy 。在 pom.xml 引入如下:
```plain text plain
1
2
3
4
5
6
7
8
9
10
11
12
13
14
15
16
17
18
19
20
21
---
因为本文会涉及到大量的 Resteasy 的原理,艿艿看了 [《RESTEASY ,从学会使用到了解原理》](http://www.cnblogs.com/langtianya/p/7624647.html) ,觉得非常不错,胖友一定要看噢。 也就是说,本文不会重复详细分享 Resteasy 的原理,哈哈哈。
本文涉及的类,如下图:
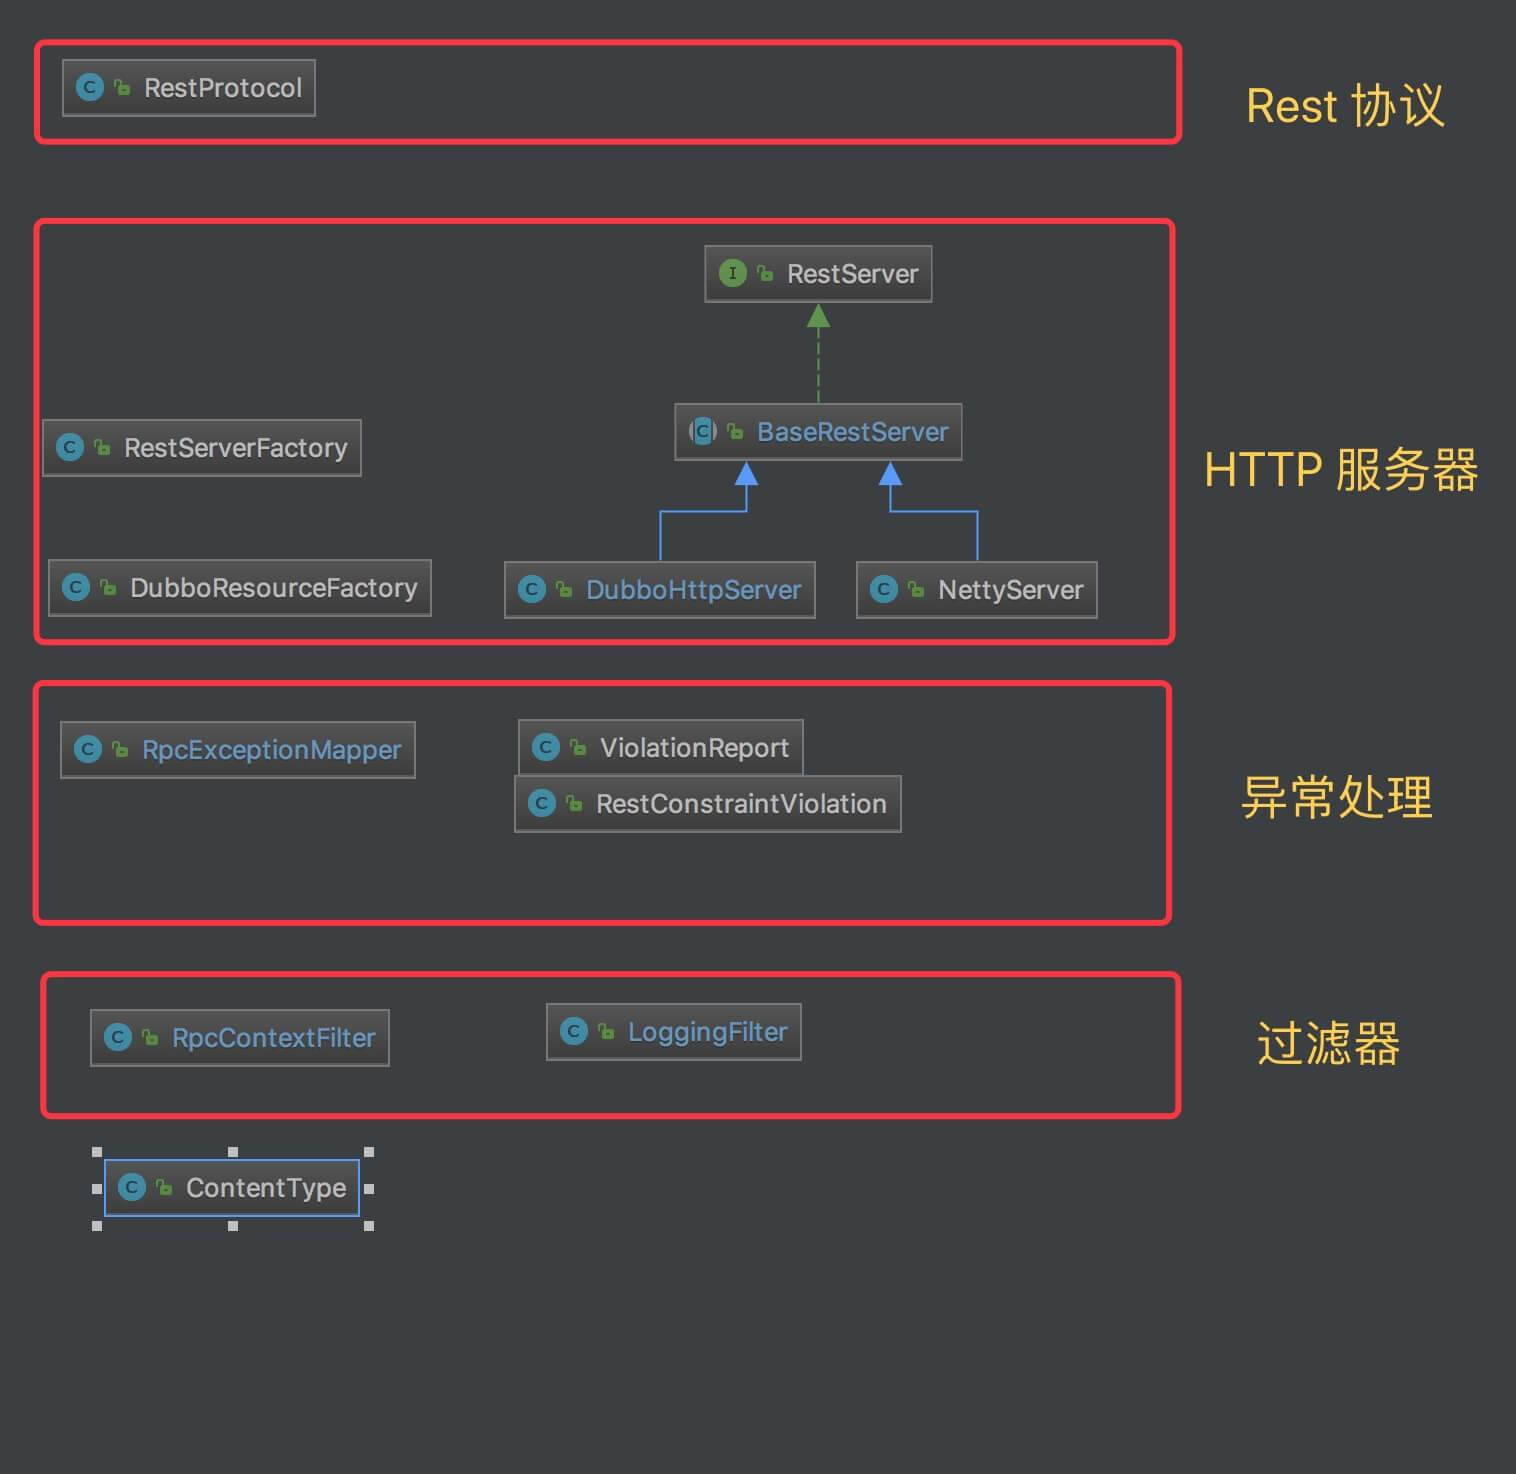
类图
我们先来看看 RestProtocol 的实现代码,然后再看其他层的实现。
# 2. RestProtocol
[com.alibaba.dubbo.rpc.protocol.rest.RestProtocol](https://github.com/YunaiV/dubbo/blob/master/dubbo-rpc/dubbo-rpc-rest/src/main/java/com/alibaba/dubbo/rpc/protocol/rest/RestProtocol.java) ,实现 AbstractProxyProtocol 抽象类,rest:// 协议实现类。
## 2.1 构造方法
```plain text
plain /** * 服务器默认端口 */ private static final int DEFAULT_PORT = 80; /** * 服务器集合 * * key:ip:port */ private final Map<String, RestServer> servers = new ConcurrentHashMap<String, RestServer>(); /** * 服务器工厂,负责创建服务器 */ private final RestServerFactory serverFactory = new RestServerFactory(); /** * 客户端数组 */ // TODO in the future maybe we can just use a single rest client and connection manager private final List<ResteasyClient> clients = Collections.synchronizedList(new LinkedList<ResteasyClient>()); /** * 连接监控器 */ private volatile ConnectionMonitor connectionMonitor; public RestProtocol() { super(WebApplicationException.class, ProcessingException.class); } public void setHttpBinder(HttpBinder httpBinder) { serverFactory.setHttpBinder(httpBinder); } public int getDefaultPort() { return DEFAULT_PORT; }
- 服务暴露相关属性: servers serverFactory 。
- 服务引用相关属性: clients connectionMonitor 。
- rpcExceptions = WebApplicationException.class 和 ProcessingException.class 。
- #setHttpBinder(httpBinder) 方法,在 RestProtocol 对象创建时,被 Dubbo SPI 机制调用,向 serverFactory 注入 httpBinder 属性。为什么这么做?在 RestServerFactory 的实现代码中,我们会看到原因。
2.2 doExport
```plain text plain 1: @Override 2: protected
1
2
3
4
5
6
7
8
9
10
11
12
13
14

---

- 第 4 行:调用
#getAddr(url)
方法,获得服务器地址
ip:port
。
- 第 6 行:调用
ServiceClassHolder#popServiceClass()
方法,获得服务的真实类名,例如:DemoServiceImpl 。在 ServiceConfig 初始化时,会调用如下代码:

```plain text
plain ServiceClassHolder.getInstance().pushServiceClass(getServiceClass(ref));
```plain text
- 当然,这不是一个优雅的实现,未来可能会重构优化这块的代码。
```
- 第 7 至 13 行:从 servers 中,获得 RestServer 对象。若不存在,调用 RestServerFactory#createServer(url) 方法进行创建,并且,调用 RestServer#start(url) 方法,进行启动。
- 第 15 至 39 行:调用 #getContextPath(url) 方法,获得 ContextPath 路径。代码如下:
```plain text plain protected String getContextPath(URL url) { int pos = url.getPath().lastIndexOf(“/”); // 尾部 / 之后 return pos > 0 ? url.getPath().substring(0, pos) : “”; }
1
2
3
4
5
6
7
8
9
10
11
12
13
14
15
16
17
18
19
20
21
22
23
24
25

---

- 第 41 行:获得以 **Annotation放在接口类还是实现类***但是,如后文所述,如果我们要用dubbo直接开发的消费端来访问此服务,则annotation必须放到接口上。*
@Path
为注解的基础类,一般情况下,我们直接在
implClass
上添加了该注解,即就是
implClass
类。当然,官方有一段话非常关键,如下:
在Dubbo 中开发 REST 服务主要都是通过 JAX-RS 的 annotation 来完成配置的,在上面的示例中,我们都是将 annotation 放在服务的实现类中。但其实,我们完全也可以将 annotation 放到服务的接口上,这两种方式是完全等价的。
在一般应用中,我们建议将 annotation 放到服务实现类,这样 annotation 和 java 实现代码位置更接近,更便于开发和维护。另外更重要的是,我们一般倾向于避免对接口的污染,保持接口的纯净性和广泛适用性。
【关键】
如果接口和实现类都同时添加了annotation,则实现类的 annotation 配置会生效,接口上的 annotation 被直接忽略。
- 第 43 行:调用 **请求是如何调度到 Service 的呢**[「3. RestServer」](http://svip.iocoder.cn/Dubbo/rpc-rest/#)
RestServer#deploy(resourceDef, impl, contextPath)
方法,部署 Service 到服务器上。到了此处,服务暴露就已经完成,那么
?在
详细解析。
- 第 44 至 52 行:返回取消暴露的回调 Runnable 。

## 2.3 doRefer

```plain text
plain 1: @Override  2: protected <T> T doRefer(Class<T> serviceType, URL url) throws RpcException {  3:     // 创建 ConnectionMonitor 对象。  4:     if (connectionMonitor == null) {  5:         connectionMonitor = new ConnectionMonitor();  6:     }  7:   8:     // 创建 HttpClient 连接池管理器  9:     // TODO more configs to add 10:     PoolingHttpClientConnectionManager connectionManager = new PoolingHttpClientConnectionManager(); 11:     // 20 is the default maxTotal of current PoolingClientConnectionManager 12:     connectionManager.setMaxTotal(url.getParameter(Constants.CONNECTIONS_KEY, 20)); // 最大请求数 13:     connectionManager.setDefaultMaxPerRoute(url.getParameter(Constants.CONNECTIONS_KEY, 20)); // 每个路由,最大请求数 14:     // 添加到 ConnectionMonitor 中。 15:     connectionMonitor.addConnectionManager(connectionManager); 16:  17:     // 创建 RequestConfig 对象 18:     RequestConfig requestConfig = RequestConfig.custom() 19:             .setConnectTimeout(url.getParameter(Constants.TIMEOUT_KEY, Constants.DEFAULT_TIMEOUT)) // 连接超时 20:             .setSocketTimeout(url.getParameter(Constants.TIMEOUT_KEY, Constants.DEFAULT_TIMEOUT)) // 请求超时 21:             .build(); 22:     // 创建 SocketConfig 对象 23:     SocketConfig socketConfig = SocketConfig.custom() 24:             .setSoKeepAlive(true) // 保持连接 25:             .setTcpNoDelay(true) 26:             .build(); 27:     // 创建 HttpClient 对象 【Apache】 28:     CloseableHttpClient httpClient = HttpClientBuilder.create() 29:             .setKeepAliveStrategy(new ConnectionKeepAliveStrategy() { // 优先以服务器返回的为准,缺省为 30 秒。 30:                 public long getKeepAliveDuration(HttpResponse response, HttpContext context) { 31:                     HeaderElementIterator it = new BasicHeaderElementIterator(response.headerIterator(HTTP.CONN_KEEP_ALIVE)); 32:                     while (it.hasNext()) { 33:                         HeaderElement he = it.nextElement(); 34:                         String param = he.getName(); 35:                         String value = he.getValue(); 36:                         if (value != null && param.equalsIgnoreCase("timeout")) { 37:                             return Long.parseLong(value) * 1000; 38:                         } 39:                     } 40:                     // TODO constant 41:                     return 30 * 1000; 42:                 } 43:             }) 44:             .setDefaultRequestConfig(requestConfig) 45:             .setDefaultSocketConfig(socketConfig) 46:             .build(); 47:  48:     // 创建 ApacheHttpClient4Engine 对象 【Resteasy】 49:     ApacheHttpClient4Engine engine = new ApacheHttpClient4Engine(httpClient/*, localContext*/); 50:     // 创建 ResteasyClient 对象 【Resteasy】 51:     ResteasyClient client = new ResteasyClientBuilder().httpEngine(engine).build(); 52:     // 添加到客户端集合 53:     clients.add(client); 54:  55:     // 设置 RpcContextFilter 过滤器 56:     client.register(RpcContextFilter.class); 57:     // 从 `extension` 配置项,设置对应的组件(过滤器 Filter 、拦截器 Interceptor 、异常匹配器 ExceptionMapper 等等)。 58:     for (String clazz : Constants.COMMA_SPLIT_PATTERN.split(url.getParameter(Constants.EXTENSION_KEY, ""))) { 59:         if (!StringUtils.isEmpty(clazz)) { 60:             try { 61:                 client.register(Thread.currentThread().getContextClassLoader().loadClass(clazz.trim())); 62:             } catch (ClassNotFoundException e) { 63:                 throw new RpcException("Error loading JAX-RS extension class: " + clazz.trim(), e); 64:             } 65:         } 66:     } 67:  68:     // 创建 Service Proxy 对象。 69:     // TODO protocol 70:     ResteasyWebTarget target = client.target("http://" + url.getHost() + ":" + url.getPort() + "/" + getContextPath(url)); 71:     return target.proxy(serviceType); 72: }
- 第 3 至 6 行:创建 ConnectionMonitor 对象。
- 第 8 至 15 行:创建 HttpClient 连接池管理器,设置请求数 相关配置,并且添加到 ConnectionMonitor 中。
- 第 17 至 46 行:创建 Apache HttpClient 对象。
- 第 17 至 21 行:创建 RequestConfig 对象,设置超时 相关配置。
- 第 22 至 26 行:创建 SocketConfig 对象,设置连接 相关配置。
- 第 29 至 43 行:创建 ConnectionKeepAliveStrategy 对象,优先以服务器返回 《HttpClient4.5.2 连接管理》2.6. 连接存活策略 Keep-Alive 为准,缺省为 30 秒。参见文章 的 : Http 规范没有规定一个持久连接应该保持存活多久。有些 Http 服务器使用非标准的 Keep-Alive 头消息和客户端进行交互,服务器端会保持数秒时间内保持连接。HttpClient 也会利用这个头消息。如果服务器返回的响应中没有包含 Keep-Alive 头消息,HttpClient会认为这个连接可以永远保持。然而,很多服务器都会在不通知客户端的情况下,关闭一定时间内不活动的连接,来节省服务器资源。在某些情况下默认的策略显得太乐观,我们可能需要自定义连接存活策略。
- 第 48 至 53 行:创建 Resteasy ResteasyClient 对象,并且添加到客户端集合 clients 中。
- 第 55 行:调用 ResteasyClient#register(Class<?> componentClass) 方法,注册 RpcContextFilter 到 ResteasyClient 中。
- 第 57 至 66 行:从 《在Dubbo中开发REST风格的远程调用(RESTful Remoting)》添加自定义的Filter、Interceptor等 extension 配置项,设置对应的组件(过滤器 Filter 、拦截器 Interceptor 、异常匹配器 ExceptionMapper 等等)。详细说明,参见 的 。
- 第 68 至 71 行:创建 ResteasyWebTarget 对象,并调用 Service Proxy ResteasyWebTarget#proxy(serviceType) 方法,创建 对象。
- 注意注解 ,上文也提到了,如果使用 Dubbo rest:// Consumer ,需要将 JAX-RS 的 到 Service 接口类中,否则,请求的参数和方法的参数,无法映射上。
2.3.1 getErrorCode
```plain text plain @Override protected int getErrorCode(Throwable e) { // TODO return super.getErrorCode(e); }
1
2
3
4
5
6
7
8
9
10
11
12
13
14
15
16

---

- 目前,暂未实现异常翻译成 Dubbo 的错误码。
- 一般情况下,我们不使用 Dubbo
rest://
Consumer ,而是让 Dubbo 暴露
dubbo://
服务,使用 Dubbo
dubbo://
Consumer 。

### 2.3.2 ConnectionMonitor

```plain text
plain protected class ConnectionMonitor extends Thread {      /**      * 是否关闭      */     private volatile boolean shutdown;     /**      * HttpClient 连接池管理器集合      */     private final List<PoolingHttpClientConnectionManager> connectionManagers = Collections.synchronizedList(new LinkedList<PoolingHttpClientConnectionManager>());      public void addConnectionManager(PoolingHttpClientConnectionManager connectionManager) {         connectionManagers.add(connectionManager);     }      @Override     public void run() {         try {             while (!shutdown) {                 synchronized (this) {                     // 等待 1000 ms                     wait(1000); // 可被下面 shutdown() 方法,强行关闭                     for (PoolingHttpClientConnectionManager connectionManager : connectionManagers) {                         connectionManager.closeExpiredConnections();                         // TODO constant                         connectionManager.closeIdleConnections(30, TimeUnit.SECONDS);                     }                 }             }         } catch (InterruptedException ex) {             shutdown();         }     }      public void shutdown() {         // 标记关闭         shutdown = true;         // 清除管理器集合         connectionManagers.clear();         // 唤醒等待线程         synchronized (this) {             notifyAll();         }     }  }
- 为什么有了连接池《HttpClient4.5.2 连接管理》2.5. 连接回收策略 ,还需要有这样一个 Monitor 呢?参见文章 的 : 经典阻塞 I/O 模型的一个主要缺点就是只有当组侧 I/O 时,socket 才能对 I/O 事件做出反应。当连接被管理器收回后,这个连接仍然存活,但是却无法监控socket的状态,也无法对I/O事件做出反馈。如果连接被服务器端关闭了,客户端监测不到连接的状态变化(也就无法根据连接状态的变化,关闭本地的 socket )。 HttpClient为了缓解这一问题造成的影响,会在使用某个连接前,监测这个连接是否已经过时,如果服务器端关闭了连接,那么连接就会失效。这种过时检查并不是 100% 有效,并且会给每个请求增加 10 到 30 毫秒额外开销。唯一一个可行的,且 does not involve a one thread per socket model for idle connections 的解决办法,是建立一个监控线程,来专门回收由于长时间不活动而被判定为失效的连接。这个监控线程可以周期性的调用ClientConnectionManager 类的 closeExpiredConnections() 方法来关闭过期的连接,回收连接池中被关闭的连接。它也可以选择性的调用 ClientConnectionManager 类的 closeIdleConnections() 方法来关闭一段时间内不活动的连接。
2.4 destroy
```plain text plain @Override public void destroy() { // 父类销毁 super.destroy(); // 关闭 ConnectionMonitor if (connectionMonitor != null) { connectionMonitor.shutdown(); } // 关闭服务器 for (Map.Entry<String, RestServer> entry : servers.entrySet()) { try { if (logger.isInfoEnabled()) { logger.info(“Closing the rest server at “ + entry.getKey()); } entry.getValue().stop(); } catch (Throwable t) { logger.warn(“Error closing rest server”, t); } } servers.clear(); // 关闭客户端 if (logger.isInfoEnabled()) { logger.info(“Closing rest clients”); } for (ResteasyClient client : clients) { try { client.close(); } catch (Throwable t) { logger.warn(“Error closing rest client”, t); } } clients.clear(); }
1
2
3
4
5
6
7
8
9
10
11

---

# 3. Server

## 3.1 RestServer

[com.alibaba.dubbo.rpc.protocol.rest.RestServer](https://github.com/YunaiV/dubbo/blob/master/dubbo-rpc/dubbo-rpc-rest/src/main/java/com/alibaba/dubbo/rpc/protocol/rest/RestServer.java) ,Rest Server 接口。方法如下:

```plain text
plain public interface RestServer {      /**      * 启动服务器      *      * @param url URL 对象      */     void start(URL url);      /**      * 停止服务器      */     void stop();      /**      * 部署服务      *      * @param resourceDef 服务类      * @param resourceInstance 服务对象      * @param contextPath ContextPath      */     void deploy(Class resourceDef, Object resourceInstance, String contextPath);      /**      * 取消服务      *      * @param resourceDef 服务类      */     void undeploy(Class resourceDef);  }
- 两对方法: start(…) 和 stop() 方法, #deploy(…) 和 undeploy(…) 方法。
3.2 BaseRestServer
com.alibaba.dubbo.rpc.protocol.rest.BaseRestServer ,实现 RestServer 接口,Rest Server 抽象基类。
3.2.1 抽象方法
```plain text plain protected abstract ResteasyDeployment getDeployment(); protected abstract void doStart(URL url);
1
2
3
4
5
6
7

---

### 3.2.2 start

```plain text
plain 1: @Override  2: public void start(URL url) {  3:     // 添加 MediaType  4:     getDeployment().getMediaTypeMappings().put("json", "application/json");  5:     getDeployment().getMediaTypeMappings().put("xml", "text/xml");  6: //    server.getDeployment().getMediaTypeMappings().put("xml", "application/xml");  7:     // 添加过滤器 RpcContextFilter  8:     getDeployment().getProviderClasses().add(RpcContextFilter.class.getName());  9:     // TODO users can override this mapper, but we just rely on the current priority strategy of resteasy 10:     // 添加异常匹配 RpcExceptionMapper 11:     getDeployment().getProviderClasses().add(RpcExceptionMapper.class.getName()); 12:     // 从 `extension` 配置项,添加对应的组件(过滤器 Filter 、拦截器 Interceptor 、异常匹配器 ExceptionMapper 等等) 13:     loadProviders(url.getParameter(Constants.EXTENSION_KEY, "")); 14:  15:     // 启动服务器 16:     doStart(url); 17: }
- 第 3 至 5 行:添加 json xml 两个 MediaType 。
- 第 8 行:添加过滤器 RpcContextFilter 。这个过滤器,我们在 ResteasyClient 的初始化时,也看到了。
- 第 9 行:添加异常匹配 RpcExceptionMapper 。
- 第 13 行:调用 #loadProviders(value) 方法,从 extension 配置项,添加对应的组件(过滤器 Filter 、拦截器 Interceptor 、异常匹配器 ExceptionMapper 等等)。这块代码,们在 ResteasyClient 的初始化时,也看到了。代码如下:
```plain text plain protected void loadProviders(String value) { for (String clazz : Constants.COMMA_SPLIT_PATTERN.split(value)) { if (!StringUtils.isEmpty(clazz)) { getDeployment().getProviderClasses().add(clazz.trim()); } } }
1
2
3
4
5
6
7
8
9
10
11

---

- 第 16 行:调用 **抽象**
#doStart(url)
方法,启动服务器。

### 3.2.3 deploy

```plain text
plain @Override public void deploy(Class resourceDef, Object resourceInstance, String contextPath) {     if (StringUtils.isEmpty(contextPath)) {         getDeployment().getRegistry().addResourceFactory(new DubboResourceFactory(resourceInstance, resourceDef));     } else {         getDeployment().getRegistry().addResourceFactory(new DubboResourceFactory(resourceInstance, resourceDef), contextPath);     } }
- 调用 ResteasyDeployment#addResourceFactory(ResourceFactory) 方法,部署 Service 服务。这里,如果类比 SpringMVC ,就是添加 @RestController 注解的类。
- com.alibaba.dubbo.rpc.protocol.rest.DubboResourceFactory ,比较易懂,胖友自己看哈。
- 到了此处,我们就可以看一下 Resteasy 的请求处理过程,如下图所示:
FROM 《RESTEASY ,从学会使用到了解原理》基础上修改
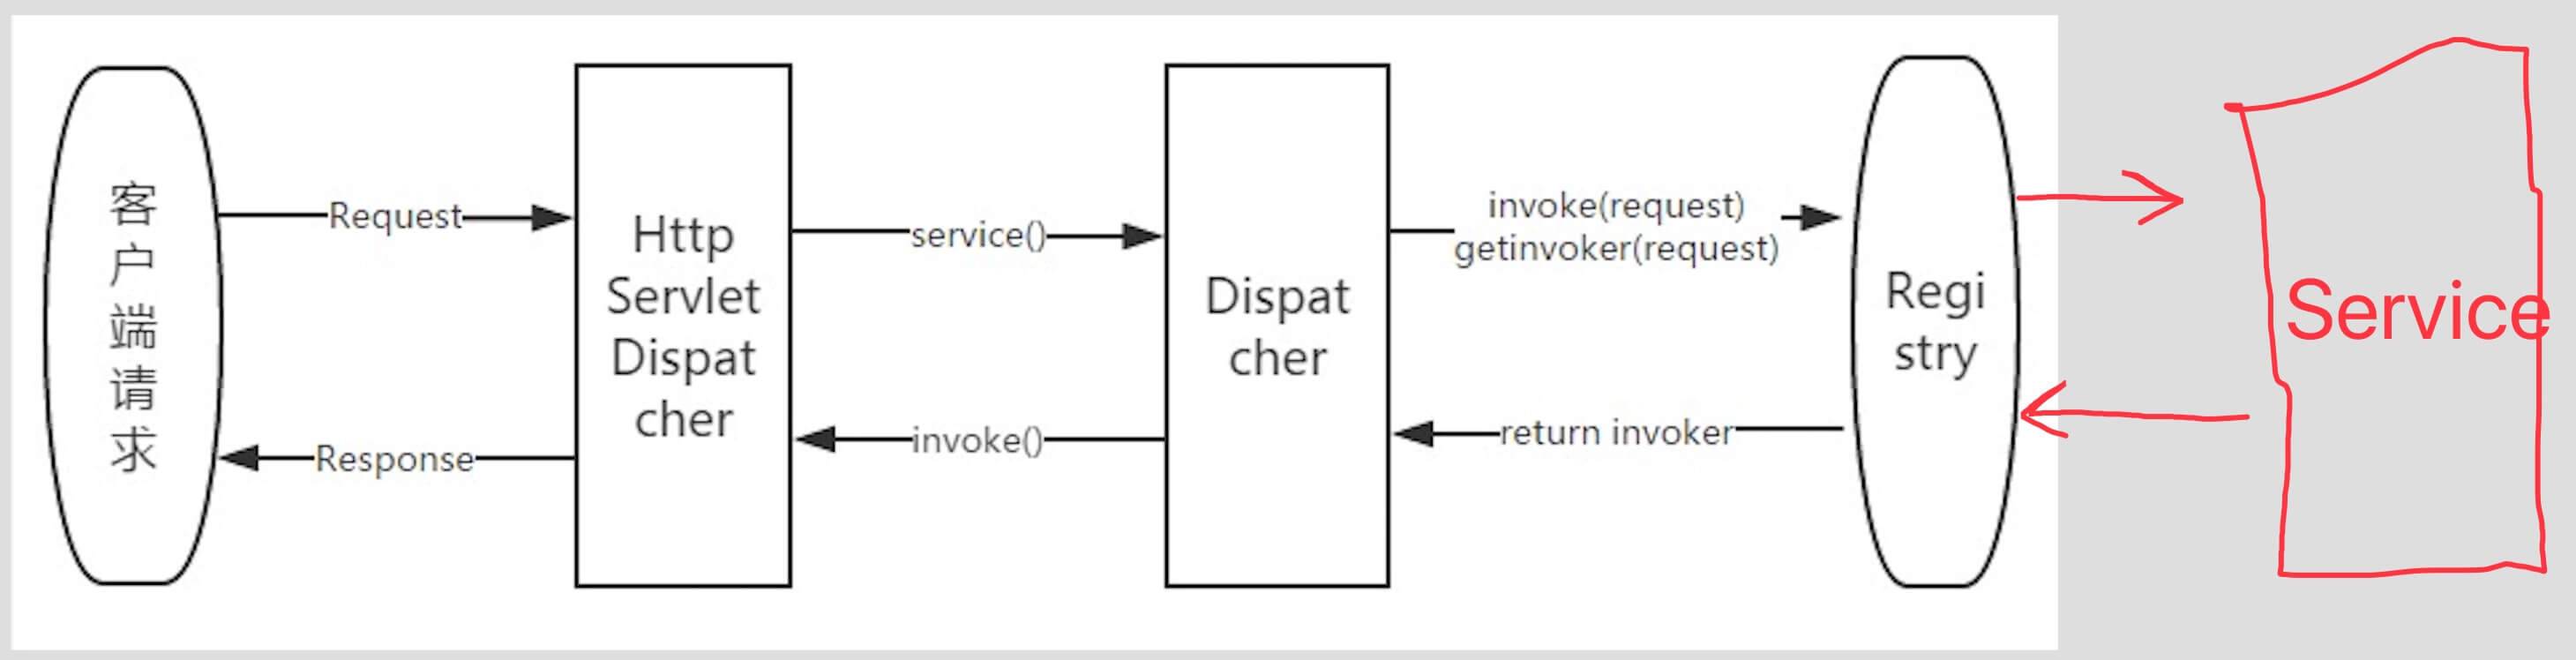
流程
- HttpServletDispatcher :接受并分发客户端 http 请求
- ResourceFactory :负责处理客户端请求的对象由谁来负责处理
- Registry :
- 服务器启动时加载用户自定义Rest资源时,会解析上面的注解,并将注解相对路径和该类中执行的方法建立对应关系注册到 Registry 中。
- 当客户端请求过来时会根据请求中的相对路径去 Registry 中查找对应的 Invoker 对象,然后执行并将处理结果返回。
是不是一下子就清晰了,世界又明亮了?!
3.2.4 undeploy
```plain text plain @Override public void undeploy(Class resourceDef) { getDeployment().getRegistry().removeRegistrations(resourceDef); }
1
2
3
4
5
6
7
8
9
10
11
12
13

---

## 3.3 NettyHttpServer

[com.alibaba.dubbo.rpc.protocol.rest.NettyHttpServer](https://github.com/YunaiV/dubbo/blob/master/dubbo-rpc/dubbo-rpc-rest/src/main/java/com/alibaba/dubbo/rpc/protocol/rest/NettyHttpServer.java) ,实现 BaseRestServer 抽象基类,基于 Netty 的 HTTP 服务器实现类。

**注意**,NettyHttpServer 不是 Servlet Container ,所以不能使用 @Context 注解。

### 3.3.1 doStart

```plain text
plain private final NettyJaxrsServer server = new NettyJaxrsServer();    1: @Override   2: protected void doStart(URL url) {   3:     // 设置 NettyJaxrsServer 的属性   4:     String bindIp = url.getParameter(Constants.BIND_IP_KEY, url.getHost());   5:     if (!url.isAnyHost() && NetUtils.isValidLocalHost(bindIp)) {   6:         server.setHostname(bindIp); // Hostname   7:     }   8:     server.setPort(url.getParameter(Constants.BIND_PORT_KEY, url.getPort())); // Port   9:     Map<ChannelOption, Object> channelOption = new HashMap<ChannelOption, Object>();  10:     channelOption.put(ChannelOption.SO_KEEPALIVE, url.getParameter(Constants.KEEP_ALIVE_KEY, Constants.DEFAULT_KEEP_ALIVE)); // Keep-Alive  11:     server.setChildChannelOptions(channelOption);  12:     server.setExecutorThreadCount(url.getParameter(Constants.THREADS_KEY, Constants.DEFAULT_THREADS)); // 执行线程数  13:     server.setIoWorkerCount(url.getParameter(Constants.IO_THREADS_KEY, Constants.DEFAULT_IO_THREADS)); // IO 线程数  14:     server.setMaxRequestSize(url.getParameter(Constants.PAYLOAD_KEY, Constants.DEFAULT_PAYLOAD)); // 请求最大长度  15:     // 启动 NettyJaxrsServer  16:     server.start();  17: }
- serverNetty4 属性, 对 Resteasy Server 的实现。
- 第 3 至 14 行:设置 NettyJaxrsServer 的属性。
- 第 16 行:调用 NettyJarxrsServer#start() 方法,启动服务器。
3.3.2 stop
```plain text plain @Override public void stop() { server.stop(); }
1
2
3
4
5
6
7

---

### 3.3.3 getDeployment

```plain text
plain @Override protected ResteasyDeployment getDeployment() {     return server.getDeployment(); }
3.4 DubboHttpServer
com.alibaba.dubbo.rpc.protocol.rest.DubboHttpServer ,实现 BaseRestServer 抽象基类,基于 dubbo-remoting-http 的 HTTP 服务器实现类。
3.4.1 构造方法
```plain text plain /** * Resteasy HttpServletDispatcher */ private final HttpServletDispatcher dispatcher = new HttpServletDispatcher(); /** * Resteasy ResteasyDeployment */ private final ResteasyDeployment deployment = new ResteasyDeployment(); /** * Dubbo HttpBinder$Adaptive */ private HttpBinder httpBinder; /** * HttpServer 对象 */ private HttpServer httpServer; public DubboHttpServer(HttpBinder httpBinder) { this.httpBinder = httpBinder; }
1
2
3
4
5
6
7
8
9
10
11
12

---

- DubboHttpServer 相比 NettyHttpServer 的请求流程会**复杂**
一些,
Dubbo DispatcherServlet => Dubbo RestHandler => Resteasy HttpServletDispatcher => …
。

### 3.4.2 doStart

```plain text
plain 1: @Override  2: protected void doStart(URL url) {  3:     // 创建 HttpServer 对象,使用 RestHandler 作为处理器。  4:     // TODO jetty will by default enable keepAlive so the xml config has no effect now  5:     httpServer = httpBinder.bind(url, new RestHandler());  6:   7:     // 获得 ServletContext 对象  8:     ServletContext servletContext = ServletManager.getInstance().getServletContext(url.getPort());  9:     if (servletContext == null) { 10:         servletContext = ServletManager.getInstance().getServletContext(ServletManager.EXTERNAL_SERVER_PORT); 11:     } 12:     if (servletContext == null) { 13:         throw new RpcException("No servlet context found. If you are using server='servlet', " + 14:                 "make sure that you've configured " + BootstrapListener.class.getName() + " in web.xml"); 15:     } 16:     // 设置 ResteasyDeployment 17:     servletContext.setAttribute(ResteasyDeployment.class.getName(), deployment); // https://github.com/resteasy/Resteasy/blob/master/server-adapters/resteasy-undertow/src/main/java/org/jboss/resteasy/plugins/server/undertow/UndertowJaxrsServer.java#L74 18:  19:     // 初始化 Resteasy HttpServletDispatcher 20:     try { 21:         dispatcher.init(new SimpleServletConfig(servletContext)); 22:     } catch (ServletException e) { 23:         throw new RpcException(e); 24:     } 25: }
- 第 5 行:调用 HttpBinder#bind(url, handler) 方法,创建 HttpServer 对象,使用 RestHandler 作为处理器。
- 第 7 至 17 行:获得 ServletContext 对象,设置 ResteasyDeployment 到属性 。
- 为什么是 UndertowJaxrsServer ResteasyDeployment.class.getName() 呢?参见 的代码。
- 第 19 至 24 行:调用 HttpServletDispatcher#init(ServletConfig) 方法,初始化 Resteasy 调度器。
- SimpleServletConfig ,主要是实现 ServletName 为 “DispatcherServlet” 。
3.4.3 stop
```plain text plain @Override public void stop() { httpServer.close(); }
1
2
3
4
5
6
7

---

### 3.4.4 getDeployment

```plain text
plain @Override protected ResteasyDeployment getDeployment() {     return deployment; }
3.4.5 RestHandler
```plain text plain private class RestHandler implements HttpHandler { @Override public void handle(HttpServletRequest request, HttpServletResponse response) throws IOException, ServletException { // 设置 RpcContext.getContext().setRemoteAddress(request.getRemoteAddr(), request.getRemotePort()); // 调度请求 dispatcher.service(request, response); } }
1
2
3
4
5
6
7
8
9
10
11
12
13
14
15
16
17
18
19
20
21
22
23
24
25
26
27
28
29
30
31
32
33
34
35
36
37
38
39
40
41
42
43
44
45

---

- 实现 HttpHandler 接口。
- 调用
HttpServletDispatcher#service(request, response)
方法,调度请求,给 Resteasy HttpServletDispatcher 。

## 3.5 RestServerFactory

[com.alibaba.dubbo.rpc.protocol.rest.RestServerFactory](https://github.com/YunaiV/dubbo/blob/master/dubbo-rpc/dubbo-rpc-rest/src/main/java/com/alibaba/dubbo/rpc/protocol/rest/RestServerFactory.java) ,创建 RestServer 的工厂。

代码比较简单,胖友自己看看。

# 4. Filter

这是 JAX-RS 中的 Filter ,而不是 Dubbo 的 Filter 。

## 4.1 RpcContextFilter

[com.alibaba.dubbo.rpc.protocol.rest.RpcContextFilter](https://github.com/YunaiV/dubbo/blob/master/dubbo-rpc/dubbo-rpc-rest/src/main/java/com/alibaba/dubbo/rpc/protocol/rest/RpcContextFilter.java) ,实现 ContainerRequestFilter 和 ClientRequestFilter 接口,**处理 RpcContext** 的 Filter 实现类。

- Client Filter :通过将 Dubbo RpcContext Attachment ,设置到 Http Header 的
Dubbo-Attachments
中,请求传递给 Server 。
- Server Filter :解析 Http Header 的
Dubbo-Attachments
,设置到 RpcContext Attachment 中。

代码比较简单,胖友自己看看。

## 4.2 LoggingFilter

[com.alibaba.dubbo.rpc.protocol.rest.support.LoggingFilter](https://github.com/YunaiV/dubbo/blob/master/dubbo-rpc/dubbo-rpc-rest/src/main/java/com/alibaba/dubbo/rpc/protocol/rest/support/LoggingFilter.java) ,实现 ContainerRequestFilter 和 ClientRequestFilter **等等**接口,打印日志的 Filter 。**目前仅打印请求和响应的 Header** 。

默认未使用,需要配置。

代码比较简单,胖友自己看看。

# 5. ExceptionMapper

[com.alibaba.dubbo.rpc.protocol.rest.ExceptionMapper](https://github.com/YunaiV/dubbo/blob/master/dubbo-rpc/dubbo-rpc-rest/src/main/java/com/alibaba/dubbo/rpc/protocol/rest/ExceptionMapper.java) ,实现 javax.ws.rs.ext.ExceptionMapper 接口,RPC 异常匹配实现类。代码如下:

```plain text
plain 1: @Override  2: public Response toResponse(RpcException e) {  3:     // 参数不合法,拼接返回 Response  4:     // TODO do more sophisticated exception handling and output  5:     if (e.getCause() instanceof ConstraintViolationException) { // java validation 异常  6:         return handleConstraintViolationException((ConstraintViolationException) e.getCause());  7:     }  8:     // 普通 Response 返回  9:     // we may want to avoid exposing the dubbo exception details to certain clients 10:     // TODO for now just do plain text output 11:     return Response.status(Response.Status.INTERNAL_SERVER_ERROR).entity("Internal server error: " + e.getMessage()).type(ContentType.TEXT_PLAIN_UTF_8).build(); 12: }
- 第 3 至 7 行:当 Java Validation 校验发现参数不合法时,调用 #handleConstraintViolationException(ConstraintViolationException) 方法,处理参数不合法的异常,拼接返回 Response 。代码如下:
```plain text plain protected Response handleConstraintViolationException(ConstraintViolationException cve) { ViolationReport report = new ViolationReport(); for (ConstraintViolation cv : cve.getConstraintViolations()) { report.addConstraintViolation(new RestConstraintViolation( cv.getPropertyPath().toString(), cv.getMessage(), cv.getInvalidValue() == null ? “null” : cv.getInvalidValue().toString())); } // TODO for now just do xml output return Response.status(Response.Status.INTERNAL_SERVER_ERROR).entity(report).type(ContentType.TEXT_XML_UTF_8).build(); }
1
2
3
4
5
6
7
8

---

```plain text
- <font style="color:rgb(51, 51, 51);">我们知道,一个请求可以有多个参数,因此,可以有多个约束条件,所以可以违反多个。</font>
- [com.alibaba.dubbo.rpc.protocol.rest.ViolationReport](https://github.com/YunaiV/dubbo/blob/master/dubbo-rpc/dubbo-rpc-rest/src/main/java/com/alibaba/dubbo/rpc/protocol/rest/ViolationReport.java)<font style="color:rgb(51, 51, 51);"> ,RestConstraintViolation 的集合。</font>
- [com.alibaba.dubbo.rpc.protocol.rest.RestConstraintViolation](https://github.com/YunaiV/dubbo/blob/master/dubbo-rpc/dubbo-rpc-rest/src/main/java/com/alibaba/dubbo/rpc/protocol/rest/RestConstraintViolation.java)<font style="color:rgb(51, 51, 51);"> ,</font>**<font style="color:rgb(51, 51, 51);">一条</font>**<font style="color:rgb(51, 51, 51);">不符合约束 。</font>
- <font style="color:rgb(51, 51, 51);">目前,仅返回 XML 格式。如果胖友需要 JSON 格式,可以自己拓展设置。</font>
- 第 11 行:普通 Response 返回。
6. ContentType
com.alibaba.dubbo.rpc.protocol.rest.ContentType ,ContentType 枚举类。代码如下:
plain text plain public class ContentType { public static final String APPLICATION_JSON_UTF_8 = MediaType.APPLICATION_JSON + "; " + MediaType.CHARSET_PARAMETER + "=UTF-8"; public static final String TEXT_XML_UTF_8 = MediaType.TEXT_XML + "; " + MediaType.CHARSET_PARAMETER + "=UTF-8"; public static final String TEXT_PLAIN_UTF_8 = MediaType.TEXT_PLAIN + "; " + MediaType.CHARSET_PARAMETER + "=UTF-8"; }
666. 彩蛋

知识星球
写的有一些些长了, 仿佛贴了整个项目的代码。
初看时,感觉比较复杂。梳理完后,觉得好简单的说。
读源码就是这样的感受:
初極狹,纔通人。復行數十步,豁然開朗。
共勉!
另外,在写这篇文章的过程中,笔者在想,是不是以后可以实现一个 springmvc:// 协议,相比 rest:// ,更易用和通用。毕竟,使用 Resteasy 的项目,实际不多。