服务引用(二)之远程引用(Dubbo)
本文基于 Dubbo 2.6.1 版本,望知悉。
1. 概述
在 《精尽 Dubbo 源码分析 —— 服务引用(一)之本地引用(Injvm)》 一文中,我们已经分享了本地引用服务。在本文中,我们来分享远程引用服务。在 Dubbo 中提供多种协议( Protocol ) 的实现,大体流程一致,本文以 Dubbo Protocol 为例子,这也是 Dubbo 的默认协议。
如果不熟悉该协议的同学,可以先看看 《Dubbo 使用指南 —— dubbo://》 ,简单了解即可。
特性
缺省协议,使用基于 mina 1.1.7 和 hessian 3.2.1 的 remoting 交互。
- 连接个数:单连接
- 连接方式:长连接
- 传输协议:TCP
- 传输方式:NIO 异步传输
- 序列化:Hessian 二进制序列化
- 适用范围:传入传出参数数据包较小(建议小于100K),消费者比提供者个数多,单一消费者无法压满提供者,尽量不要用 dubbo 协议传输大文件或超大字符串。
- 适用场景:常规远程服务方法调用
相比本地引用,远程引用会多做如下几件事情:
- 向注册中心订阅发现 ,从而 服务提供者列表。
- 启动通信客户端,通过它进行远程调用 。
2. 远程引用
远程暴露服务的顺序图如下:
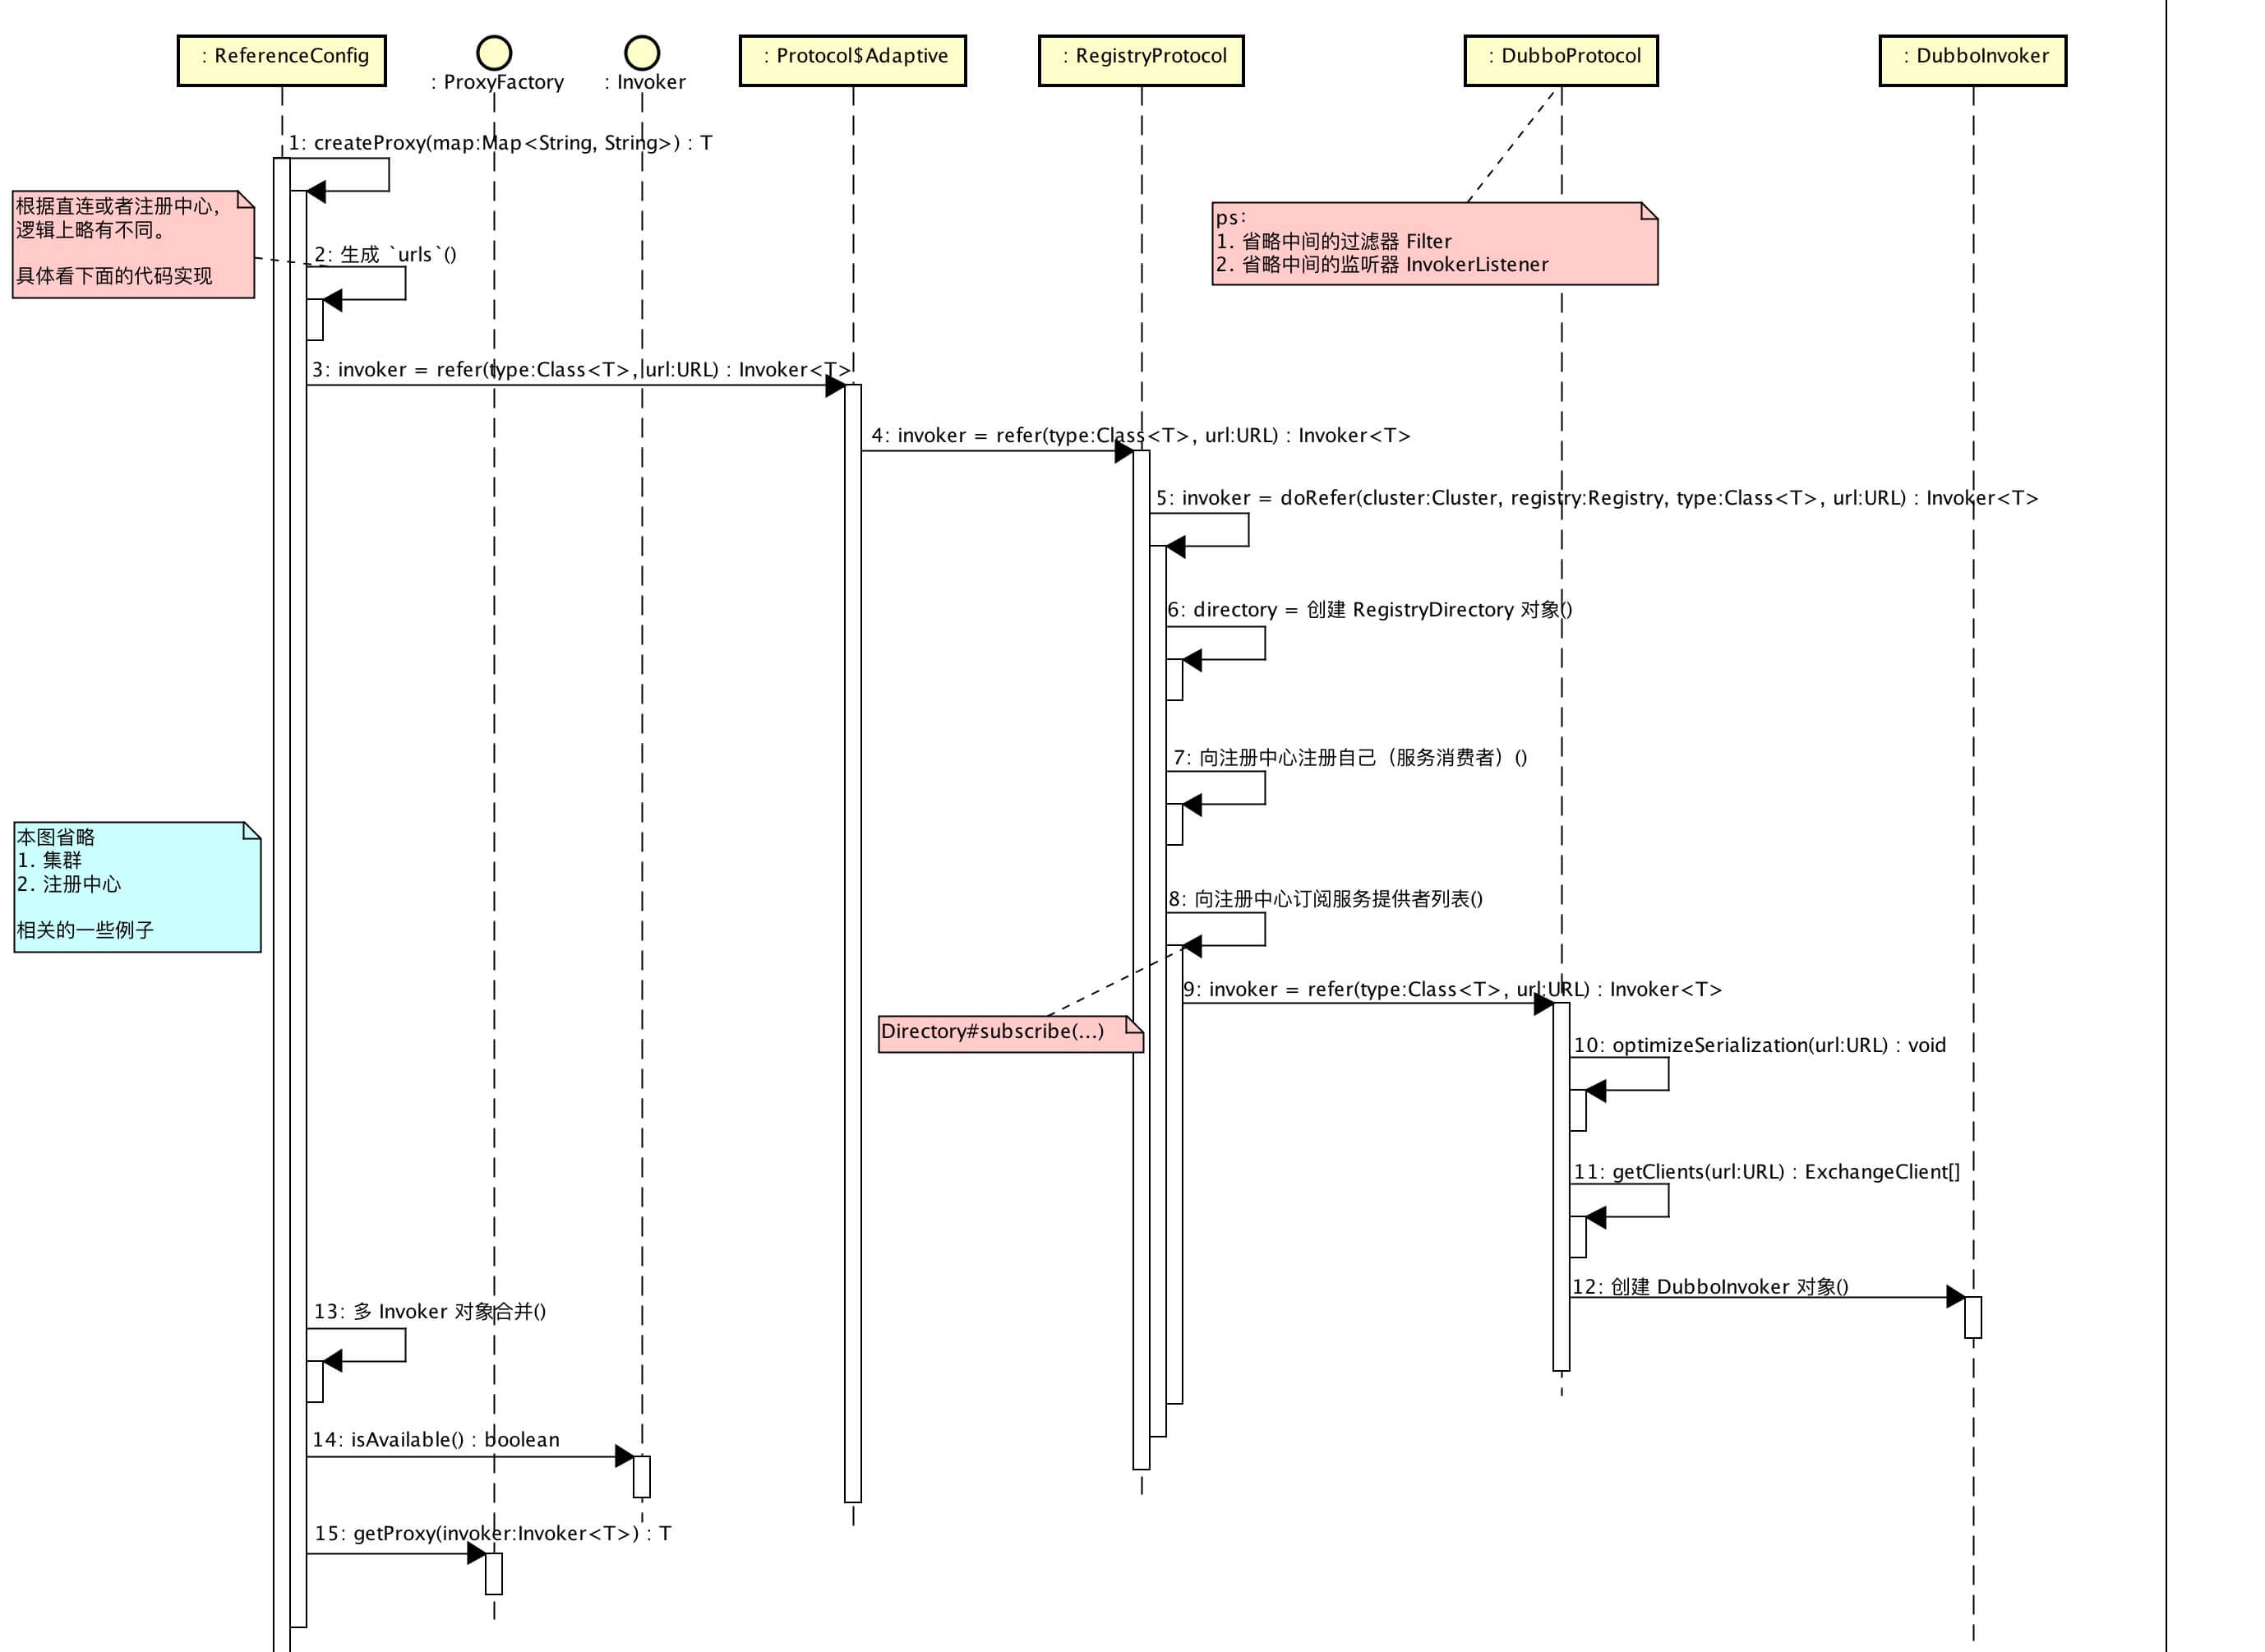
远程引用顺序图
在 #createProxy(map) 方法中,涉及远程引用服务的代码如下:
```plain text plain /** * 服务引用 URL 数组 */ private final List
1
2
3
4
5
6
7
8
9
10
11
12
13
14
15
16
17
18
19
20
21
22
23
24
25
26
27
28
29
30
31
32
33
34
35
36
37
38
39
40
41
42
43
44
45
46
47
48
49
50
51
52
53
54
55
56
57
58
59
60
61
62
63
64
65
66
67
68
69
70
71
72
73
74
75
76
77
78
79
80
81
82
83
84
85
86
87
88
89
90
91
92
93
94
95
96
97
98
99
100
101
102
103
104
105
106
107
108
109
110

---

- 第 11 行:省略**是否本地引用**[《精尽 Dubbo 源码分析 —— 服务引用(一)之本地引用(Injvm)》](http://svip.iocoder.cn/Dubbo/reference-refer-local/?self=)
的代码,在
已经有分享。
- 第 13 至 15 行:省略**本地引用**[《精尽 Dubbo 源码分析 —— 服务引用(一)之本地引用(Injvm)》](http://svip.iocoder.cn/Dubbo/reference-refer-local/?self=)
的代码,在
已经有分享。
- 第 16 至 90 行:正常流程,一般为远程引用。
- 第 18 至 38 行:**定义直连地址**
url
配置项,
,可以是服务提供者的地址,也可以是注册中心的地址。
    - 第 20 行:拆分地址成数组,使用 “;” 分隔。
    - 第 22 至 23 行:循环数组
us
,创建 URL 对象后,添加到
urls
中。
    - 第 25 行:创建 URL 对象。
    - 第 26 至 29 行:路径属性
url.path
未设置时,缺省使用接口全名
interfaceName
。
    - 第 30 至 32 行:若 **注册中心的地址**
url.protocol = registry
时,
,在参数
url.parameters.refer
上,设置上服务引用的配置参数集合
map
。
    - 第 33 至 36 行:**服务提供者的地址**
。
        - 从逻辑上类似【第 53 行】的代码。
        - 一般情况下,不建议这样在
url
配置注册中心,而是在
registry
配置。如果要配置,格式为
registry://host:port?registry=
,例如
registry://127.0.0.1?registry=zookeeper
。
        - TODO ClusterUtils.mergeUrl
- 第 39 至 59 行:**注册中心**
protocol
配置项,
。
    - 第 42 行:调用
#loadRegistries(provider)
方法,加载注册中心的 com.alibaba.dubbo.common.URL` 数组。
        - 在 [《精尽 Dubbo 源码分析 —— 服务暴露(一)之本地暴露(Injvm)》「2.1 loadRegistries」](http://svip.iocoder.cn/Dubbo/service-export-local/?self=)
详细解析。
    - 第 43 至 58 行:循环数组
us
,创建 URL 对象后,添加到
urls
中。
        - 第 47 行:调用
#loadMonitor(registryURL)
方法,获得监控中心 URL 。
            - 在 [《精尽 Dubbo 源码分析 —— 服务暴露(二)之远程暴露(Dubbo)》「2.1 loadRegistries」](http://svip.iocoder.cn/Dubbo/reference-refer-dubbo/#)
小节,详细解析。
        - 第 49 至 51 行:服务引用配置对象
map
,带上监控中心的 URL 。具体用途,我们在后面分享监控中心会看到。
        - 第 53 行:调用 [URL#addParameterAndEncoded(key, value)](https://github.com/YunaiV/dubbo/blob/c635dd1990a1803643194048f408db310f06175b/dubbo-common/src/main/java/com/alibaba/dubbo/common/URL.java#L891-L896)**并且需要编码包含了服务引用的配置**
方法,将服务引用配置对象参数集合
map
,作为
“refer”
参数添加到注册中心的 URL 中,
。通过这样的方式,注册中心的 URL 中,
。
- 第 61 至 64 行:单 **直接调用**
urls
时,
Protocol#refer(type, url)
方法,引用服务,返回 Invoker 对象。
    - 此处 Dubbo SPI **自适应好处自动**
的特性的
就出来了,可以
根据 URL 参数,获得对应的拓展实现。例如,
invoker
传入后,根据
invoker.url
自动获得对应 Protocol 拓展实现为 DubboProtocol 。
    - 实际上,Protocol 有两个 Wrapper 拓展实现类: ProtocolFilterWrapper、ProtocolListenerWrapper 。所以,
#export(…)
方法的调用顺序是:
        - **Protocol$Adaptive => ProtocolFilterWrapper => ProtocolListenerWrapper => RegistryProtocol**
        - =>
        - **Protocol$Adaptive => ProtocolFilterWrapper => ProtocolListenerWrapper => DubboProtocol**
        - 也就是说,**这一条大的调用链,包含两条小的调用链**
。原因是:
            - 首先,传入的是注册中心的 URL ,通过 Protocol$Adaptive 获取到的是 RegistryProtocol 对象。
            - 其次,RegistryProtocol 会在其
#refer(…)
方法中,使用服务提供者的 URL ( 即注册中心的 URL 的
refer
参数值),再次调用 Protocol$Adaptive 获取到的是 DubboProtocol 对象,进行服务暴露。
        - **为什么是这样的顺序AOP**
?通过这样的顺序,可以实现类似
的效果,在获取服务提供者列表后,再创建连接服务提供者的客户端。伪代码如下:

```plain text
plain RegistryProtocol#refer(...) {          // 1. 获取服务提供者列表 【并且订阅】          // 2. 创建调用连接服务提供者的客户端      DubboProtocol#refer(...);          // ps:实际这个过程中,还有别的代码,详细见下文。 }
```plain text + x
1
2
3
4
5
6
7
8
9
10
11
12
13
14
15
16
17
18
19
20
21
22
23
24
25
26
27
28
29
30
31
32
33
34
35
36
37
38
39
40
41
42
43
44
45
46
47
48
49
50
- 第 65 至 89 行:多 **循环调用**
urls
时,
Protocol#refer(type, url)
方法,引用服务,返回 Invoker 对象。此时,会有多个 Invoker 对象,需要进行合并。
- 什么时候会出现多个 [《Dubbo 用户指南 —— 多注册中心注册》](http://dubbo.apache.org/zh-cn/docs/user/demos/multi-registry.html)
urls
呢?例如:
。
- 第 66 至 76 行:循环
urls
,引用服务。
- 第 71 行:调用
Protocol#refer(type, url)
方法,引用服务,返回 Invoker 对象。然后,添加到
invokers
中。
- 第 72 会 75 行:使用最后一个注册中心的 URL ,赋值到
registryURL
。
- 第 77 至 88 行:详细解析,见 [《精尽 Dubbo 源码解析 —— 集群容错(三)之 Directory 实现》](http://svip.iocoder.cn/Dubbo/cluster-3-impl-directory/?self=)
。
- 第 92 行:省略**启动时检查**[《精尽 Dubbo 源码分析 —— 服务引用(一)之本地引用(Injvm)》](http://svip.iocoder.cn/Dubbo/reference-refer-local/?self=)
的代码,在
已经有分享。
- 第 96 行:省略**创建 Service 代理对象**[《精尽 Dubbo 源码分析 —— 服务引用(一)之本地引用(Injvm)》](http://svip.iocoder.cn/Dubbo/reference-refer-local/?self=)
的代码,在
已经有分享。
# 3. Protocol
**服务引用与暴露的 Protocol 很多类似点**,本文就不重复叙述了。
建议不熟悉的胖友,请点击 [《精尽 Dubbo 源码分析 —— 服务暴露(一)之本地暴露(Injvm)》「3. Protocol」](http://svip.iocoder.cn/Dubbo/service-export-local/?self=) 查看。
本文涉及的 Protocol 类图如下:
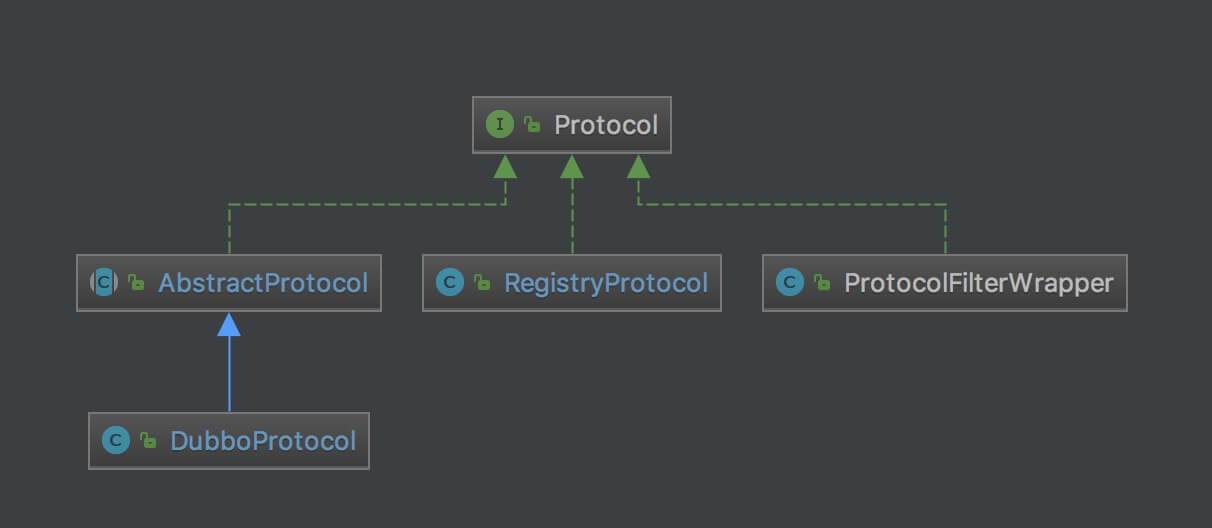
Protocol 类图
## 3.1 ProtocolFilterWrapper
接 [《精尽 Dubbo 源码分析 —— 服务引用(一)之本地引用(Injvm)》「 3.1 ProtocolFilterWrapper」](http://svip.iocoder.cn/Dubbo/service-reference-local/?self=) 小节。
本文涉及的 #refer(type, url) 方法,代码如下:
```plain text
plain 1: public <T> Invoker<T> refer(Class<T> type, URL url) throws RpcException { 2: // 注册中心 3: if (Constants.REGISTRY_PROTOCOL.equals(url.getProtocol())) { 4: return protocol.refer(type, url); 5: } 6: // 引用服务,返回 Invoker 对象 7: // 给改 Invoker 对象,包装成带有 Filter 过滤链的 Invoker 对象 8: return buildInvokerChain(protocol.refer(type, url), Constants.REFERENCE_FILTER_KEY, Constants.CONSUMER); 9: }
- 第 2 至 5 行:当 注册中心的 URL invoker.url.protocl = registry , ,无需创建 Filter 过滤链。
- 第 8 行:调用 protocol#refer(type, url) 方法,继续引用服务,最终返回 Invoker 。
- 第 8 行:在引用服务完成后,调用 #buildInvokerChain(invoker, key, group) 方法,创建带有 Filter 过滤链的 Invoker 对象。
3.2 RegistryProtocol
3.2.1 refer
本文涉及的 #refer(type, url) 方法,代码如下:
```plain text plain /** * Cluster 自适应拓展实现类对象 */ private Cluster cluster; 1: public
1
2
3
4
5
6
7
8
9
10
11
12
13
14
15
16
17
18
19
20
21
22
23
24
25
---
- 第 3 行:获得**真实**[《精尽 Dubbo 源码分析 —— 服务暴露(一)之本地暴露(Injvm)》「2.1 loadRegistries」](http://svip.iocoder.cn/Dubbo/reference-refer-dubbo/#)**红线部分**
的注册中心的 URL 。该过程是我们在
的那张图的反向流程,即
:
getRegistryUrl
- 第 5 行:获得注册中心 Registry 对象。
- 第 7至 9 行:【TODO 8018】RegistryService.class
- 第 13 行:获得服务引用配置参数集合
qs
。
- 第 16 至 22 行:分组聚合,参见 [《Dubbo 用户指南 —— 分组聚合》](http://dubbo.apache.org/zh-cn/docs/user/demos/group-merger.html)
文档。
- 第 24 行:调用 **可合并的**
#doRefer(cluster, registry, type, url)
方法,执行服务引用。不同于【第 20 行】的代码,后者调用
#getMergeableCluster()
方法,获得
Cluster 对象,代码如下:
```plain text
plain private Cluster getMergeableCluster() { return ExtensionLoader.getExtensionLoader(Cluster.class).getExtension("mergeable"); }
3.2.2 doRefer
#doRefer(cluster, registry, type, url) 方法,执行服务引用的逻辑。代码如下:
```plain text plain 1: /** 2: * 执行服务引用,返回 Invoker 对象 3: * 4: * @param cluster Cluster 对象 5: * @param registry 注册中心对象 6: * @param type 服务接口类型 7: * @param url 注册中心 URL 8: * @param
1
2
3
4
5
6
7
8
9
10
11
12
13
14
15
16
17
18
19
20
21
22
23
24
25
26
27
28
29
30
31
32
33
34
35
36
37
38
39
40
41
42
43
44
---
- 第 12 至 15 行,创建 RegistryDirectory 对象,并设置注册中心到它的属性。
- 第 18 行:获得服务引用配置集合 **注意**
parameters
。
,
url
传入 RegistryDirectory 后,经过处理并重新创建,所以
url != directory.url
,所以获得的是服务引用配置集合。如下图所示:
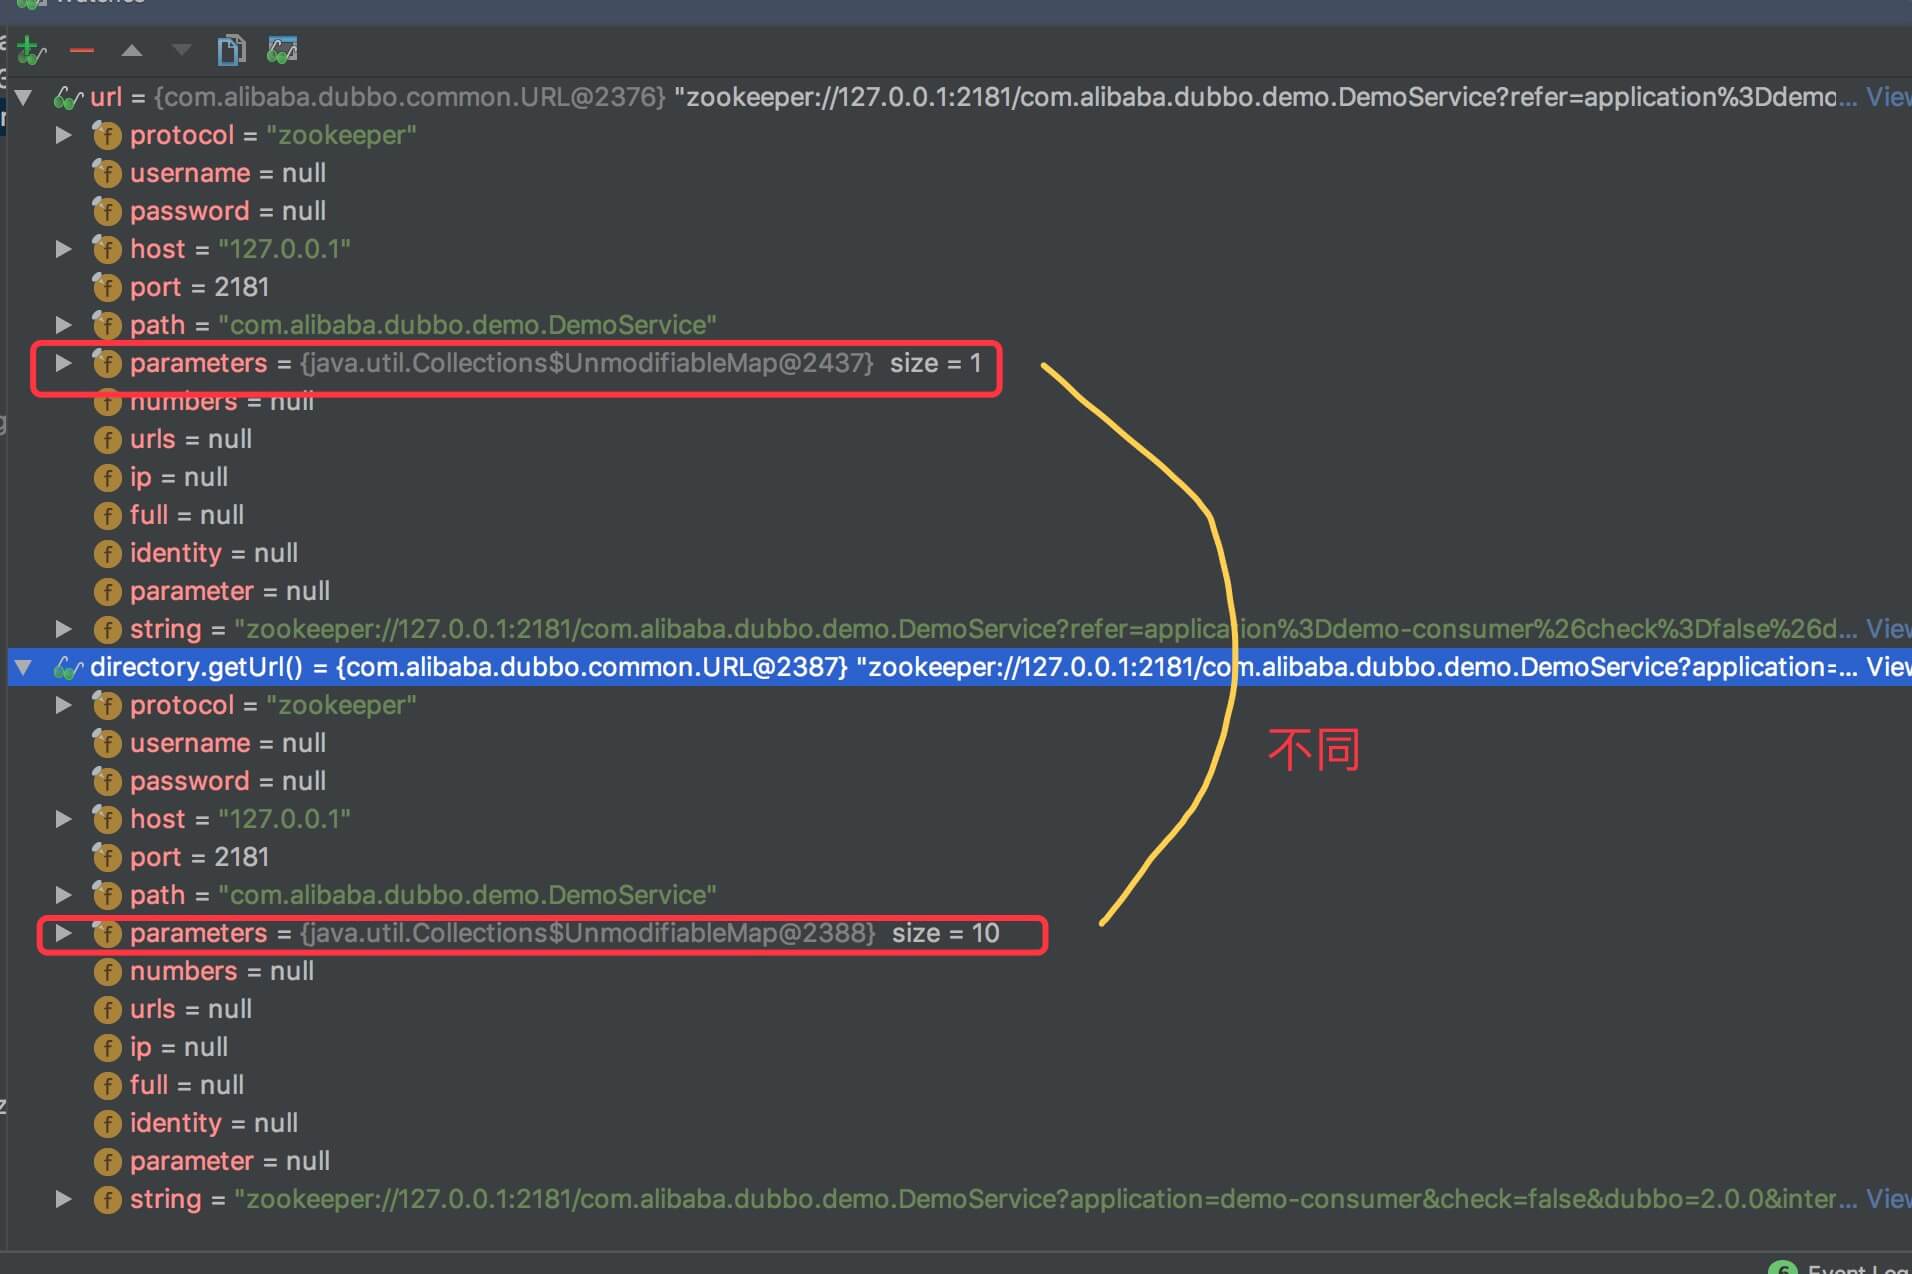
parameters
- 第 19 行:创建订阅 URL 对象。
- 第 20 至 25 行:调用 **自己**
RegistryService#register(url)
方法,向注册中心注册
(服务消费者)。
- 在 [《精尽 Dubbo 源码分析 —— 注册中心(一)之抽象 API》「3. RegistryService」](http://svip.iocoder.cn/Dubbo/registry-api/?self=)
,有详细解析。
- 第 26 终 30 行:调用
Directory#subscribe(url)
方法,向注册中心订阅服务提供者 + 路由规则 + 配置规则。
- 在该方法中,会循环获得到的服务体用这列表,调用
Protocol#refer(type, url)
方法,创建每个调用服务的 Invoker 对象。
- 第 33 行:创建 Invoker 对象。详细解析,见 [《精尽 Dubbo 源码解析 —— 集群容错(一)之抽象 API》](http://svip.iocoder.cn/Dubbo/cluster-1-api-interface/?self=)
。
- 第 35 行:调用
ProviderConsumerRegTable#registerConsuemr(invoker, url, subscribeUrl, directory)
方法,向本地注册表,注册消费者。
- 在 [《精尽 Dubbo 源码分析 —— 注册中心(一)之抽象 API》「5. ProviderConsumerRegTable」](http://svip.iocoder.cn/Dubbo/registry-api/?self=)
,有详细解析。
- 第 36 行:返回 Invoker 对象。
## 3.3 DubboProtocol
### 3.3.1 refer
本文涉及的 #refer(type, url) 方法,代码如下:
```plain text
plain // AbstractProtocol.java 父类 /** * Invoker 集合 */ //TODO SOFEREFENCE protected final Set<Invoker<?>> invokers = new ConcurrentHashSet<Invoker<?>>(); // DubboProtocol.java 1: public <T> Invoker<T> refer(Class<T> serviceType, URL url) throws RpcException { 2: // 初始化序列化优化器 3: optimizeSerialization(url); 4: // 获得远程通信客户端数组 5: // 创建 DubboInvoker 对象 6: // create rpc invoker. 7: DubboInvoker<T> invoker = new DubboInvoker<T>(serviceType, url, getClients(url), invokers); 8: // 添加到 `invokers` 9: invokers.add(invoker); 10: return invoker; 11: }
- invokers 属性,Invoker 集合。
- 第 3 行:调用 《精尽 Dubbo 源码分析 —— 序列化(一)之总体实现》 #optimizeSerialization(url) 方法,初始化序列化优化器。在 中,详细解析。
- 第 7 行:调用 #getClients(url) 方法,创建远程通信客户端数组。
- 第 7 行:创建 DubboInvoker 对象。
- 第 9 行:添加到 invokers 。
- 第 10 行:返回 Invoker 对象。
3.3.2 getClients
友情提示,涉及 Client 的内容,胖友先看过 《精尽 Dubbo 源码分析 —— NIO 服务器》 所有的文章。
#getClients(url) 方法,获得连接服务提供者的远程通信客户端数组。代码如下:
```plain text plain 1: /** 2: * 获得连接服务提供者的远程通信客户端数组 3: * 4: * @param url 服务提供者 URL 5: * @return 远程通信客户端 6: */ 7: private ExchangeClient[] getClients(URL url) { 8: // 是否共享连接 9: // whether to share connection 10: boolean service_share_connect = false; 11: int connections = url.getParameter(Constants.CONNECTIONS_KEY, 0); 12: // if not configured, connection is shared, otherwise, one connection for one service 13: if (connections == 0) { // 未配置时,默认共享 14: service_share_connect = true; 15: connections = 1; 16: } 17: 18: // 创建连接服务提供者的 ExchangeClient 对象数组 19: ExchangeClient[] clients = new ExchangeClient[connections]; 20: for (int i = 0; i < clients.length; i++) { 21: if (service_share_connect) { // 共享 22: clients[i] = getSharedClient(url); 23: } else { // 不共享 24: clients[i] = initClient(url); 25: } 26: } 27: return clients; 28: }
1
2
3
4
5
6
7
8
9
10
11
12
13
14
15
16
17
18
19
20
21
22
23
24
25
26
27
28

---

- 第 8 至 16 行:是否共享连接。
- 第 18 至 26 行:创建连接服务提供者的 ExchangeClient 对象数组。
    - **注意**
,若开启共享连接,基于 URL 为维度共享。
    - 第 21 至 22 行:共享连接,调用
#getSharedClient(url)
方法,获得 ExchangeClient 对象。
    - 第 23 至 25 行:不共享连接,调用
#initClient(url)
方法,直接创建 ExchangeClient 对象。
- connections
配置项。
    - 默认 0 。即,对同一个远程服务器,**共用**
同一个连接。
    - 大于 0 。即,每个服务引用,**独立**
每一个连接。
    - [《Dubbo 用户指南 —— 连接控制》](http://dubbo.apache.org/zh-cn/docs/user/demos/config-connections.html)
    - [《Dubbo 用户指南 —— dubbo:reference》](http://dubbo.apache.org/zh-cn/docs/user/references/xml/dubbo-reference.html)

### 3.3.3 getSharedClient

#getClients(url) 方法,获得连接服务提供者的远程通信客户端数组。代码如下:

```plain text
plain /**  * 通信客户端集合  *  * key: 服务器地址。格式为:host:port  */ private final Map<String, ReferenceCountExchangeClient> referenceClientMap = new ConcurrentHashMap<String, ReferenceCountExchangeClient>(); // <host:port,Exchanger> /**  * TODO 8030 ,这个是什么用途啊。  *  * key: 服务器地址。格式为:host:port 。和 {@link #referenceClientMap} Key ,是一致的。  */ private final ConcurrentMap<String, LazyConnectExchangeClient> ghostClientMap = new ConcurrentHashMap<String, LazyConnectExchangeClient>();    1: private ExchangeClient getSharedClient(URL url) {   2:     // 从集合中,查找 ReferenceCountExchangeClient 对象   3:     String key = url.getAddress();   4:     ReferenceCountExchangeClient client = referenceClientMap.get(key);   5:     if (client != null) {   6:         // 若未关闭,增加指向该 Client 的数量,并返回它   7:         if (!client.isClosed()) {   8:             client.incrementAndGetCount();   9:             return client;  10:         // 若已关闭,移除  11:         } else {  12:             referenceClientMap.remove(key);  13:         }  14:     }  15:     // 同步,创建 ExchangeClient 对象。  16:     synchronized (key.intern()) {  17:         // 创建 ExchangeClient 对象  18:         ExchangeClient exchangeClient = initClient(url);  19:         // 将 `exchangeClient` 包装,创建 ReferenceCountExchangeClient 对象  20:         client = new ReferenceCountExchangeClient(exchangeClient, ghostClientMap);  21:         // 添加到集合  22:         referenceClientMap.put(key, client);  23:         // 添加到 `ghostClientMap`  24:         ghostClientMap.remove(key);  25:         return client;  26:     }  27: }
- referenceClientMap连接共享 属性,通信客户端集合。在我们创建好 Client 对象,“ ”服务器后,会添加到这个集合中,用于后续的 Client 的 。
- ReferenceCountExchangeClient ,顾名思义,带有指向数量计数的 Client 封装。
- “连接 ” ,打引号的原因,因为有 LazyConnectExchangeClient ,还是顾名思义,延迟连接的 Client 封装。
- ReferenceCountExchangeClient 和 LazyConnectExchangeClient 的具体实现,在 「5. Client」 详细解析。
- ghostClientMap 属性,幽灵客户端集合。TODO 8030 ,这个是什么用途啊。
- 【添加】每次 ReferenceCountExchangeClient 彻底重新创建幽灵客户端 关闭( 指向归零 ) ,其内部的 client 会替换成 的 LazyConnectExchangeClient 对象,此时叫这个对象为 ,添加到 ghostClientMap 中。
- 【移除】当幽灵客户端,对应的 URL 的服务器被重新连接上后,会被移除。
- 注意被移除之前幽灵 ,在幽灵客户端 , referenceClientMap 中,依然保留着对应的 URL 的 ReferenceCountExchangeClient 对象。所以, ghostClientMap 相当于标记 referenceClientMap 中,哪些 LazyConnectExchangeClient 对象,是 状态。
- 第 2 至 4 行:从集合 referenceClientMap 中,查找 ReferenceCountExchangeClient 对象。
- 第 5 至 14 行:查找到客户端。
- 第 6 至 9 行:若未关闭 ,调用 ReferenceCountExchangeClient#incrementAndGetCount() 方法,增加指向该客户端的数量,并返回。
- 第 11 至 13 行:若已关闭幽灵新的 ,适用于 状态的 ReferenceCountExchangeClient 对象,从 referenceClientMap 中移除,准备下面的代码,创建 ReferenceCountExchangeClient 对象。
- 第 15 至 26 行:同步 ( synchronized ) ,创建新的 ReferenceCountExchangeClient 对象。
- 第 18 行:调用 #initClient(url) 方法,创建 ExchangeClient 对象。
- 第 20 行:将 ExchangeClient 对象,封装创建成 ReferenceCountExchangeClient 独享。
- 第 22 行:添加到集合 referenceClientMap 。
- 第 24 行:移除出集合 幽灵 ghostClientMap ,因为不再是 状态啦。
3.3.4 initClient
#initClient(url) 方法,创建 ExchangeClient 对象,”连接”服务器。
```plain text plain 1: private ExchangeClient initClient(URL url) { 2: // 校验 Client 的 Dubbo SPI 拓展是否存在 3: // client type setting. 4: String str = url.getParameter(Constants.CLIENT_KEY, url.getParameter(Constants.SERVER_KEY, Constants.DEFAULT_REMOTING_CLIENT)); 5: // BIO is not allowed since it has severe performance issue. 6: if (str != null && str.length() > 0 && !ExtensionLoader.getExtensionLoader(Transporter.class).hasExtension(str)) { 7: throw new RpcException(“Unsupported client type: “ + str + “,” + 8: “ supported client type is “ + StringUtils.join(ExtensionLoader.getExtensionLoader(Transporter.class).getSupportedExtensions(), “ “)); 9: } 10: 11: // 设置编解码器为 Dubbo ,即 DubboCountCodec 12: url = url.addParameter(Constants.CODEC_KEY, DubboCodec.NAME); 13: 14: // 默认开启 heartbeat 15: // enable heartbeat by default 16: url = url.addParameterIfAbsent(Constants.HEARTBEAT_KEY, String.valueOf(Constants.DEFAULT_HEARTBEAT)); 17: 18: // 连接服务器,创建客户端 19: ExchangeClient client; 20: try { 21: // 懒连接,创建 LazyConnectExchangeClient 对象 22: // connection should be lazy 23: if (url.getParameter(Constants.LAZY_CONNECT_KEY, false)) { 24: client = new LazyConnectExchangeClient(url, requestHandler); 25: // 直接连接,创建 HeaderExchangeClient 对象 26: } else { 27: client = Exchangers.connect(url, requestHandler); 28: } 29: } catch (RemotingException e) { 30: throw new RpcException(“Fail to create remoting client for service(“ + url + “): “ + e.getMessage(), e); 31: } 32: return client; 33: }
1
2
3
4
5
6
7
8
9
10
11
12
13
14
15
16
17
18
19
20
21
22
23
24
25
26
27
28
29
---
- 第 2 至 9 行:校验配置的 Client 的 Dubbo SPI 拓展是否存在。若不存在,抛出 RpcException 异常。
- 第 12 行:设置编解码器为
“Dubbo”
协议,即 DubboCountCodec 。
- 第 16 行:默认开启**心跳**
功能。
- 第 19 至 31 行:连接服务器,创建客户端。
- 第 21 至 24 行:**懒加载**
,创建 LazyConnectExchangeClient 对象。
- 第 25 至 28 行:**直接连接**
,创建 HeaderExchangeClient 对象。
# 4. Invoker
本文涉及的 Invoker 类图如下:
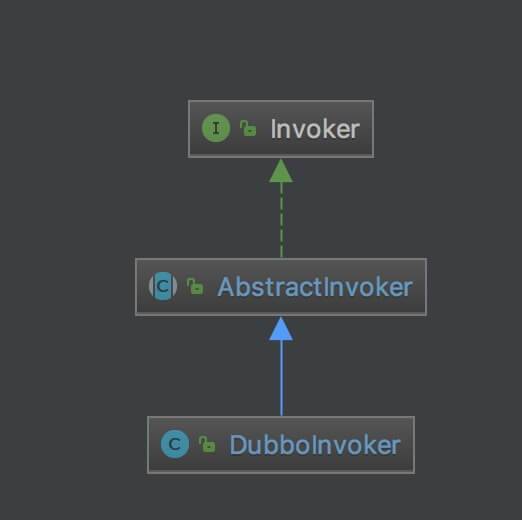
Invoker 类图
## 4.1 DubboInvoker
[com.alibaba.dubbo.rpc.protocol.dubbo.DubboInvoker](https://github.com/YunaiV/dubbo/blob/8de6d56d06965a38712c46a0220f4e59213db72f/dubbo-rpc/dubbo-rpc-default/src/main/java/com/alibaba/dubbo/rpc/protocol/dubbo/DubboInvoker.java) ,实现 AbstractExporter 抽象类,Dubbo Invoker 实现类。代码如下:
```plain text
plain 1: /** 2: * 远程通信客户端数组 3: */ 4: private final ExchangeClient[] clients; 5: /** 6: * 使用的 {@link #clients} 的位置 7: */ 8: private final AtomicPositiveInteger index = new AtomicPositiveInteger(); 9: /** 10: * 版本 11: */ 12: private final String version; 13: /** 14: * 销毁锁 15: * 16: * 在 {@link #destroy()} 中使用 17: */ 18: private final ReentrantLock destroyLock = new ReentrantLock(); 19: /** 20: * Invoker 集合,从 {@link DubboProtocol#invokers} 获取 21: */ 22: private final Set<Invoker<?>> invokers; 23: 24: public DubboInvoker(Class<T> serviceType, URL url, ExchangeClient[] clients) { 25: this(serviceType, url, clients, null); 26: } 27: 28: public DubboInvoker(Class<T> serviceType, URL url, ExchangeClient[] clients, Set<Invoker<?>> invokers) { 29: super(serviceType, url, new String[]{Constants.INTERFACE_KEY, Constants.GROUP_KEY, Constants.TOKEN_KEY, Constants.TIMEOUT_KEY}); 30: this.clients = clients; 31: // get version. 32: this.version = url.getParameter(Constants.VERSION_KEY, "0.0.0"); 33: this.invokers = invokers; 34: }
- 胖友,请看属性上的代码注释。
- 第 29 行:调用父类构造方法。该方法中,会将 interface group version token timeout 添加到公用的隐式传参 AbstractInvoker.attachment 属性。
- 代码比较简单,胖友请自己阅读。
5. Client
友情提示,涉及 Client 的内容,胖友先看过 《精尽 Dubbo 源码分析 —— NIO 服务器》 所有的文章。
5.1 ReferenceCountExchangeClient
com.alibaba.dubbo.rpc.protocol.dubbo.ReferenceCountExchangeClient ,实现 ExchangeClient 接口,支持指向计数的信息交换客户端实现类。
构造方法
```plain text plain 1: /** 2: * URL 3: */ 4: private final URL url; 5: /** 6: * 指向数量 7: */ 8: private final AtomicInteger refenceCount = new AtomicInteger(0); 9: /** 10: * 幽灵客户端集合 11: */ 12: private final ConcurrentMap<String, LazyConnectExchangeClient> ghostClientMap; 13: /** 14: * 客户端 15: */ 16: private ExchangeClient client; 17: 18: public ReferenceCountExchangeClient(ExchangeClient client, ConcurrentMap<String, LazyConnectExchangeClient> ghostClientMap) { 19: this.client = client; 20: // 指向加一 21: refenceCount.incrementAndGet(); 22: this.url = client.getUrl(); 23: if (ghostClientMap == null) { 24: throw new IllegalStateException(“ghostClientMap can not be null, url: “ + url); 25: } 26: this.ghostClientMap = ghostClientMap; 27: }
1
2
3
4
5
6
7
8
9
10
11
12
13
14
15
16
17
18
19
20
21
22
23
24

---

- refenceCount
属性,指向计数。
    - 【初始】构造方法,【第 21 行】,计数加一。
    - 【引用】每次引用,计数加一。
- ghostClientMap
属性,幽灵客户端集合,和
Protocol.ghostClientMap
参数,一致。
- client
属性,客户端。
    - 【创建】构造方法,传入
client
属性,指向它。
    - 【关闭】关闭方法,创建 LazyConnectExchangeClient 对象,指向该幽灵客户端。

**装饰器模式**

基于**装饰器模式**,所以,每个实现方法,都是调用 client 的对应的方法。例如:

```plain text
plain @Override public void send(Object message) throws RemotingException {     client.send(message); }
计数
```plain text plain public void incrementAndGetCount() { refenceCount.incrementAndGet(); }
1
2
3
4
5
6
7

---

**关闭**

```plain text
plain 1: @Override  2: public void close(int timeout) {  3:     if (refenceCount.decrementAndGet() <= 0) {  4:         // 关闭 `client`  5:         if (timeout == 0) {  6:             client.close();  7:         } else {  8:             client.close(timeout);  9:         } 10:         // 替换 `client` 为 LazyConnectExchangeClient 对象。 11:         client = replaceWithLazyClient(); 12:     } 13: }
- 第 3 行:计数减一 。若无指向,进行真正的关闭。
- 第 4 至 9 行:调用 client 的关闭方法,进行关闭。
- 第 11 行:调用 #replaceWithLazyClient() 方法,替换 client 为 LazyConnectExchangeClient 对象。代码如下:
```plain text plain 1: private LazyConnectExchangeClient replaceWithLazyClient() { 2: // this is a defensive operation to avoid client is closed by accident, the initial state of the client is false 3: URL lazyUrl = url.addParameter(Constants.LAZY_CONNECT_INITIAL_STATE_KEY, Boolean.FALSE) 4: .addParameter(Constants.RECONNECT_KEY, Boolean.FALSE) // 不重连 5: .addParameter(Constants.SEND_RECONNECT_KEY, Boolean.TRUE.toString()) 6: .addParameter(“warning”, Boolean.TRUE.toString()) 7: .addParameter(LazyConnectExchangeClient.REQUEST_WITH_WARNING_KEY, true) 8: .addParameter(“_client_memo”, “referencecounthandler.replacewithlazyclient”); // 备注 9: 10: // 创建 LazyConnectExchangeClient 对象,若不存在。 11: String key = url.getAddress(); 12: // in worst case there’s only one ghost connection. 13: LazyConnectExchangeClient gclient = ghostClientMap.get(key); 14: if (gclient == null || gclient.isClosed()) { 15: gclient = new LazyConnectExchangeClient(lazyUrl, client.getExchangeHandler()); 16: ghostClientMap.put(key, gclient); 17: } 18: return gclient; 19: }
1
2
3
4
5
6

---

```plain text
- <font style="color:rgb(51, 51, 51);">第 3 至 8 行:基于 </font><font style="color:rgb(51, 51, 51);">url</font><font style="color:rgb(51, 51, 51);"> ,创建 LazyConnectExchangeClient 的 URL 链接。设置的一些参数,结合 </font>[「5.2 LazyConnectExchangeClient」](http://svip.iocoder.cn/Dubbo/reference-refer-dubbo/#)<font style="color:rgb(51, 51, 51);"> 一起看。</font>
- <font style="color:rgb(51, 51, 51);">第 10 至 17 行:创建 LazyConnectExchangeClient 对象,若不存在。</font>
5.2 LazyConnectExchangeClient
com.alibaba.dubbo.rpc.protocol.dubbo.LazyConnectExchangeClient ,实现 ExchangeClient 接口,支持懒连接服务器的信息交换客户端实现类。
构造方法
```plain text plain 1: static final String REQUEST_WITH_WARNING_KEY = “lazyclient_request_with_warning”; 2: 3: /** 4: * URL 5: */ 6: private final URL url; 7: /** 8: * 通道处理器 9: */ 10: private final ExchangeHandler requestHandler; 11: /** 12: * 连接锁 13: */ 14: private final Lock connectLock = new ReentrantLock(); 15: /** 16: * lazy connect 如果没有初始化时的连接状态 17: */ 18: // lazy connect, initial state for connection 19: private final boolean initialState; 20: /** 21: * 通信客户端 22: */ 23: private volatile ExchangeClient client; 24: /** 25: * 请求时,是否检查告警 26: */ 27: protected final boolean requestWithWarning; 28: /** 29: * 警告计数器。每超过一定次数,打印告警日志。参见 {@link #warning(Object)} 30: */ 31: private AtomicLong warningcount = new AtomicLong(0); 32: 33: public LazyConnectExchangeClient(URL url, ExchangeHandler requestHandler) { 34: // lazy connect, need set send.reconnect = true, to avoid channel bad status. 35: this.url = url.addParameter(Constants.SEND_RECONNECT_KEY, Boolean.TRUE.toString()); 36: this.requestHandler = requestHandler; 37: this.initialState = url.getParameter(Constants.LAZY_CONNECT_INITIAL_STATE_KEY, Constants.DEFAULT_LAZY_CONNECT_INITIAL_STATE); 38: this.requestWithWarning = url.getParameter(REQUEST_WITH_WARNING_KEY, false); 39: }
1
2
3
4
5
6
7
8
9
10

---

- initialState
属性,如果没有初始化客户端时的链接状态。有点绕,看
#isConnected()
方法,代码如下:

```plain text
plain @Override public boolean isConnected() {     if (client == null) { // 客户端未初始化         return initialState;     } else {         return client.isConnected();     } }
```plain text
- 所以,我们可以看到 ReferenceCountExchangeClient 关闭创建的 LazyConnectExchangeClient 对象的 initialState = false ,未连接。
默认值,DEFAULT_LAZY_CONNECT_INITIAL_STATE = true 。 ```
- requestWithWarning 属性,请求时,是否检查告警。
- 所以,我们可以看到 ReferenceCountExchangeClient 关闭创建的 LazyConnectExchangeClient 对象的 initialState = false ,未连接。
- 默认值 , false 。
- warningcount 属性,警告计数器。每超过一定次数,打印告警日志。每次发送请求时,会调用 #warning(request) 方法,根据情况,打印告警日志。代码如下:
```plain text plain private void warning(Object request) { if (requestWithWarning) { // 开启 if (warningcount.get() % 5000 == 0) { // 5000 次 logger.warn(new IllegalStateException(“safe guard client , should not be called ,must have a bug.”)); } warningcount.incrementAndGet(); // 增加计数 } }
1
2
3
4
5

---

```plain text
- <font style="color:rgb(51, 51, 51);">理论来说,不会被调用。如果被调用,那么就是一个 BUG 咯。</font>
装饰器模式
基于装饰器模式,所以,每个实现方法,都是调用 client 的对应的方法。例如:
```plain text plain @Override @Override public void close(int timeout) { if (client != null) client.close(timeout); }
1
2
3
4
5
6
7

---

**初始化客户端**

```plain text
plain private void initClient() throws RemotingException {     // 已初始化,跳过     if (client != null) {         return;     }     if (logger.isInfoEnabled()) {         logger.info("Lazy connect to " + url);     }     // 获得锁     connectLock.lock();     try {         // 已初始化,跳过         if (client != null) {             return;         }         // 创建 Client ,连接服务器         this.client = Exchangers.connect(url, requestHandler);     } finally {         // 释放锁         connectLock.unlock();     } }
- 发送消息/请求前,都会调用该方法,保证客户端已经初始化。代码如下:
plain text plain public void send(Object message, boolean sent) throws RemotingException { initClient(); client.send(message, sent); } @Override public ResponseFuture request(Object request, int timeout) throws RemotingException { warning(request); initClient(); return client.request(request, timeout); }
666. 彩蛋

知识星球
写的有点迷糊,主要是集群和注册中心,看的不是特别细致。
不过咋说呢?
读源码的过程,就像剥洋葱,一层一层拨开它的心。