Spring AI 快速上手教程
一、 Spring AI 简介
Spring AI 是一个旨在简化 AI 应用开发的框架,定位类似于 Python 中的 LangChain 和 Java 中的 LangChain4j。它通过提供统一的 API,帮助开发者轻松集成和切换不同的大语言模型(LLM)。
官方网站: https://spring.io/projects/spring-ai
二、 快速上手:整合 OpenAI
本教程将以集成 OpenAI 的 GPT 模型为例,演示如何快速构建一个 Spring AI 应用。
1. 前置准备
在开始之前,请确保您已准备好以下环境和资源:
- OpenAI API Key:您需要一个有效的 API 密钥。
- 网络环境:由于 OpenAI 服务在部分地区受限,您可能需要配置网络代理。
- 开发环境:
- JDK 17 或更高版本
- Spring Boot 3.x
- 示例代码:https://gitee.com/xscodeit/ai-openai-examples.git
2. 项目搭建
2.1. 添加依赖
首先,在您的 Spring Boot 项目中添加 Spring AI 的相关依赖。
1
2
3
4
5
6
7
8
9
10
11
12
13
14
15
16
17
18
19
20
21
22
23
24
25
26
27
28
29
30
31
<dependencyManagement>
    <dependencies>
        <dependency>
            <groupId>org.springframework.ai</groupId>
            <artifactId>spring-ai-bom</artifactId>
            <version>1.0.0-SNAPSHOT</version>
            <type>pom</type>
            <scope>import</scope>
        </dependency>
    </dependencies>
</dependencyManagement>

<dependencies>
    <dependency>
        <groupId>org.springframework.boot</groupId>
        <artifactId>spring-boot-starter-web</artifactId>
    </dependency>
    <dependency>
        <groupId>org.springframework.ai</groupId>
        <artifactId>spring-ai-openai-spring-boot-starter</artifactId>
    </dependency>
    <dependency>
        <groupId>org.projectlombok</groupId>
        <artifactId>lombok</artifactId>
    </dependency>
    <dependency>
        <groupId>org.springframework.boot</groupId>
        <artifactId>spring-boot-starter-test</artifactId>
        <scope>test</scope>
    </dependency>
</dependencies>
注意:请确保在
pom.xml中添加了 Spring AI 的SNAPSHOT仓库,否则可能无法下载依赖。
2.2. 配置网络代理(可选)
如果您的开发环境无法直接访问 OpenAI API,可以在应用启动时配置一个 HTTP 代理。
1
2
3
4
5
6
7
8
9
10
11
12
13
public static void main(String[] args) {
    // 代理服务器地址
    String proxyHost = "127.0.0.1";
    // 代理服务器端口
    int proxyPort = 7890;

    System.setProperty("proxyType", "4");
    System.setProperty("proxyHost", proxyHost);
    System.setProperty("proxyPort", Integer.toString(proxyPort));
    System.setProperty("proxySet", "true");

    SpringApplication.run(Application.class, args);
}
2.3. 配置 API Key 和 Endpoint
在 application.yml 文件中配置您的 OpenAI API Key 和服务地址。建议使用中转服务以提高稳定性和速度。
1
2
3
4
5
6
7
8
9
10
11
12
13
14
15
xushu:
  # 官方 API(请自行配置)
  openai:
    key: ${OPENAI_KEY}
    url: ${OPENAI_URL}
  # 中转 API(推荐,请自行配置)
  aicore:
    key: ${OPEN_AI_KEY}
    url: ${OPEN_AI_URL}

spring:
  ai:
    openai:
      api-key: ${xushu.aicore.key}
      base-url: ${xushu.aicore.url}
3. 核心功能示例
Spring AI 提供了丰富的功能,包括文本生成、流式响应、图像生成和音视频处理。
3.1. 注入核心客户端
首先,在您的 Service 或 Controller 中注入 Spring AI 提供的核心客户端。
1
2
3
4
5
6
7
8
9
10
11
12
13
14
15
16
17
18
@RestController
public class AiController {

    private final ChatClient chatClient;
    private final OpenAiImageModel imageClient;
    private final OpenAiAudioTranscriptionModel audioTranscriptionClient;
    private final OpenAiAudioApi openAiAudioApi;

    @Autowired
    public AiController(ChatClient chatClient, OpenAiImageModel imageClient, OpenAiAudioTranscriptionModel audioTranscriptionClient, OpenAiAudioApi openAiAudioApi) {
        this.chatClient = chatClient;
        this.imageClient = imageClient;
        this.audioTranscriptionClient = audioTranscriptionClient;
        this.openAiAudioApi = openAiAudioApi;
    }

    // ... methods
}
3.2. 文本生成
通过 ChatClient 可以轻松实现与大模型的文本交互。
1
2
3
4
5
6
7
8
@GetMapping("/ai/simple")
public Map<String, String> completion(@RequestParam(value = "message", defaultValue = "给我讲个笑话") String message) {
    String content = chatClient.prompt()
            .user(message)
            .call()
            .content();
    return Map.of("generation", content);
}
3.3. 流式文本响应
对于需要实时返回内容的场景,可以使用流式 API。
1
2
3
4
5
6
7
@GetMapping(value = "/ai/stream", produces = "text/event-stream;charset=UTF-8")
public Flux<String> stream(@RequestParam(value = "message", defaultValue = "给我讲个笑话") String message) {
    return chatClient.prompt()
            .user(message)
            .stream()
            .content();
}
3.4. 图像生成
Spring AI 支持调用 DALL-E 模型生成图像。
1
2
3
4
5
6
7
8
9
10
11
12
13
14
15
@GetMapping(value = "/ai/img", produces = "text/html")
public String image(@RequestParam(value = "message", defaultValue = "一只可爱的猫") String message) {
    ImageResponse response = imageClient.call(
            new ImagePrompt(message,
                    OpenAiImageOptions.builder()
                            .withQuality("hd")
                            .withN(1)
                            .withModel(OpenAiImageApi.ImageModel.DALL_E_2.getValue())
                            .withHeight(256)
                            .withWidth(256)
                            .build()));

    String imageUrl = response.getResult().getOutput().getUrl();
    return "<img src='" + imageUrl + "'/>";
}
3.5. 音频转文本
您可以将音频文件转换为文本。
1
2
3
4
5
6
7
8
9
10
11
12
13
@GetMapping(value = "/ai/audio2text")
public String audioToText() {
    var audioFile = new ClassPathResource("/hello.mp3");
    var transcriptionOptions = OpenAiAudioTranscriptionOptions.builder()
            .withResponseFormat(OpenAiAudioApi.TranscriptResponseFormat.TEXT)
            .withTemperature(0f)
            .build();

    AudioTranscriptionPrompt transcriptionRequest = new AudioTranscriptionPrompt(audioFile, transcriptionOptions);
    AudioTranscriptionResponse response = audioTranscriptionClient.call(transcriptionRequest);

    return response.getResult().getOutput();
}
3.6. 文本转音频
同样,也可以将文本转换为语音。
1
2
3
4
5
6
7
8
9
10
11
12
13
14
15
16
@GetMapping(value = "/ai/text2audio")
public String textToAudio() throws IOException {
    var request = OpenAiAudioApi.SpeechRequest.builder()
            .withVoice(OpenAiAudioApi.SpeechRequest.Voice.ONYX)
            .withInput("你好,我是徐庶,欢迎关注我的频道。")
            .build();

    ResponseEntity<byte[]> speech = openAiAudioApi.createSpeech(request);
    byte[] audioBytes = speech.getBody();

    // 将音频字节保存为 MP3 文件
    Path outputPath = Paths.get(System.getProperty("user.dir"), "xushu.mp3");
    Files.write(outputPath, audioBytes);

    return "ok";
}
3.7. 多模态输入
Spring AI 支持发送包含文本和图像的多模态请求。
1
2
3
4
5
6
7
8
9
10
11
12
13
14
15
16
@GetMapping(value = "/ai/multimodal")
public String multimodal(String message, String imgUrl) throws IOException {
    byte[] imageData = new ClassPathResource("/test.png").getContentAsByteArray();

    var userMessage = new UserMessage(
            "这张图片里有什么?",
            List.of(new Media(MimeTypeUtils.IMAGE_PNG, imageData))
    );

    ChatResponse response = chatClient.call(new Prompt(userMessage,
            OpenAiChatOptions.builder()
                    .withModel(OpenAiApi.ChatModel.GPT_4_TURBO_PREVIEW.getValue())
                    .build()));

    return response.getResult().getOutput().getContent();
}
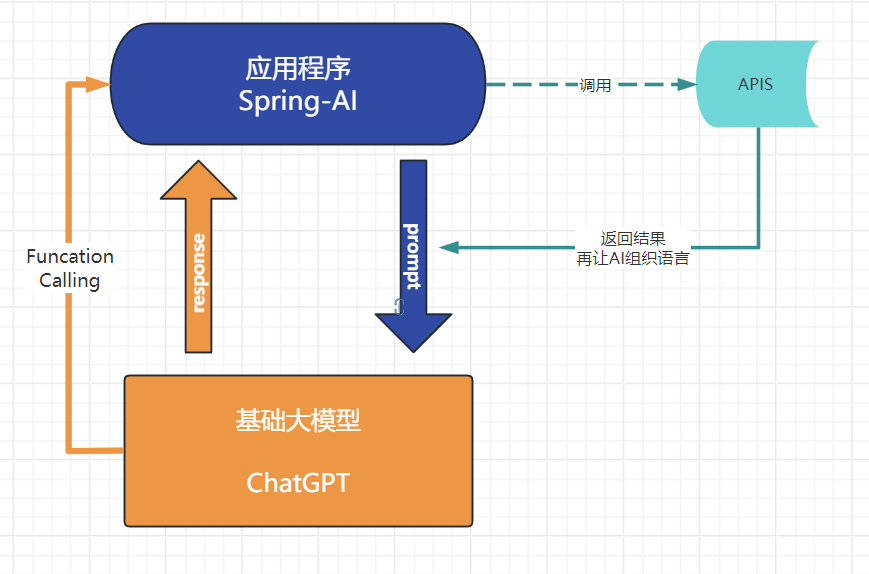
三、 Function Calling 详解
Function Calling 允许 AI 模型调用外部函数以获取实时信息或执行特定操作,极大地扩展了 AI 的能力。
1. 工作流程
当 AI 无法直接回答问题时(如查询实时天气),它会请求调用一个预定义的函数。
2. 实现步骤
步骤 1:定义并注册函数
首先,创建一个 Function Bean,用于处理具体的业务逻辑。
1
2
3
4
5
6
7
8
9
10
11
12
13
14
15
16
17
18
19
20
21
22
23
@Configuration
public class FunctionCallConfig {

    @Bean
    @Description("获取指定地点的天气信息")
    public Function<WeatherService.Request, WeatherService.Response> getWeather() {
        return new WeatherService();
    }
}

// WeatherService.java
public class WeatherService implements Function<WeatherService.Request, WeatherService.Response> {

    public record Request(String location, String unit) {}
    public record Response(String weather) {}

    @Override
    public Response apply(Request request) {
        // 此处应调用真实的天气 API
        String weather = "地点:" + request.location() + ",天气:晴朗,温度:25°C";
        return new Response(weather);
    }
}
步骤 2:在调用时启用函数
在调用 ChatClient 时,通过 .withFunction() 方法指定要启用的函数。
1
2
3
4
5
6
7
8
9
10
11
12
@GetMapping("/ai/weather")
public String getWeatherInfo(@RequestParam String message) {
    UserMessage userMessage = new UserMessage(message);

    ChatResponse response = chatClient.call(new Prompt(
            List.of(userMessage),
            OpenAiChatOptions.builder()
                    .withFunction("getWeather") // 启用名为 getWeather 的函数
                    .build()));

    return response.getResult().getOutput().getContent();
}
当用户提问“北京现在天气怎么样?”时,Spring AI 会自动执行以下流程:
- 将用户问题和
getWeather函数的定义发送给大模型。 - 大模型识别出需要调用
getWeather函数,并从问题中提取参数(如location="北京")。 - Spring AI 框架捕获到函数调用请求,执行
WeatherService中的apply方法。 - 将
apply方法的返回结果再次发送给大模型。 - 大模型根据函数返回的结果,组织成自然语言并最终响应给用户。

3. 源码探究
FunctionCalling 的核心实现在 AbstractChatClient 和 OpenAiChatClient 中。
createRequest: 将Prompt对象转换为大模型服务商所需的ChatCompletionRequest,并将.withFunction()指定的函数信息解析到tools参数中。callWithFunctionSupport:- 调用
doChatCompletion发送请求。如果大模型决定调用函数,其响应将包含tool_calls字段。 handleFunctionCallOrReturn方法会检查响应中是否包含函数调用请求。- 如果存在,它会查找并执行对应的
FunctionBean,然后将函数的返回结果再次发送给大模型进行最终的语言组织。
- 调用
四、 生态与发展
社区活跃度
Spring AI 社区非常活跃,并计划在未来版本中集成更多国内外主流的大模型,如阿里的通义千问、月之暗面的 Moonshot 等。
厂商支持
阿里巴巴已率先推出基于 Spring AI 的 spring-cloud-starter-alibaba-ai,为通义系列模型提供了无缝支持,进一步推动了 Spring AI 在国内的生态发展。